
[TOC]
>[success] # mutation 与 action / module
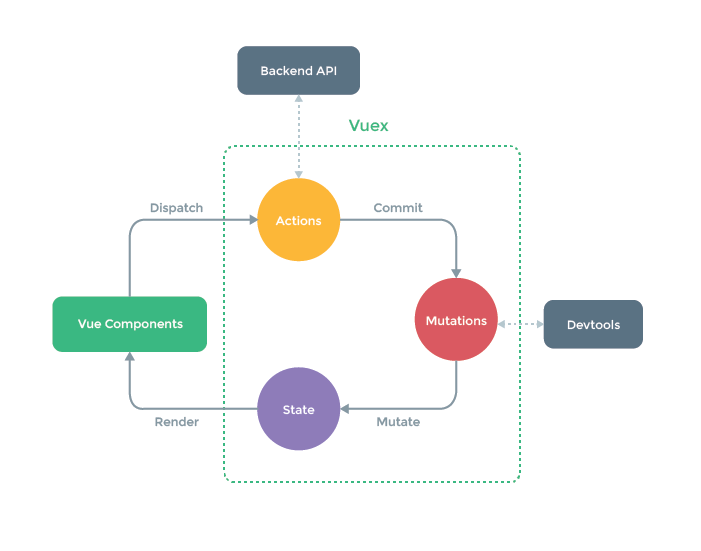
上图是 **Vuex** 状态管理的 **流程**,描述了从 **Vue Components(组件)** 执行 **异步操作** 的一个 **环形流程** ,实际上如果 **没有异步操作的需求** 就不用走 **Actions** 的这个步骤, **2种操作(同步、异步操作)** 的流程如下:
1. **异步操作**: **Vue Components(组件)** > **Actions(请求接口操作写这里)** > **Mutations(接口成功返回值后在这里修改State的值)** > **State状态更新** > **Vue Components(组件)视图更新**
2. **同步操作** : **Vue Components(组件)** > **Mutations(修改State的值)** > **State状态更新** > **Vue Components(组件)视图更新**
>[success] ## mutation
我们想修改 **State** 时,**不可以直接修改(例如:this.$store.state.appName = '小阿giao') state** ,而是要通过一个 **Commit** 提交一个 **Mutations** ,或者 **Dispatch** 一个 **Actions** 来走上图( **Vuex状态管理的流程图** )这个 **环形流程** 来修改 **State**
1. 首先在 **store文件夹** 中 创建一个 **mutations.js**
**store/mutations.js**
~~~
const mutations = {
//
}
export default mutations
~~~
2. 在 **store/index.js** 中引入 **mutations.js**
**store/index.js**
~~~
import Vue from 'vue'
import Vuex from 'vuex'
import state from './state' // state.js文件可以不写.js结尾,这样写也会自动找到state.js文件
import getters from './getters'
import mutations from './mutations'
import actions from './actions'
import user from './module/user' // 引入模块文件
Vue.use(Vuex)
export default new Vuex.Store({
state, // ES6对象简写的形式,state: state 等同与 state
getters,
mutations,
actions,
modules: { // 模块引用
user
}
})
~~~
>[success] ### 使用方法
上面把 **根状态** 的 **mutations** 引入完成了, 那么如何通过 **mutations** 来修改 **state** 呢,首先 **展示一个错误的修改方式**
>[success] #### 错误方式
**sotre.vue**
~~~
<template>
<div>
<p>{{ appName }}</p>
<button @click="handleChangeAppName">修改appName</button>
</div>
</template>
<script>
export default {
computed:{
appName(){
return this.$store.state.appName
}
},
methods:{
handleChangeAppName(){
// 不可以通过这种方式来修改state中的appName
this.appName = 'newAppName'
}
}
}
</script>
~~~
我在上面的 **store.vue** 文件中通过 **点击事件** 直接 **修改计算属性** ,这时浏览器会报错
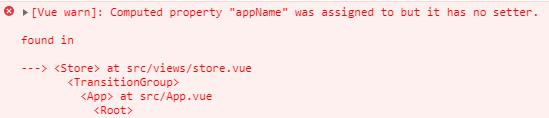
意思是 **【计算属性】 被注册,但是它没有 【setter方法】**,大白话就是 **【一个计算属性】,默认情况下只有一个【getter方法】,没有【setter方法】。**
**getter方法触发方式** :**计算属性** 被 **读取** 时,**getter方法** 会被触发。
**setter方法触发方式** :**修改计算属性** 的时候,会触发 **setter方法** 。
下面的代码进行了 **错误的示范** 修改了 **计算属性**:
**store.vue**
~~~
<template>
<div>
<p>{{ nameB }}</p>
<button @click="handleChangeNameB">修改计算属性nameB</button>
</div>
</template>
<script>
export default {
data(){
return{
name: '路飞'
}
},
computed:{
nameB: {
set: function(newValue){ // nameB被修改时,该函数会被触发。这里可以当做watch或者change来使用
this.name = `${ newValue }真是奥利给`
},
get: function(newValue){ // 处理过后的值,返回(return)给使用nameB的地方
return this.name + '索隆'
}
}
},
methods:{
handleChangeNameB(){
this.nameB = '娜美桑'
}
}
}
</script>
~~~
>[success] #### 正确方式
1. 使用 **commit** 调用 **mutations** 中的方法来修改 **state**
首先在 **store/state.js** 中设置 **appName全局变量**
**store/state.js**
~~~
const state = {
appName: 'admin'
}
export default state
~~~
然后在 **store/mutations.js** 中写上 **修改 state 的方法**
**store/mutations.js**
~~~
const mutations = {
/**
* 修改app名称方法
* @param state 【state】指的是同级的【state】,也就是【根级别】的中的state
* @param params 调用SET_APP_NAME方法时传过来的参数,可以传基本数据类型(字符串、布尔等),也可以传入引用类型(对象、数组、等)
*/
SET_APP_NAME(state, params){
state.appName = params
}
}
export default mutations
~~~
在使用到文件中这样使用即可
**store.vue**
~~~
<template>
<div>
<p>{{ appName }}</p>
<button @click="handleChangeAppName">修改Vuex中的appName</button>
</div>
</template>
<script>
export default {
computed:{
appName: function(){
return this.$store.state.appName
}
},
methods:{
handleChangeAppName(){
// commit第一个参数为mutations中方法名,第二个参数为要传过去的值
this.$store.commit('SET_APP_NAME', 'newAppName')
}
}
}
</script>
~~~
或者 **commit** 也可以传 **一个参数** , **传个对象** ,如下:
**store.vue**
~~~
<template>
<div>
<p>{{ appName }}</p>
<button @click="handleChangeAppName">修改Vuex中的appName</button>
</div>
</template>
<script>
export default {
computed:{
appName: function(){
return this.$store.state.appName
}
},
methods:{
handleChangeAppName(){
this.$store.commit({
type: 'SET_APP_NAME', // type就是要执行mutations里的方法的名称
appName: 'newAppName' // 这里appName可以对应state要修改的state
})
}
}
}
</script>
~~~
**store/mutations.js**
~~~
const mutations = {
/**
* 修改app名称方法
* @param state 【state】指的是同级的【state】,也就是【根级别】的中的state
* @param params 调用SET_APP_NAME方法时传过来的参数,可以传基本数据类型(字符串、布尔等),也可以传入引用类型(对象、数组、等)
*/
SET_APP_NAME(state, params){
state.appName = params.appName
}
}
export default mutations
~~~
2. 使用 **Vue** 的 **Set 动态添加State**
假如 **state 中有一个变量以后要使用** ,但是 **现在 state 中是没有声明定义这个变量** ,就需要用到 **Vue** 提供的 **Set** 方法来添加 **State**,因为在 **最初state 中 没有声明定义这个变量** ,然后通过的 **mutation** 来 **修改这个变量** 是 **不会触发视图更新** 的 ,因为 **最初没有在实例上定义声明的变量是没有get跟set方法的**,所以**不会触发视图更新**,如果想 **触发视图更新** 只有通过 **Vue** 提供的 **Set** 方法来向 **State** 中 **添加变量**,同时也会给这个 **变量** 添加 **get** 跟 **set** 方法,以达到 **视图更新** 的效果,案例如下:
假如我以后在 **store/state.js** 中有一个 **appVersion** 的变量以后要用到,但是目前没有在 **state** 中 **定义声明**
**store/state.js**
~~~
const state = {
appName: 'admin',
// appVersion: '1.0'
}
export default state
~~~
在 **store/mutations.js** 中写 **动态添加appVersion** 变量的方法,主要是用到了 **Vue** 的 **Set** 方法,来做到动态添加 **State**
**store/mutations.js**
~~~
import vue from 'vue'
const mutations = {
SET_APP_VERSION(state, params){
vue.set(state, 'appVersion', params.appVersion) // vue的$set方法动态向state中添加appVersion
}
}
export default mutations
~~~
在 **页面中使用** 这样写
**store.vue**
~~~
<template>
<div>
<p>版本号{{ appVersion }}</p>
<button @click="handleChangeAppVersion">向Vuex中添加appVersion</button>
</div>
</template>
<script>
export default {
computed:{
appVersion: function(){
return this.$store.state.appVersion
}
},
methods:{
// 点击按钮添加app版本号(appVersion)
handleChangeAppVersion(){
this.$store.commit({
type: 'SET_APP_VERSION',
appVersion: '1.0'
})
}
}
}
</script>
~~~
3. **mapMutations方法快速访问 mutation 中的函数**
上面描述了通过 **commit** 方法执行一个 **mutation** 中定义的 **函数** 来修改 **state** ,以及使用 **Vue** 提供的 **Set** 方法动态向 **state** 中 **添加变量** ,接下来讲一下如何使用 **Vuex** 提供的 **mapMutations** 方法来调用 **mutation** 中的方法。
*****
3.1 **使用 mapMutations 访问 【根状态】 以及 【module(模块)】中的 【mutation】**
首先 **store.vue** 文件中引入 **mapMutations** ,然后再通过 **...mapMutations([ 'mutation中定义的方法名称' ])** 把 **Vuex** 中的 **mutation** 中的方法(这里 **mapMutations方法** 中的 **数组参数** ,无论是 **根状态(store/index.js)** 下,还是 **module(模块)** 下的 **mutation** 方法,都可以通过 **mapMutations** 方法引入),引入到 **methods** 中
**store.vue**
~~~
<template>
<div>
<p>用户名:{{ userName }}</p>
<p>app名称:{{ appName }}</p>
<button @click="handleChangeAppName">修改app名称</button>
<button @click="handleChangeUserName">修改用户名</button>
</div>
</template>
<script>
import { mapMutations } from 'vuex'
export default {
computed:{
appName: function(){ // 根状态下的state
return this.$store.state.appName
},
userName: function(){ // module(模块)下的state
return this.$store.state.user.userName
}
},
methods:{
...mapMutations([ // 1. 通过(扩展运算符)...mapMutations来把Vuex中mutation的方法展开到methods中
'SET_APP_NAME',
'SET_USER_NAME'
]),
handleChangeAppName(){
// 2. 调用根状态下mutation中的SET_APP_NAME方法
this.SET_APP_NAME('看云app')
},
handleChangeUserName(){
// 2. 调用module(模块)中mutation中的SET_USER_NAME方法
this.SET_USER_NAME('小黑')
}
}
}
</script>
~~~
**根状态** 的 **store/mutations.js**
**store/mutations.js**
~~~
const mutations = {
/**
* 修改app名称方法
* @param state 【state】指的是同级的【state】,也就是【根级别】的中的state
* @param params 调用SET_APP_NAME方法时传过来的参数,可以传基本数据类型(字符串、布尔等),也可以传入引用类型(对象、数组、等)
*/
SET_APP_NAME(state, params){
state.appName = params
}
}
export default mutations
~~~
**根状态** 的 **store/state.js**
**store/state.js**
~~~
const state = {
appName: '腾讯qq',
}
export default state
~~~
**module(模块)的 js 文件**
**store/module/user.js**
~~~
const state = {
userName: '小明'
}
const mutations = {
SET_USER_NAME(state, params){
state.userName = params
}
}
const actions = {
//
}
const getters = {
firstLetter: (state) => { // 定义getter
return state.userName.substr(0, 1)
}
}
export default {
// namespaced: true, // 注意这里没有开启命名空间
getters,
state,
mutations,
actions
}
~~~
3.2 **mapMutations配合命名空间使用**
**store/module/user.js**
~~~
const state = {
userName: '小明'
}
const mutations = {
SET_USER_NAME(state, params){
state.userName = params
}
}
const actions = {
//
}
const getters = {
firstLetter: (state) => { // 定义getter
return state.userName.substr(0, 1)
}
}
export default {
namespaced: true, // 开启命名空间
getters,
state,
mutations,
actions
}
~~~
**store.vue**
~~~
<template>
<div>
<p>用户名:{{ userName }}</p>
<button @click="handleChangeUserName">修改用户名</button>
</div>
</template>
<script>
import { mapMutations } from 'vuex'
export default {
computed:{
userName: function(){ // module(模块)下的state
return this.$store.state.user.userName
}
},
methods:{
...mapMutations('user',[ // 1. 第一个参数module(模块)名称,第二个参数模块中的mutations里的方法名
'SET_USER_NAME'
]),
handleChangeUserName(){
// 2. 调用module(模块)中mutation中的SET_USER_NAME方法
this.SET_USER_NAME('小黑')
}
}
}
</script>
~~~
或者可以使用**mapMutations**配合**Vuex**提供的**createNamespacedHelpers**方法一起使用来获取**模块**中的**mutations**,这种方式 **mapMutations 不需要写第一个模块名的参数**
~~~
<template>
<div>
<p>用户名:{{ userName }}</p>
<button @click="handleChangeUserName">修改用户名</button>
</div>
</template>
<script>
import { createNamespacedHelpers } from 'vuex'
const { mapMutations } = createNamespacedHelpers('user') // createNamespacedHelpers('模块名称')
export default {
computed:{
userName: function(){ // module(模块)下的state
return this.$store.state.user.userName
}
},
methods:{
...mapMutations([ // 1. 上面使用了createNamespacedHelpers,这里就不用像之前一样再写模块名作为第一个参数
'SET_USER_NAME'
]),
handleChangeUserName(){
// 2. 调用module(模块)中mutation中的SET_USER_NAME方法
this.SET_USER_NAME('小黑')
}
}
}
</script>
~~~
>[success] ## action
我们想进行一些 **异步操作(请求接口)** 后想修改 **state** ,就要在 **action** 中写 **异步操作(请求接口)**,然后执行 **commit** 方法提交一个 **mutation** ,再在 **mutation** 中修改 **state** 。
1. 首先在**store文件夹**中 创建一个**actions.js**
**store/actions.js**
~~~
const actions = {
/**
* 通过接口更新app名称方法
* @param { commit } 【commit】是一个方法,调用它可以提交一个【mutation】的方法,通过【mutation】来修改【state】
* @param
*/
updateAppName({ commit }){
//
}
// 上面的写法是ES6的结构赋值的写法,相当于下面这样写:
// updateAppName(paramsObj){
// const commit = paramsObj.commit
// }
}
export default actions
~~~
2. 在 **store/index.js** 中引入**actions.js**
**store/index.js**
~~~
import Vue from 'vue'
import Vuex from 'vuex'
import state from './state' // state.js文件可以不写.js结尾,这样写也会自动找到state.js文件
import getters from './getters'
import mutations from './mutations'
import actions from './actions'
import user from './module/user' // 引入模块文件
Vue.use(Vuex)
export default new Vuex.Store({
state, // ES6对象简写的形式,state: state 等同与 state
getters,
mutations,
actions,
modules: { // 模块引用
user
}
})
~~~
>[success] ### 使用方法
**需求** :根据调用接口返回 **appName**,并且赋值给 **state** 中定义好的 **appName** 。
1. 使用 **mapActions** 方法来把 **action** 的 **异步方法** 引入到 **methods** 中使用。这种方法无论是 **根状态** 的 **action** ,还是 **module** 的 **action** 都可以使用 **mapActions** 进行引入。
首先在 **actions.js** 中写好 **异步操作** 的方法, **updateAppName** 方法,并且在 **updateAppName** 方法中调用了 **src/api/app.js** 中的 **getAppName接口**
**store/actions.js**
~~~
import { getAppName } from '@/api/app' // 前面的是简写,等同于@/api/app.js
const actions = {
/**
* 通过接口更新app名称方法
* @param { commit } 【commit】是一个方法,调用它可以提交一个【mutation】的方法,通过【mutation】来修改【state】
*/
updateAppName({ commit }){
getAppName().then(res => {
// 解构赋值来取appName
const { info: { appName } } = res
commit('SET_APP_NAME', appName)
}).catch(err => {
console.log(err)
})
}
}
export default actions
~~~
下面是一个 **模拟的接口** , **如果成功就返回成功的数据,如果失败就返回错误** 。
**src/api/app.js**
~~~
/**
* 获取app名称接口
*/
export const getAppName = () => {
return new Promise((resolve, reject) => {
const err = null
setTimeout(() => {
if(!err) resolve({ code: 200, info: { appName: 'newAppName' } })
else reject(err)
})
})
}
~~~
在上面的 **store/actions.js** 中的 **updateAppName** 方法调用后,执行了 **src/api/app.js** 中的 **getAppName** 接口,接口成功后通过 **commit** 执行了一个 **mutation** 方法,并且在 **mutation** 方法中修改了 **state** 中的 **appName** ,如下:
**store/mutations.js**
~~~
const mutations = {
/**
* 修改app名称方法
* @param state 【state】指的是同级的【state】,也就是【根级别】的中的state
* @param params 调用SET_APP_NAME方法时传过来的参数,可以传基本数据类型(字符串、布尔等),也可以传入引用类型(对象、数组、等)
*/
SET_APP_NAME(state, params){
state.appName = params
}
}
export default mutations
~~~
还有 **state.js** , **默认是空字符串**
**store/state.js**
~~~
const state = {
appName: '',
}
export default state
~~~
最终在使用 **action** 的 **store.vue组件** 中通过 **mapActions** 将 **action** 中异步的方法引入到 **methods** 中,通过点击 **【获取app名称】** 按钮来执行 **action** 中的 **updateAppName** 异步方法,来通过接口来 **获取app名称** 。
**store.vue**
~~~
<template>
<div>
<p>app名称:{{ appName }}</p>
<button @click="handleChangeAppName">获取app名称</button>
</div>
</template>
<script>
import { mapActions } from 'vuex'
export default {
computed:{
appName: function(){
return this.$store.state.appName
}
},
methods:{
...mapActions([
'updateAppName'
]),
handleChangeAppName(){
this.updateAppName()
}
}
}
</script>
~~~
2. **mapActions** 配合 **命名空间** 使用
在 **module** 中开启 **命名空间** 把 **namespaced:true**
**store/module/user.js**
~~~
const state = {
userName: '小明'
}
const mutations = {
SET_USER_NAME(state, params){
state.userName = params
}
}
const actions = {
updateUserName({ commit }){
// 这里假装是执行完成接口后,执行commit
commit('SET_USER_NAME','小黑')
}
}
const getters = {
firstLetter: (state) => { // 定义getter
return state.userName.substr(0, 1)
}
}
export default {
namespaced: true, // 开启命名空间
getters,
state,
mutations,
actions
}
~~~
然后组件中给 **mapActions** 添加 **第一个参数** ,**第一个参数为模块名称** 。
**store.vue**
~~~
<template>
<div>
<p>{{ userName }}</p>
<button @click="handleChangeUserName">获取用户名称</button>
</div>
</template>
<script>
import { mapActions } from 'vuex'
export default {
computed:{
userName: function(){
return this.$store.state.user.userName
}
},
methods:{
...mapActions('user',[
'updateUserName'
]),
handleChangeUserName(){
this.updateUserName()
}
}
}
</script>
~~~
或者可以使用 **mapActions** 配合 **Vuex** 提供的 **createNamespacedHelpers** 方法一起使用来获取 **模块** 中的 **action**,这种方式 **mapActions 不需要写第一个参数** 。
~~~
<template>
<div>
<p>{{ userName }}</p>
<button @click="handleChangeUserName">获取用户名称</button>
</div>
</template>
<script>
import { createNamespacedHelpers } from 'vuex'
const { mapActions } = createNamespacedHelpers('user') // createNamespacedHelpers('模块名称')
export default {
computed:{
userName: function(){
return this.$store.state.user.userName
}
},
methods:{
...mapActions([
'updateUserName'
]),
handleChangeUserName(){
this.updateUserName()
}
}
}
</script>
~~~
3. 使用 **dispatch** 来调用 **action**
**store.vue**
~~~
<template>
<div>
<p>{{ userName }}</p>
<button @click="handleChangeUserName">获取用户名称</button>
</div>
</template>
<script>
export default {
computed:{
userName: function(){
return this.$store.state.user.userName
}
},
methods:{
handleChangeUserName(){
this.$store.dispatch('updateUserName', '我是params')
}
}
}
</script>
~~~
**store/module/user.js**
~~~
const state = {
userName: '小明'
}
const mutations = {
SET_USER_NAME(state, params){
state.userName = params
}
}
const actions = {
/**
* 通过接口更新app名称方法
* @param { commit } 【commit】是一个方法,调用它可以提交一个【mutation】的方法,通过【mutation】来修改【state】
* @param params this.$store.dispatch('updateUserName', '我是params')时传的参数
*/
updateUserName({ commit }, params){
console.log(params) // 我是params
// 这里假装是执行完成接口后,执行commit
commit('SET_USER_NAME','小黑')
}
}
const getters = {
firstLetter: (state) => { // 定义getter
return state.userName.substr(0, 1)
}
}
export default {
getters,
state,
mutations,
actions
}
~~~
>[success] ### 补充
上面 **actions.js** 文件中在 **处理异步调用接口** 时使用了 **.then** 与 **.catch** ,这种是类似于 **回调的形式** ,看起来不是特别好,我们可以使用 **ES8** 的 **async** 、**await**,然后用 **try** 包裹成功要处理的数据,**catch** 处理失败,代码如下:
**store/actions.js**
~~~
import { getAppName } from '@/api/app' // 前面的是简写,等同于@/api/app.js
const actions = {
/**
* 通过接口更新app名称方法
* @param { commit } 【commit】是一个方法,调用它可以提交一个【mutation】的方法,通过【mutation】来修改【state】
*/
// updateAppName({ commit }){
// getAppName().then(res => {
// // 解构赋值来取appName
// const { info: { appName } } = res
// commit('SET_APP_NAME', appName)
// }).catch(err => {
// console.log(err)
// })
// }
// 用ES8后
async updateAppName({ commit }){
try{
const { info: { appName } } = await getAppName()
commit('SET_APP_NAME', appName)
} catch (err) {
console.log(err)
}
}
}
export default actions
~~~
>[success] ## module
之前在创建项目时就已经把 **user** 拆分成了 **module(模块)** ,项目庞大时,**store** 变得非常臃肿,我们它们都拆分成 **module(模块)** ,这样专门管理起来比较 **清晰** , 每个 **module(模块)** 都是一个独立的 **store** ,所以在 **module(模块)** 中还可以包含 **module(模块)** ,如下:
**store/module/user.js**
~~~
const state = {}
const mutations = {}
const actions = {}
const getters = {}
export default {
getters,
state,
mutations,
actions,
modules: {
//
}
}
~~~
这样就可以在 **module模块** 中写 **module模块** 拆分出更细的 **模块**
>[success] ### 命名空间
1. **module模块** 使用 **命名空间**
如果想给某个模块一个密闭的空间,防止其他地方污染到这个模块,就可以添加一个**namespaced: true**即可变成为**命名空间**,如下:
**store/module/user.js**
~~~
const state = {
userName: '小明'
}
const mutations = {
SET_USER_NAME(state, params){
state.userName = params
}
}
const actions = {
//
}
const getters = {
firstLetter: (state) => { // 定义getter
return state.userName.substr(0, 1)
}
}
export default {
namespaced: true, // 开启命名空间
getters,
state,
mutations,
actions
}
~~~
**module(模块)** 中使用了 **命名空间**, 在 **组件中** 使用 **mapState** 、**mapGetters** 、**mapActions** 时就要在第一个参数上添加 **模块名称**
**store.vue**
~~~
<template>
<div>
<p>用户名:{{ userName }}</p>
<button @click="handleChangeUserName">修改用户名</button>
</div>
</template>
<script>
import { mapMutations } from 'vuex'
export default {
computed:{
userName: function(){ // module(模块)下的state
return this.$store.state.user.userName
}
},
methods:{
...mapMutations('user',[ // 1. 第一个参数module(模块)名称,第二个参数模块中的mutations里的方法名
'SET_USER_NAME'
]),
handleChangeUserName(){
// 2. 调用module(模块)中mutation中的SET_USER_NAME方法
this.SET_USER_NAME('小黑')
}
}
}
</script>
~~~
或者也可以使用 **Vuex** 提供的 **createNamespacedHelpers**方法来获取使用 **命名空间** 模块中的方法,上述代码中已经介绍到了 **createNamespacedHelpers** 如何使用,这里就不在再次陈述了。
2. **module(模块)中嵌套module(模块)模块**
**module(模块)** 中嵌套 **module(模块)** 在 **组件中如何获取** 呢?
**store.vue**
~~~
<template>
<div>
获取模块中嵌套的模块中的方法
</div>
</template>
<script>
import { mapMutations } from 'vuex'
export default {
methods:{
...mapMutations('user/next',[ // 这样就能获取到模块中嵌套模块中的方法
'SET_USER_NAME'
])
}
}
</script>
~~~
>[success] ### 动态注册模块
1. **动态添加模块**
可以通过 **$store** 提供的 **registerModule** 方法来进行 **动态添加模块** 的操作
**store.vue**
~~~
<template>
<div>
<button @click="registerModule">动态注册模块</button>
<p v-for="i in todoList" :key="i">
{{ i }}
</p>
</div>
</template>
<script>
import { mapState } from 'vuex'
export default {
computed: {
...mapState({
// 这里需要判断,因为默认情况下是没有这个模块的,这个模块是动态添加进去的
todoList: state => state.todo ? state.todo.todoList : []
})
},
methods:{
registerModule(){
// 第一个参数:要新创建的模块名,第二个参数就是个对象,里面写我们的state,getter等等
this.$store.registerModule('todo', {
state:{
todoList: [
'学习mutations',
'学习actions'
]
}
})
}
}
}
</script>
~~~
2. **动态给某个模块添加模块(嵌套的模块)**
~~~
<template>
<div>
<button @click="registerModule">动态注册模块</button>
<p v-for="i in todoList" :key="i">
{{ i }}
</p>
</div>
</template>
<script>
import { mapState } from 'vuex'
export default {
computed: {
...mapState({
// 这里需要判断,因为默认情况下是没有这个模块的,这个模块是动态添加进去的
todoList: state => state.user.todo ? state.user.todo.todoList : []
})
},
methods:{
registerModule(){
// 第一个参数:要新创建的模块名,第二个参数就是个对象,里面写我们的state,getter等等
this.$store.registerModule(['user', 'todo'], { // 这里写成数组的形式代表给user模块添加一个todo子模块
state:{
todoList: [
'学习mutations',
'学习actions'
]
}
})
}
}
}
</script>
~~~
>[success] ### 补充
在 **module(模块)** 中使用 **action** 时,实际上除了 **commit参数** 外还有 **state参数(指向的是当前模块中的state)** 、 **rootState(指向的是store/index.js中的根状态中的state)、dispatch** ,如果想给某个模块一个密闭的空间,防止其他地方污染到这个模块,就可以添加一个 **namespaced: true** 即可变成为 **命名空间** ,代码如下:
~~~
const state = {
//
}
const mutations = {
//
}
const actions = {
/**
* 更新用户名称方法
* @param commit 执行一个mutation方法来修改state
* @param state 当前模块中的state
* @param rootState 根状态中的state
* @param dispath 可以调用同级actions中的xxx方法,例如dispath(xxx, '')
*/
updateUserName({ commit, state, rootState, dispath }){
},
xxx(){
//
}
}
export default {
namespaced: true, // 开启命名空间
state,
mutations,
actions
}
~~~
>[warning] ## 后期补充(该项后期删除)
vuex页面刷新后状态消失,状态如何保存下来
以上的几种mapMutations以及之前的mapState 、mapGetter这几个都可以模块跟根部状态混合着写一起用吗
- vue 26课
- Vue-cli3.0项目搭建
- Vue-ui 创建cli3.0项目
- Vue-ui 界面详解
- 项目目录详解
- public文件夹
- favicon.ico
- index.html
- src文件夹
- api文件夹
- assets文件夹
- components文件夹
- config文件夹
- directive文件夹
- lib文件夹
- mock文件夹
- mock简明文档
- router文件夹
- store文件夹
- views文件夹
- App.vue
- main.js
- .browserslistrc
- .editorconfig
- .eslintrc.js
- .gitignore
- babel.config.js
- package-lock.json
- package.json
- postcss.config.js
- README.en.md
- README.md
- vue.config.js
- Vue Router
- 路由详解(一)----基础篇
- 路由详解(二)----进阶篇
- Vuex
- Bus
- Vuex-基础-state&getter
- Vuex-基础-mutation&action/module
- Vuex-进阶
- Ajax请求
- 解决跨域问题
- 封装axios
- Mock.js模拟Ajax响应
- 组件封装
- 从数字渐变组件谈第三方JS库使用
- 从SplitPane组件谈Vue中如何【操作】DOM
- 渲染函数和JSX快速掌握
- 递归组件的使用
- 登陆/登出以及JWT认证
- 响应式布局
- 可收缩多级菜单的实现
- vue杂项
- vue递归组件
- vue-cli3.0多环境打包配置
- Vue+Canvas实现图片剪切
- vue3系统入门与项目实战
- Vue语法初探
- 初学编写 HelloWorld 和 Counter
- 编写字符串反转和内容隐藏功能
- 编写TodoList功能了解循环与双向绑定
- 组件概念初探,对 TodoList 进行组件代码拆分
- Vue基础语法
- Vue 中应用和组件的基础概念
- 理解 Vue 中的生命周期函数
- 常用模版语法讲解
- 数据,方法,计算属性和侦听器
- 样式绑定语法
- 条件渲染
- 列表循环渲染
- 事件绑定
- 表单中双向绑定指令的使用
- 探索组件的理念
- 组件的定义及复用性,局部组件和全局组件
- 组件间传值及传值校验
- 单向数据流的理解
- Non-Props 属性是什么
- 父子组件间如何通过事件进行通信
- 组件间双向绑定高级内容
- 使用匿名插槽和具名插槽解决组件内容传递问题
- 作用域插槽
- 动态组件和异步组件
- 基础语法知识点查缺补漏
- Vue 中的动画
- 使用 Vue 实现基础的 CSS 过渡与动画效果
- 使用 transition 标签实现单元素组件的过渡和动画效果
- 组件和元素切换动画的实现
- 列表动画
- 状态动画
- Vue 中的高级语法
- Mixin 混入的基础语法
- 开发实现 Vue 中的自定义指令
- Teleport 传送门功能
- 更加底层的 render 函数
- 插件的定义和使用
- 数据校验插件开发实例
- Composition API
- Setup 函数的使用
- ref,reactive 响应式引用的用法和原理
- toRef 以及 context 参数
- 使用 Composition API 开发TodoList
- computed方法生成计算属性
- watch 和 watchEffect 的使用和差异性
- 生命周期函数的新写法
- Provide,Inject,模版 Ref 的用法
- Vue 项目开发配套工具讲解
- VueCLI 的使用和单文件组件
- 使用单文件组件编写 TodoList
- Vue-Router 路由的理解和使用
- VueX 的语法详解
- CompositionAPI 中如何使用 VueX
- 使用 axios 发送ajax 请求
- Vue3.0(正式版) + TS
- 你好 Typescript: 进入类型的世界
- 什么是 Typescript
- 为什么要学习 Typescript
- 安装 Typescript
- 原始数据类型和 Any 类型
- 数组和元组
- Interface- 接口初探
- 函数
- 类型推论 联合类型和 类型断言
- class - 类 初次见面
- 类和接口 - 完美搭档
- 枚举(Enum)
- 泛型(Generics) 第一部分
- 泛型(Generics) 第二部分 - 约束泛型
- 泛型第三部分 - 泛型在类和接口中的使用
- 类型别名,字面量 和 交叉类型
- 声明文件
- 内置类型
- 总结