[TOC]
> # 说明
有时候设计会使用`arduino`辅助FPGA进行开发,习惯了`linux`的命令行模式,更习惯了`fish`自动命令填充的快捷和配置的方便,所以研究了一下在cygwin坏境下使用命令行下载`qrduino`代码到开发板。
> # 配置说明
## 工具准备
* arduino工具windows版本
* cygwin(需要安装好fish解释器)
* vscode (作为代码编辑器-可以不需要)
**1.cygwin环境安装**
[windows安装cygwin运行linux指令](https://www.kancloud.cn/dlover/note/1848680)
**2.安装arduino和vscode**
注意安装`arduino`后将安装路径添加到环境变量,或者添加到cygwin的环境变量中,如果只在fish中配置环境变量,可以在`fish`的`config.fish`文件中添加填以下代码:
```
set -x PATH $PATH /cygdrive/D/yhpsoft/arduino/arduino-1.8.1/ #arduino路径
```
如果想要配置一次后在cygwin环境所有shell下都可以使用,可以将路径添加到windows的环境变量中,或者在`cygwin的根目录/etc/profile`文件中配置,如下:
```bash
PATH=$PATH:/cygdrive/D/yhpsoft/arduino/arduino-1.8.1/ #在cygwin的profile中配置ardunio环境变量
fish #将启动的中断解释器切换到 fish ,相当于配置启动cygwin的默认解释器
```
## 配置vscode
为了实现在`windows`环境下使用`cygwin`的终端解释器,需要进行简单的配置。
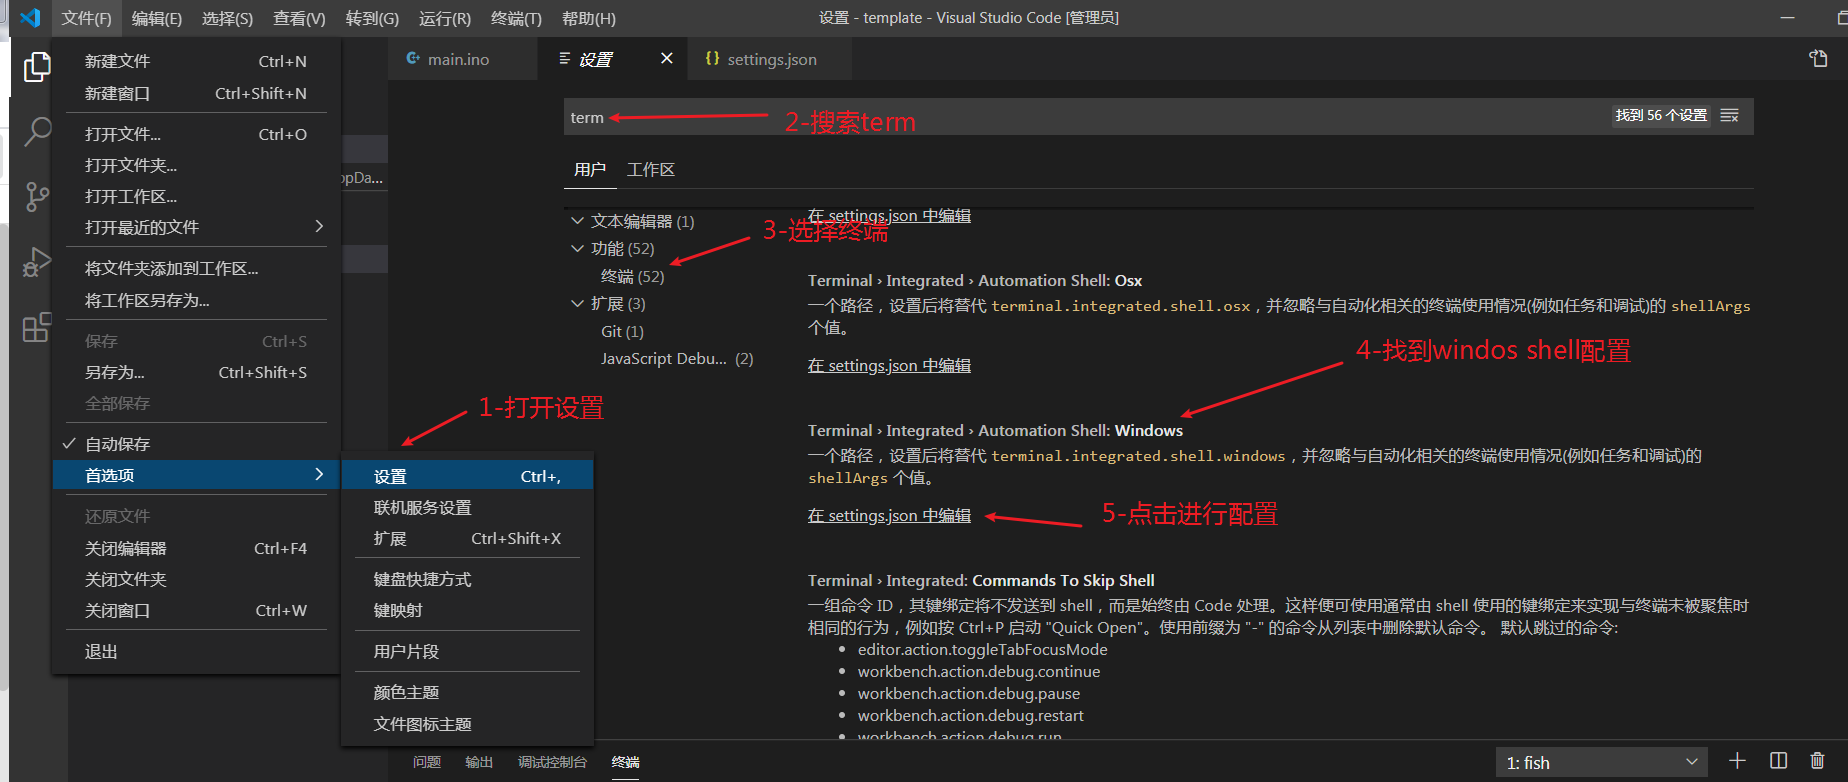
**1.首先打开文件设置,搜索框搜索term,选定终端,配置windows下的shell路径**

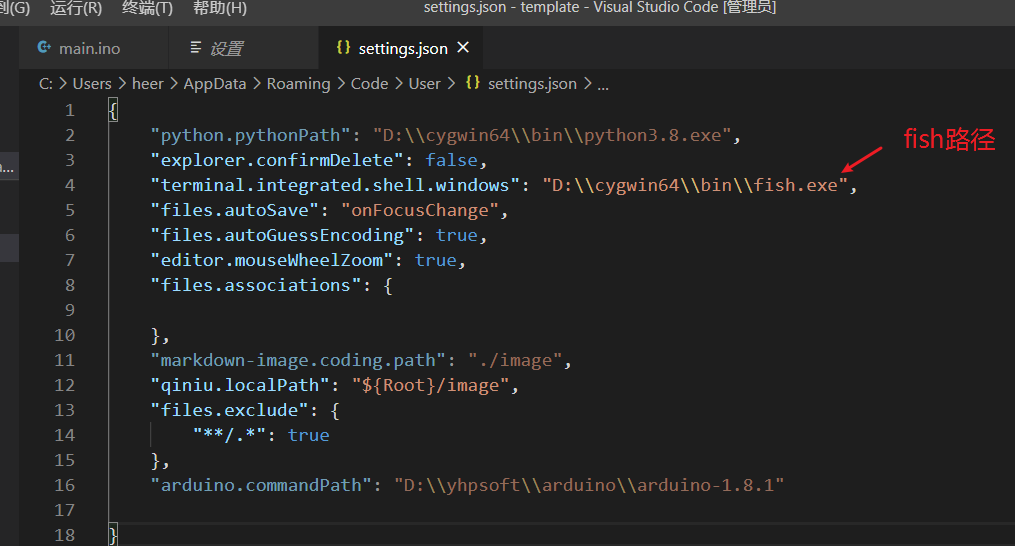
将`fish`解释器的路径填入,这里的`fish`解释器是`cygwin`下的,请先按工具准备中的说明安装好该环境!

根据自己的fish安装路径来!
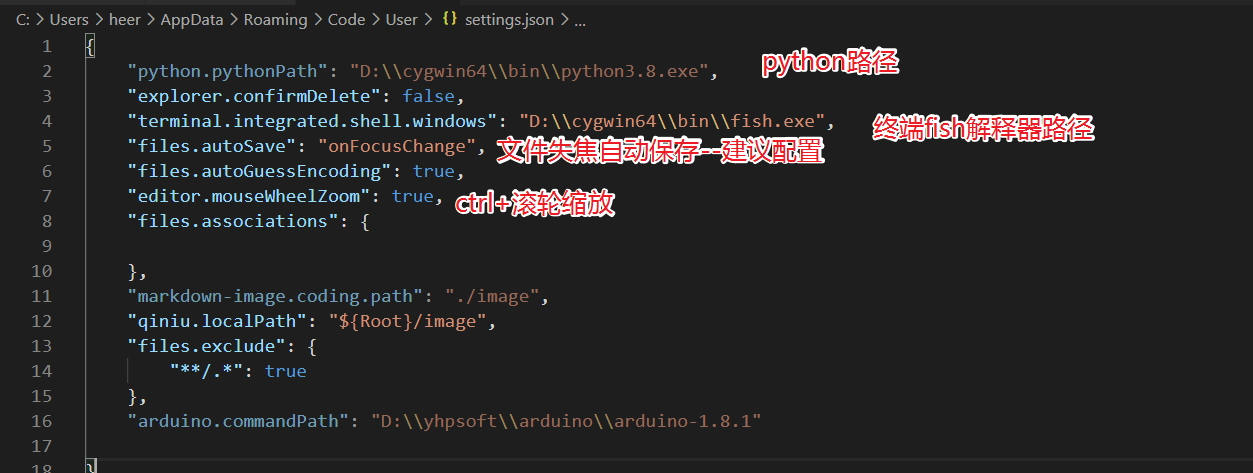
**2. 其他的配置和1的方式类似,但是为方便我们可以直接在1的settings.json文件中直接配置**

为了之后配置放方便,直接在此记下这个文件!
```json
{
"python.pythonPath": "D:\\cygwin64\\bin\\python3.8.exe",
"explorer.confirmDelete": false,
"terminal.integrated.shell.windows": "D:\\cygwin64\\bin\\fish.exe",
"files.autoSave": "onFocusChange",
"files.autoGuessEncoding": true,
"editor.mouseWheelZoom": true,
"files.associations": {
},
"markdown-image.coding.path": "./image",
"qiniu.localPath": "${Root}/image",
"files.exclude": {
"**/.*": true
},
"arduino.commandPath": "D:\\yhpsoft\\arduino\\arduino-1.8.1"
}
```
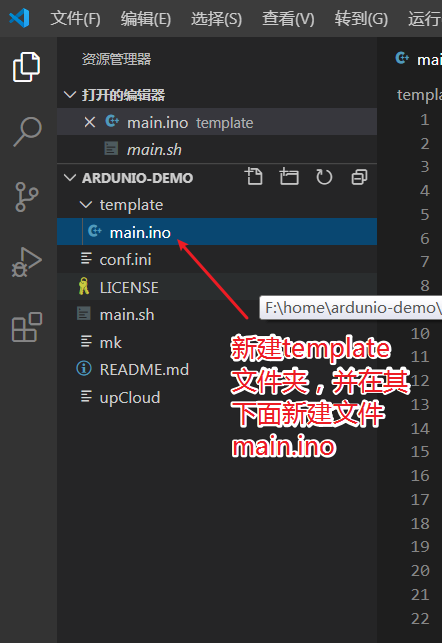
配置好后我们打开vscode下的终端,样子就是这样的了!

## 编写一段程序测试一下

将下面的代码拷贝到`main.ino`文件
```c++
int potpin=0;//指定模拟端口A0
int ledpin=13;//指定LED端口 13
int val=0;//声明临时变量
float v=0;
void setup()
{
pinMode(ledpin,OUTPUT);//设置端口13为输出模式
Serial.begin(115200);//设置串口波特率为9600
}
void loop()
{
digitalWrite(ledpin,HIGH);//拉高端口13,LED点亮
delay(1000);//延时0.05秒
digitalWrite(ledpin,LOW);//拉低端口13,关闭LED
delay(1000);//延时0.05 秒
val=analogRead(potpin);//读取A0口的电压值并赋值到val
v=5.0/1023*val;
Serial.println(v);//串口发送val值
}
```
连接UNO开发板,然在vscode的终端使用命令向开发板上载程序!
```
heer@FPGA-Use ~/ardunio-demo [1]# arduino_debug --board arduino:avr:uno --port COM29 --upload ./template/main.ino
```
操作成功会显示:
```
DPI detection failed, fallback to 96 dpi
正在加载配置...
正在初始化包...
正在准备开发板...
正在验证...
项目使用了 3492 字节,占用了 (10%) 程序存储空间。最大为 32256 字节。
全局变量使用了204字节,(9%)的动态内存,余留1844字节局部变量。最大为2048字节。
上传...
```

稍微解释一下命令:
- 序
- 第1章 Linux下开发FPGA
- 1.1 Linux下安装diamond
- 1.2 使用轻量级linux仿真工具iverilog
- 1.3 使用linux shell来读写串口
- 1.4 嵌入式上的linux
- 设备数教程
- linux C 标准库文档
- linux 网络编程
- 开机启动流程
- 1.5 linux上实现与树莓派,FPGA等通信的串口脚本
- 第2章 Intel FPGA的使用
- 2.1 特别注意
- 2.2 高级应用开发流程
- 2.2.1 生成二进制bit流rbf
- 2.2.2 制作Preloader Image
- 2.2.2.1 生成BSP文件
- 2.2.2.2 编译preloader和uboot
- 2.2.2.3 更新SD的preloader和uboot
- 2.3 HPS使用
- 2.3.1 通过JTAG下载代码
- 2.3.2 HPS软件部分开发
- 2.3 quartus中IP核的使用
- 2.3.1 Intel中RS232串口IP的使用
- 2.4 一些问题的解决方法
- 2.4.1 关于引脚的复用的综合出错
- 第3章 关于C/C++的一些语法
- 3.1 C中数组作为形参不传长度
- 3.2 汇编中JUMP和CALL的区别
- 3.3 c++中map的使用
- 3.4 链表的一些应用
- 3.5 vector的使用
- 3.6 使用C实现一个简单的FIFO
- 3.6.1 循环队列
- 3.7 C语言不定长参数
- 3.8 AD采样计算同频信号的相位差
- 3.9 使用C实现栈
- 3.10 增量式PID
- 第4章 Xilinx的FPGA使用
- 4.1 Alinx使用中的一些问题及解决方法
- 4.1.1 在Genarate Bitstream时提示没有name.tcl
- 4.1.2 利用verilog求位宽
- 4.1.3 vivado中AXI写DDR说明
- 4.1.4 zynq中AXI GPIO中断问题
- 4.1.5 关于时序约束
- 4.1.6 zynq的PS端利用串口接收电脑的数据
- 4.1.7 SDK启动出错的解决方法
- 4.1.8 让工具综合是不优化某一模块的方法
- 4.1.9 固化程序(双核)
- 4.1.10 分配引脚时的问题
- 4.1.11 vivado仿真时相对文件路径的问题
- 4.2 GCC使用Attribute分配空间给变量
- 4.3 关于Zynq的DDR写入byte和word的方法
- 4.4 常用模块
- 4.4.1 I2S接收串转并
- 4.5 时钟约束
- 4.5.1 时钟约束
- 4.6 VIVADO使用
- 4.6.1 使用vivado进行仿真
- 4.7 关于PicoBlaze软核的使用
- 4.8 vivado一些IP的使用
- 4.8.1 float-point浮点单元的使用
- 4.10 zynq的双核中断
- 第5章 FPGA的那些好用的工具
- 5.1 iverilog
- 5.2 Arduino串口绘图器工具
- 5.3 LabVIEW
- 5.4 FPGA开发实用小工具
- 5.5 Linux下绘制时序图软件
- 5.6 verilog和VHDL相互转换工具
- 5.7 linux下搭建轻量易用的verilog仿真环境
- 5.8 VCS仿真verilog并查看波形
- 5.9 Verilog开源的综合工具-Yosys
- 5.10 sublim text3编辑器配置verilog编辑环境
- 5.11 在线工具
- 真值表 -> 逻辑表达式
- 5.12 Modelsim使用命令仿真
- 5.13 使用TCL实现的个人仿真脚本
- 5.14 在cygwin下使用命令行下载arduino代码到开发板
- 5.15 STM32开发
- 5.15.1 安装Atollic TrueSTUDIO for STM32
- 5.15.2 LED闪烁吧
- 5.15.3 模拟U盘
- 第6章 底层实现
- 6.1 硬件实现加法的流程
- 6.2 硬件实现乘法器
- 6.3 UART实现
- 6.3.1 通用串口发送模块
- 6.4 二进制数转BCD码
- 6.5 基本开源资源
- 6.5.1 深度资源
- 6.5.2 FreeCore资源集合
- 第7章 常用模块
- 7.1 温湿度传感器DHT11的verilog驱动
- 7.2 DAC7631驱动(verilog)
- 7.3 按键消抖
- 7.4 小脚丫数码管显示
- 7.5 verilog实现任意人数表决器
- 7.6 基本模块head.v
- 7.7 四相八拍步进电机驱动
- 7.8 单片机部分
- 7.8.1 I2C OLED驱动
- 第8章 verilog 扫盲区
- 8.1 时序电路中数据的读写
- 8.2 从RTL角度来看verilog中=和<=的区别
- 8.3 case和casez的区别
- 8.4 关于参数的传递与读取(paramter)
- 8.5 关于符号优先级
- 第9章 verilog中的一些语法使用
- 9.1 可综合的repeat
- 第10章 system verilog
- 10.1 简介
- 10.2 推荐demo学习网址
- 10.3 VCS在linux上环境的搭建
- 10.4 deepin15.11(linux)下搭建system verilog的vcs仿真环境
- 10.5 linux上使用vcs写的脚本仿真管理
- 10.6 system verilog基本语法
- 10.6.1 数据类型
- 10.6.2 枚举与字符串
- 第11章 tcl/tk的使用
- 11.1 使用Tcl/Tk
- 11.2 tcl基本语法教程
- 11.3 Tk的基本语法
- 11.3.1 建立按钮
- 11.3.2 复选框
- 11.3.3 单选框
- 11.3.4 标签
- 11.3.5 建立信息
- 11.3.6 建立输入框
- 11.3.7 旋转框
- 11.3.8 框架
- 11.3.9 标签框架
- 11.3.10 将窗口小部件分配到框架/标签框架
- 11.3.11 建立新的上层窗口
- 11.3.12 建立菜单
- 11.3.13 上层窗口建立菜单
- 11.3.14 建立滚动条
- 11.4 窗口管理器
- 11.5 一些学习的脚本
- 11.6 一些常用的操作语法实现
- 11.6.1 删除同一后缀的文件
- 11.7 在Lattice的Diamond中使用tcl
- 第12章 FPGA的重要知识
- 12.1 面积与速度的平衡与互换
- 12.2 硬件原则
- 12.3 系统原则
- 12.4 同步设计原则
- 12.5 乒乓操作
- 12.6 串并转换设计技巧
- 12.7 流水线操作设计思想
- 12.8 数据接口的同步方法
- 第13章 小项目
- 13.1 数字滤波器
- 13.2 FIFO
- 13.3 一个精简的CPU( mini-mcu )
- 13.3.1 基本功能实现
- 13.3.2 中断添加
- 13.3.3 使用中断实现流水灯(实际硬件验证)
- 13.3.4 综合一点的应用示例
- 13.4.5 使用flex开发汇编编译器
- 13.4.5 linux--Flex and Bison
- 13.4 有符号数转单精度浮点数
- 13.5 串口调试FPGA模板
