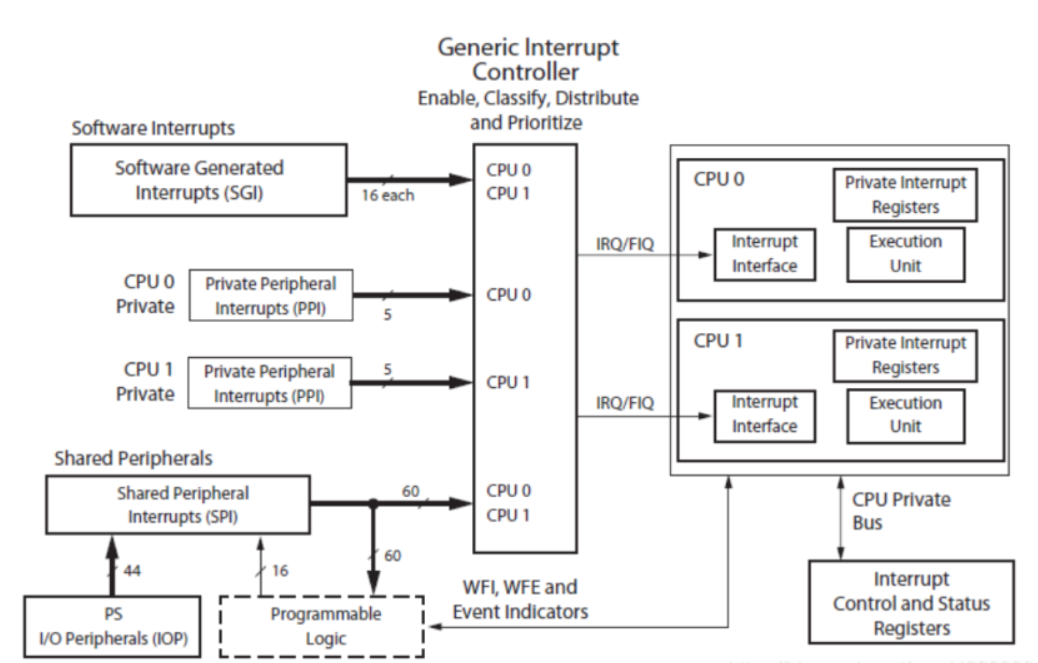
可以看到PL端的中断,通过SPI连接到GIC上,在双核模式下使用PL端的中断时,需要对中断进行绑定。
# 搭建硬件系统
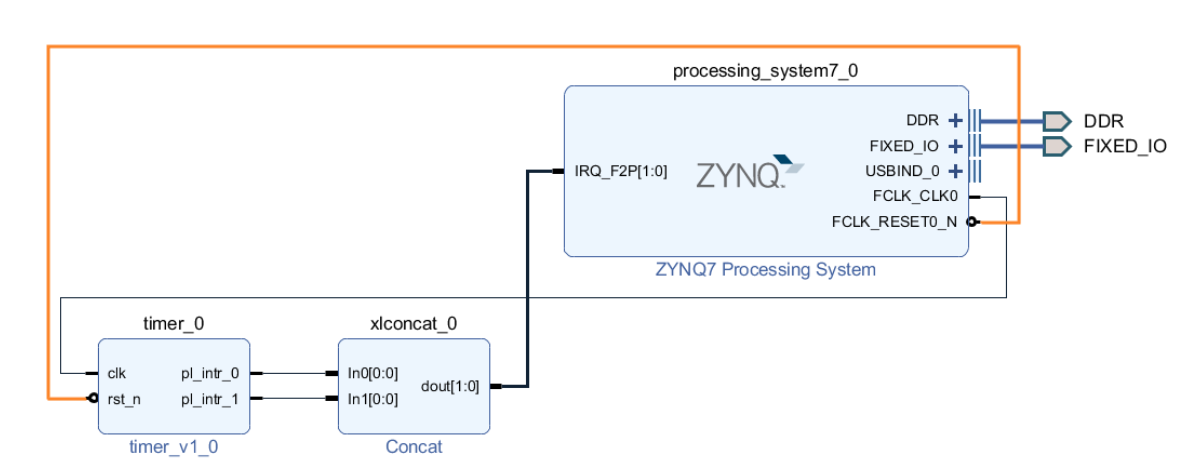
为了快速上手,在搭建硬件系统时,设计一个定时器模块,该模块完成的功能就是每隔1s和2s向ZYNQ核提供一个PL端的中断。
timer模块是产生PL端中断的模块,该模块是自行使用Vivado封装的一个模块,对应代码如下:

```verilog
module timer(
input wire clk ,
input wire rst_n ,
output wire pl_intr_0 ,
output wire pl_intr_1
);
//==========================================
//parameter define
//==========================================
parameter ONE_SEC = 50000000;
parameter TWO_SEC = ONE_SEC << 1;
parameter ONE_US = 500;
//==========================================
//internal signals
//==========================================
reg [31:0] cnt_1s ;
wire add_cnt_1s ;
wire end_cnt_1s ;
reg [31:0] cnt_2s ;
wire add_cnt_2s ;
wire end_cnt_2s ;
reg pl_intr_1_r ;
reg pl_intr_0_r ;
assign pl_intr_0 = pl_intr_0_r;
assign pl_intr_1 = pl_intr_1_r;
//----------------cnt_1s------------------
always @(posedge clk or negedge rst_n) begin
if (rst_n == 1'b0) begin
cnt_1s <= 'd0;
end
else if (add_cnt_1s) begin
if(end_cnt_1s)
cnt_1s <= 'd0;
else
cnt_1s <= cnt_1s + 1'b1;
end
else begin
cnt_1s <= 'd0;
end
end
assign add_cnt_1s = 1;
assign end_cnt_1s = add_cnt_1s && cnt_1s == (ONE_SEC - 1);
//----------------cnt_2s------------------
always @(posedge clk or negedge rst_n) begin
if (rst_n == 1'b0) begin
cnt_2s <= 'd0;
end
else if (add_cnt_2s) begin
if(end_cnt_2s)
cnt_2s <= 'd0;
else
cnt_2s <= cnt_2s + 1'b1;
end
else begin
cnt_2s <= 'd0;
end
end
assign add_cnt_2s = 1;
assign end_cnt_2s = add_cnt_2s && cnt_2s == (TWO_SEC - 1);
//----------------pl_intr_0_r------------------
always @(posedge clk or negedge rst_n) begin
if (rst_n==1'b0) begin
pl_intr_0_r <= 1'b0;
end
else if (cnt_1s == (ONE_SEC - ONE_US - 1)) begin
pl_intr_0_r <= 1'b1;
end
else if (end_cnt_1s) begin
pl_intr_0_r <= 1'b0;
end
end
//----------------pl_intr_1_r------------------
always @(posedge clk or negedge rst_n) begin
if (rst_n==1'b0) begin
pl_intr_1_r <= 1'b0;
end
else if (cnt_2s == (TWO_SEC - ONE_US - 1)) begin
pl_intr_1_r <= 1'b1;
end
else if (end_cnt_2s) begin
pl_intr_1_r <= 1'b0;
end
end
endmodule
```
# 硬中断初始化流程
| 步骤 | 函数 |
|---|---|
|初始化异常处理系统|Xil\_ExceptionInit()|
|初始化中断控制器|XScuGic_LookupConfig(),XScuGic_CfgInitialize()|
|注册异常回调函数|Xil\_ExceptionRegisterHandler()|
|将中断控制器与对应的中断ID相连接|XScuGic\_Connect()|
|设置中断类型和优先级|XScuGic\_SetPriTrigTypeByDistAddr()|
|硬中断映射到对应的CPU|XScuGic\_InterruptMaptoCpu()|
|使能中断控制器|XScuGic\_Enable()|
|使能异常处理系统|Xil\_ExceptionEnable()|
程序设计
程序设计十分简单,只需要在CPU0和CPU1接收到来自PL端的对应的中断时,就让其打印一下信息就行了。
CPU0应用程序
在设置硬中断时,需要设置中断的类型和优先级,使用到的函数是XScuGic_SetPriTrigTypeByDistAddr(DIST_BASE_ADDR, CPU0_HW_INT_ID, 0x20, 0x03);
其中第一个参数是,中断设置的基地址,ZYNQ的中断设置都有一个基地址,对各个中断号的中断的响应,可以通过中断号来进行偏移,除此之外还需要设置中断的优先级,中断的优先级是以8为递增的,也就是中断的优先级有0x00,0x08,0x10,0x18等等,优先级最低的是0xF8;中断的类型根据中断的类型不同可以设置为不同类型的中断,其中私有中断(PPI)默认为上升沿触发,软中断(SFI),共享中断(SPI)可以设置为电平中断和边沿中断。
```c
#include <stdio.h>
#include "platform.h"
#include "xil_printf.h"
#include "xparameters.h"
#include "xscugic.h"
#include "sleep.h"
// OCM
#define OCM3_ADDR 0xFFFF0000
#define GIC_DEV_ID XPAR_PS7_SCUGIC_0_DEVICE_ID
#define DIST_BASE_ADDR XPAR_PS7_SCUGIC_0_DIST_BASEADDR
//software interrupt ID is 0x00~0x0F
#define CPU0_SW_INT_ID 0x0D //CPU0的软中断ID,用于中断CPU0
#define CPU1_SW_INT_ID 0x0E //CPU1的软中断ID,用于中断CPU1
//PL 到 arm的中断
#define CPU0_HW_INT_ID 61 //CPU0的硬中断,1S计数器中断
#define CPU1_HW_INT_ID 62 //CPU1的硬中断,2S计数器中断
static XScuGic gicInst;
static XScuGic_Config * gicCfg_Ptr;
void hwIntrHandler(void * CallBackRef)
{
printf("CPU0 is interrupted by HW\n");
}
int initGic()
{
int status;
//1. 初始化异常处理系统
Xil_ExceptionInit();
//2. 初始化中断控制器
gicCfg_Ptr = XScuGic_LookupConfig(GIC_DEV_ID);
status = XScuGic_CfgInitialize(&gicInst, gicCfg_Ptr, gicCfg_Ptr->CpuBaseAddress);
if(status != XST_SUCCESS)
{
printf("initialize GIC failed\n");
return XST_FAILURE;
}
//3. 注册异常回调函数
Xil_ExceptionRegisterHandler(XIL_EXCEPTION_ID_INT, (Xil_ExceptionHandler)XScuGic_InterruptHandler, &gicInst);
//4. 连接GIC对应的硬中断ID
status = XScuGic_Connect(&gicInst, CPU0_HW_INT_ID, (Xil_InterruptHandler)hwIntrHandler, &gicInst);
if(status != XST_SUCCESS)
{
printf("Connect GIC failed\n");
return XST_FAILURE;
}
XScuGic_SetPriTrigTypeByDistAddr(DIST_BASE_ADDR, CPU0_HW_INT_ID, 0x20, 0x03);
//6. 将硬中断绑定到CPU0
XScuGic_InterruptMaptoCpu(&gicInst, 0x00, CPU0_HW_INT_ID);
//7. 使能硬中断
XScuGic_Enable(&gicInst, CPU0_HW_INT_ID);
//8. 使能异常处理系统
Xil_ExceptionEnable();
return status;
}
int main()
{
//初始化中断控制器
int status;
status = initGic();
if(status != XST_SUCCESS)
{
printf("initialize GIC failed\n");
return XST_FAILURE;
}
while(1)
{
}
return 0;
}
```
## CPU1应用程序
```c
#include <stdio.h>
#include "platform.h"
#include "xil_printf.h"
#include "xparameters.h"
#include "xscugic.h"
#include "sleep.h"
// on chip memory3 address
#define OCM3_ADDR 0xFFFF0000
#define GIC_DEV_ID XPAR_PS7_SCUGIC_0_DEVICE_ID
#define DIST_BASE_ADDR XPAR_PS7_SCUGIC_0_DIST_BASEADDR
//software interrupt ID is 0x00~0x0F
#define CPU0_SW_INT_ID 0x0D //CPU0的软中断ID,用于中断CPU0
#define CPU1_SW_INT_ID 0x0E //CPU1的软中断ID,用于中断CPU1
#define CPU0_HW_INT_ID 61 //CPU0的硬中断,1S计数器中断
#define CPU1_HW_INT_ID 62 //CPU1的硬中断,2S计数器中断
static XScuGic gicInst;
static XScuGic_Config * gicCfg_Ptr;
void hwIntrHandler(void * CallBackRef)
{
usleep(1000);
printf("CPU1 is interrupted by HW\n");
}
int initGic()
{
int status;
//1. 初始化异常处理系统
Xil_ExceptionInit();
//2. 初始化中断控制器
gicCfg_Ptr = XScuGic_LookupConfig(GIC_DEV_ID);
status = XScuGic_CfgInitialize(&gicInst, gicCfg_Ptr, gicCfg_Ptr->CpuBaseAddress);
if(status != XST_SUCCESS)
{
printf("initialize GIC failed\n");
return XST_FAILURE;
}
//3. 注册异常回调函数,中断类型的异常
Xil_ExceptionRegisterHandler(XIL_EXCEPTION_ID_INT, (Xil_ExceptionHandler)XScuGic_InterruptHandler, &gicInst);
//4. 连接GIC对应的硬中断ID
status = XScuGic_Connect(&gicInst, CPU1_HW_INT_ID, (Xil_InterruptHandler)hwIntrHandler, &gicInst);
if(status != XST_SUCCESS)
{
printf("Connect GIC failed\n");
return XST_FAILURE;
}
//5. 设置硬中断优先级和中断类型
XScuGic_SetPriTrigTypeByDistAddr(DIST_BASE_ADDR, CPU1_HW_INT_ID, 0x20, 0x03);
//6. 将硬中断绑定到CPU0(双使用双核时,需要对硬中断进行一次映射)
XScuGic_InterruptMaptoCpu(&gicInst, 0x01, CPU1_HW_INT_ID);
//7. 使能硬中断
XScuGic_Enable(&gicInst, CPU1_HW_INT_ID);
//8. 使能异常处理系统
Xil_ExceptionEnable();
return status;
}
int main()
{
//初始化中断控制器
int status;
status = initGic();
if(status != XST_SUCCESS)
{
printf("initialize GIC failed\n");
return XST_FAILURE;
}
while(1)
{
}
return 0;
}
```
- 序
- 第1章 Linux下开发FPGA
- 1.1 Linux下安装diamond
- 1.2 使用轻量级linux仿真工具iverilog
- 1.3 使用linux shell来读写串口
- 1.4 嵌入式上的linux
- 设备数教程
- linux C 标准库文档
- linux 网络编程
- 开机启动流程
- 1.5 linux上实现与树莓派,FPGA等通信的串口脚本
- 第2章 Intel FPGA的使用
- 2.1 特别注意
- 2.2 高级应用开发流程
- 2.2.1 生成二进制bit流rbf
- 2.2.2 制作Preloader Image
- 2.2.2.1 生成BSP文件
- 2.2.2.2 编译preloader和uboot
- 2.2.2.3 更新SD的preloader和uboot
- 2.3 HPS使用
- 2.3.1 通过JTAG下载代码
- 2.3.2 HPS软件部分开发
- 2.3 quartus中IP核的使用
- 2.3.1 Intel中RS232串口IP的使用
- 2.4 一些问题的解决方法
- 2.4.1 关于引脚的复用的综合出错
- 第3章 关于C/C++的一些语法
- 3.1 C中数组作为形参不传长度
- 3.2 汇编中JUMP和CALL的区别
- 3.3 c++中map的使用
- 3.4 链表的一些应用
- 3.5 vector的使用
- 3.6 使用C实现一个简单的FIFO
- 3.6.1 循环队列
- 3.7 C语言不定长参数
- 3.8 AD采样计算同频信号的相位差
- 3.9 使用C实现栈
- 3.10 增量式PID
- 第4章 Xilinx的FPGA使用
- 4.1 Alinx使用中的一些问题及解决方法
- 4.1.1 在Genarate Bitstream时提示没有name.tcl
- 4.1.2 利用verilog求位宽
- 4.1.3 vivado中AXI写DDR说明
- 4.1.4 zynq中AXI GPIO中断问题
- 4.1.5 关于时序约束
- 4.1.6 zynq的PS端利用串口接收电脑的数据
- 4.1.7 SDK启动出错的解决方法
- 4.1.8 让工具综合是不优化某一模块的方法
- 4.1.9 固化程序(双核)
- 4.1.10 分配引脚时的问题
- 4.1.11 vivado仿真时相对文件路径的问题
- 4.2 GCC使用Attribute分配空间给变量
- 4.3 关于Zynq的DDR写入byte和word的方法
- 4.4 常用模块
- 4.4.1 I2S接收串转并
- 4.5 时钟约束
- 4.5.1 时钟约束
- 4.6 VIVADO使用
- 4.6.1 使用vivado进行仿真
- 4.7 关于PicoBlaze软核的使用
- 4.8 vivado一些IP的使用
- 4.8.1 float-point浮点单元的使用
- 4.10 zynq的双核中断
- 第5章 FPGA的那些好用的工具
- 5.1 iverilog
- 5.2 Arduino串口绘图器工具
- 5.3 LabVIEW
- 5.4 FPGA开发实用小工具
- 5.5 Linux下绘制时序图软件
- 5.6 verilog和VHDL相互转换工具
- 5.7 linux下搭建轻量易用的verilog仿真环境
- 5.8 VCS仿真verilog并查看波形
- 5.9 Verilog开源的综合工具-Yosys
- 5.10 sublim text3编辑器配置verilog编辑环境
- 5.11 在线工具
- 真值表 -> 逻辑表达式
- 5.12 Modelsim使用命令仿真
- 5.13 使用TCL实现的个人仿真脚本
- 5.14 在cygwin下使用命令行下载arduino代码到开发板
- 5.15 STM32开发
- 5.15.1 安装Atollic TrueSTUDIO for STM32
- 5.15.2 LED闪烁吧
- 5.15.3 模拟U盘
- 第6章 底层实现
- 6.1 硬件实现加法的流程
- 6.2 硬件实现乘法器
- 6.3 UART实现
- 6.3.1 通用串口发送模块
- 6.4 二进制数转BCD码
- 6.5 基本开源资源
- 6.5.1 深度资源
- 6.5.2 FreeCore资源集合
- 第7章 常用模块
- 7.1 温湿度传感器DHT11的verilog驱动
- 7.2 DAC7631驱动(verilog)
- 7.3 按键消抖
- 7.4 小脚丫数码管显示
- 7.5 verilog实现任意人数表决器
- 7.6 基本模块head.v
- 7.7 四相八拍步进电机驱动
- 7.8 单片机部分
- 7.8.1 I2C OLED驱动
- 第8章 verilog 扫盲区
- 8.1 时序电路中数据的读写
- 8.2 从RTL角度来看verilog中=和<=的区别
- 8.3 case和casez的区别
- 8.4 关于参数的传递与读取(paramter)
- 8.5 关于符号优先级
- 第9章 verilog中的一些语法使用
- 9.1 可综合的repeat
- 第10章 system verilog
- 10.1 简介
- 10.2 推荐demo学习网址
- 10.3 VCS在linux上环境的搭建
- 10.4 deepin15.11(linux)下搭建system verilog的vcs仿真环境
- 10.5 linux上使用vcs写的脚本仿真管理
- 10.6 system verilog基本语法
- 10.6.1 数据类型
- 10.6.2 枚举与字符串
- 第11章 tcl/tk的使用
- 11.1 使用Tcl/Tk
- 11.2 tcl基本语法教程
- 11.3 Tk的基本语法
- 11.3.1 建立按钮
- 11.3.2 复选框
- 11.3.3 单选框
- 11.3.4 标签
- 11.3.5 建立信息
- 11.3.6 建立输入框
- 11.3.7 旋转框
- 11.3.8 框架
- 11.3.9 标签框架
- 11.3.10 将窗口小部件分配到框架/标签框架
- 11.3.11 建立新的上层窗口
- 11.3.12 建立菜单
- 11.3.13 上层窗口建立菜单
- 11.3.14 建立滚动条
- 11.4 窗口管理器
- 11.5 一些学习的脚本
- 11.6 一些常用的操作语法实现
- 11.6.1 删除同一后缀的文件
- 11.7 在Lattice的Diamond中使用tcl
- 第12章 FPGA的重要知识
- 12.1 面积与速度的平衡与互换
- 12.2 硬件原则
- 12.3 系统原则
- 12.4 同步设计原则
- 12.5 乒乓操作
- 12.6 串并转换设计技巧
- 12.7 流水线操作设计思想
- 12.8 数据接口的同步方法
- 第13章 小项目
- 13.1 数字滤波器
- 13.2 FIFO
- 13.3 一个精简的CPU( mini-mcu )
- 13.3.1 基本功能实现
- 13.3.2 中断添加
- 13.3.3 使用中断实现流水灯(实际硬件验证)
- 13.3.4 综合一点的应用示例
- 13.4.5 使用flex开发汇编编译器
- 13.4.5 linux--Flex and Bison
- 13.4 有符号数转单精度浮点数
- 13.5 串口调试FPGA模板
