# 2.3.5.RadioButton(单选按钮)&Checkbox(复选框)
## 本节引言:
> 本节给大家带来的是Andoird基本UI控件中的RadioButton和Checkbox; 先说下本节要讲解的内容是:RadioButton和Checkbox的
> **1.基本用法
> 2.事件处理;
> 3.自定义点击效果;
> 4.改变文字与选择框的相对位置;
> 5.修改文字与选择框的距离**
其实这两个控件有很多地方都是类似的,除了单选和多选,事件处理,其他的都是类似的! 另外还有一个ListView上Checkbox的错位的问题,我们会在ListView那一章对这个问题进行 解决,好的,开始本节内容~ 本节官方文档API:[RadioButton](http://androiddoc.qiniudn.com/reference/android/widget/RadioButton.html);[CheckBox](http://androiddoc.qiniudn.com/reference/android/widget/CheckBox.html);
## 1.基本用法与事件处理:
### 1)RadioButton(单选按钮)
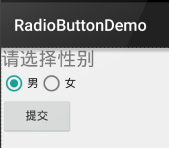
> 如题单选按钮,就是只能够选中一个,所以我们需要把RadioButton放到RadioGroup按钮组中,从而实现 单选功能!先熟悉下如何使用RadioButton,一个简单的性别选择的例子: 另外我们可以为外层RadioGroup设置orientation属性然后设置RadioButton的排列方式,是竖直还是水平~
**效果图:**

PS:笔者的手机是Android 5.0.1的,这里的RadioButton相比起旧版本的RadioButton,稍微好看一点~
**布局代码如下:**
```
<LinearLayout xmlns:android="http://schemas.android.com/apk/res/android"
xmlns:tools="http://schemas.android.com/tools"
android:id="@+id/LinearLayout1"
android:layout_width="match_parent"
android:layout_height="match_parent"
android:orientation="vertical"
tools:context=".MainActivity" >
<TextView
android:layout_width="wrap_content"
android:layout_height="wrap_content"
android:text="请选择性别"
android:textSize="23dp"
/>
<RadioGroup
android:id="@+id/radioGroup"
android:layout_width="wrap_content"
android:layout_height="wrap_content"
android:orientation="horizontal">
<RadioButton
android:id="@+id/btnMan"
android:layout_width="wrap_content"
android:layout_height="wrap_content"
android:text="男"
android:checked="true"/>
<RadioButton
android:id="@+id/btnWoman"
android:layout_width="wrap_content"
android:layout_height="wrap_content"
android:text="女"/>
</RadioGroup>
<Button
android:id="@+id/btnpost"
android:layout_width="wrap_content"
android:layout_height="wrap_content"
android:text="提交"/>
</LinearLayout>
```
**获得选中的值:**
这里有两种方法,
**第一种**是为RadioButton设置一个事件监听器setOnCheckChangeListener
**例子代码如下:**
```
RadioGroup radgroup = (RadioGroup) findViewById(R.id.radioGroup);
//第一种获得单选按钮值的方法
//为radioGroup设置一个监听器:setOnCheckedChanged()
radgroup.setOnCheckedChangeListener(new OnCheckedChangeListener() {
@Override
public void onCheckedChanged(RadioGroup group, int checkedId) {
RadioButton radbtn = (RadioButton) findViewById(checkedId);
Toast.makeText(getApplicationContext(), "按钮组值发生改变,你选了" + radbtn.getText(), Toast.LENGTH_LONG).show();
}
});
```
**运行效果图:** 
PS:另外有一点要切记,要为每个RadioButton添加一个id,不然单选功能会生效!!!
**第二种**方法是通过单击其他按钮获取选中单选按钮的值,当然我们也可以直接获取,这个看需求~
**例子代码如下:**
```
Button btnchange = (Button) findViewById(R.id.btnpost);
RadioGroup radgroup = (RadioGroup) findViewById(R.id.radioGroup);
//为radioGroup设置一个监听器:setOnCheckedChanged()
btnchange.setOnClickListener(new OnClickListener() {
@Override
public void onClick(View v) {
for (int i = 0; i < radgroup.getChildCount(); i++) {
RadioButton rd = (RadioButton) radgroup.getChildAt(i);
if (rd.isChecked()) {
Toast.makeText(getApplicationContext(), "点击提交按钮,获取你选择的是:" + rd.getText(), Toast.LENGTH_LONG).show();
break;
}
}
}
});
```
**运行效果图:**

**代码解析:** 这里我们为提交按钮设置了一个setOnClickListener事件监听器,每次点击的话遍历一次RadioGroup判断哪个按钮被选中我们可以通过下述方法获得RadioButton的相关信息!
* **getChildCont**( )获得按钮组中的单选按钮的数目;
* **getChinldAt**(i):根据索引值获取我们的单选按钮
* **isChecked**( ):判断按钮是否选中
### 2)CheckBox(复选框)
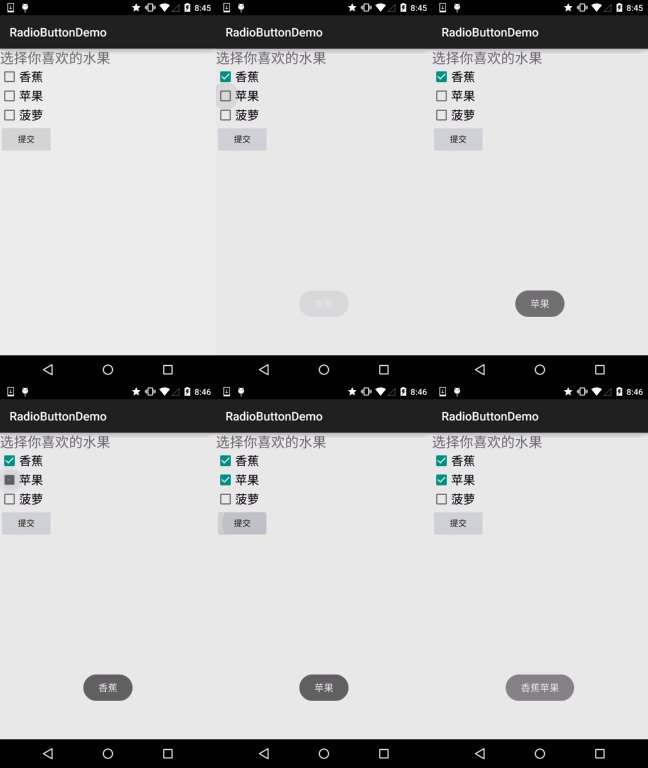
> 如题复选框,即可以同时选中多个选项,至于获得选中的值,同样有两种方式: 1.为每个CheckBox添加事件:setOnCheckedChangeListener 2.弄一个按钮,在点击后,对每个checkbox进行判断:isChecked();
**运行效果图:**

**实现代码:**
```
public class MainActivity extends AppCompatActivity implements View.OnClickListener,CompoundButton.OnCheckedChangeListener{
private CheckBox cb_one;
private CheckBox cb_two;
private CheckBox cb_three;
private Button btn_send;
@Override
protected void onCreate(Bundle savedInstanceState) {
super.onCreate(savedInstanceState);
setContentView(R.layout.activity_main);
cb_one = (CheckBox) findViewById(R.id.cb_one);
cb_two = (CheckBox) findViewById(R.id.cb_two);
cb_three = (CheckBox) findViewById(R.id.cb_three);
btn_send = (Button) findViewById(R.id.btn_send);
cb_one.setOnCheckedChangeListener(this);
cb_two.setOnCheckedChangeListener(this);
cb_three.setOnCheckedChangeListener(this);
btn_send.setOnClickListener(this);
}
@Override
public void onCheckedChanged(CompoundButton compoundButton, boolean b) {
if(compoundButton.isChecked()) Toast.makeText(this,compoundButton.getText().toString(),Toast.LENGTH_SHORT).show();
}
@Override
public void onClick(View view) {
String choose = "";
if(cb_one.isChecked())choose += cb_one.getText().toString() + "";
if(cb_two.isChecked())choose += cb_two.getText().toString() + "";
if(cb_three.isChecked())choose += cb_three.getText().toString() + "";
Toast.makeText(this,choose,Toast.LENGTH_SHORT).show();
}
}
```
## 2.自定义点击效果
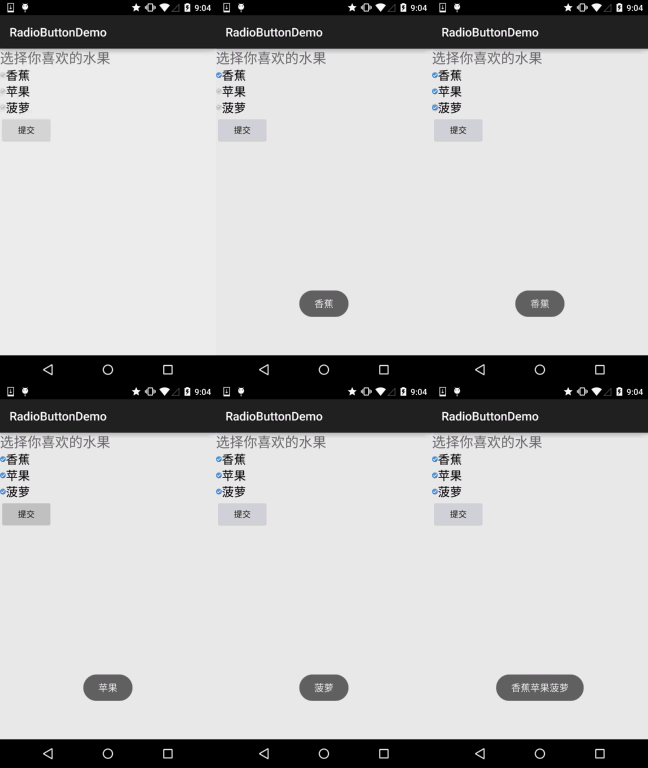
> 虽然5.0后的RadioButton和Checkbox都比旧版本稍微好看了点,但是对于我们来说 可能还是不喜欢或者需求,需要自己点击效果!实现起来很简单,先编写一个自定义 的selctor资源,设置选中与没选中时的切换图片~!
实现效果图如下:

PS:这里素材的原因,有点小...
```
<?xml version="1.0" encoding="utf-8"?>
<selector xmlns:android="http://schemas.android.com/apk/res/android">
<item
android:state_enabled="true"
android:state_checked="true"
android:drawable="@mipmap/ic_checkbox_checked"/>
<item
android:state_enabled="true"
android:state_checked="false"
android:drawable="@mipmap/ic_checkbox_normal" />
</selector>
```
写好后,我们有两种方法设置,也可以说一种吧!你看看就知道了~
①android:button属性设置为上述的selctor
```
android:button="@drawable/rad_btn_selctor"
```
②在style中定义一个属性,然后通过android style属性设置,先往style添加下述代码:
```
<style name="MyCheckBox" parent="@android:style/Widget.CompoundButton.CheckBox">
<item name="android:button">@drawable/rad_btn_selctor</item>
</style>
```
然后布局那里:
```
style="@style/MyCheckBox"
```
## 3.改变文字与选择框的相对位置
> 这个实现起来也很简单,还记得我们之前学TextView的时候用到的drawableXxx吗? 要控制选择框的位置,两部即可!设置:
>
> **Step 1.** android:button="@null"
> **Step 2.** android:drawableTop="@android:drawable/btn_radio"
> 当然我们可以把drawableXxx替换成自己喜欢的效果!
## 4.修改文字与选择框的距离
> 有时,我们可能需要调节文字与选择框之间的距离,让他们看起来稍微没那么挤,我们可以:
> 1.在XML代码中控制: 使用android:paddingXxx = "xxx" 来控制距离
> 2.在Java代码中,稍微好一点,动态计算paddingLeft!
**示例代码如下:**
```
rb.setButtonDrawable(R.drawable.rad_btn_selctor);
int rb_paddingLeft = getResources().getDrawable(R.mipmap.ic_checkbox_checked).getIntrinsicWidth()+5;
rb.setPadding(rb_paddingLeft, 0, 0, 0);
```
## 本节小结:
> 好的,关于RadioButton和Checkbox就讲到这里,如果有什么写得不对的,不好的,或者有好的建议欢迎指出 万分感激~谢谢...
- 1.0 Android基础入门教程
- 1.0.1 2015年最新Android基础入门教程目录
- 1.1 背景相关与系统架构分析
- 1.2 开发环境搭建
- 1.2.1 使用Eclipse + ADT + SDK开发Android APP
- 1.2.2 使用Android Studio开发Android APP
- 1.3 SDK更新不了问题解决
- 1.4 Genymotion模拟器安装
- 1.5.1 Git使用教程之本地仓库的基本操作
- 1.5.2 Git之使用GitHub搭建远程仓库
- 1.6 .9(九妹)图片怎么玩
- 1.7 界面原型设计
- 1.8 工程相关解析(各种文件,资源访问)
- 1.9 Android程序签名打包
- 1.11 反编译APK获取代码&资源
- 2.1 View与ViewGroup的概念
- 2.2.1 LinearLayout(线性布局)
- 2.2.2 RelativeLayout(相对布局)
- 2.2.3 TableLayout(表格布局)
- 2.2.4 FrameLayout(帧布局)
- 2.2.5 GridLayout(网格布局)
- 2.2.6 AbsoluteLayout(绝对布局)
- 2.3.1 TextView(文本框)详解
- 2.3.2 EditText(输入框)详解
- 2.3.3 Button(按钮)与ImageButton(图像按钮)
- 2.3.4 ImageView(图像视图)
- 2.3.5.RadioButton(单选按钮)&Checkbox(复选框)
- 2.3.6 开关按钮ToggleButton和开关Switch
- 2.3.7 ProgressBar(进度条)
- 2.3.8 SeekBar(拖动条)
- 2.3.9 RatingBar(星级评分条)
- 2.4.1 ScrollView(滚动条)
- 2.4.2 Date & Time组件(上)
- 2.4.3 Date & Time组件(下)
- 2.4.4 Adapter基础讲解
- 2.4.5 ListView简单实用
- 2.4.6 BaseAdapter优化
- 2.4.7ListView的焦点问题
- 2.4.8 ListView之checkbox错位问题解决
- 2.4.9 ListView的数据更新问题
- 2.5.0 构建一个可复用的自定义BaseAdapter
- 2.5.1 ListView Item多布局的实现
- 2.5.2 GridView(网格视图)的基本使用
- 2.5.3 Spinner(列表选项框)的基本使用
- 2.5.4 AutoCompleteTextView(自动完成文本框)的基本使用
- 2.5.5 ExpandableListView(可折叠列表)的基本使用
- 2.5.6 ViewFlipper(翻转视图)的基本使用
- 2.5.7 Toast(吐司)的基本使用
- 2.5.8 Notification(状态栏通知)详解
- 2.5.9 AlertDialog(对话框)详解
- 2.6.0 其他几种常用对话框基本使用
- 2.6.1 PopupWindow(悬浮框)的基本使用
- 2.6.2 菜单(Menu)
- 2.6.3 ViewPager的简单使用
- 2.6.4 DrawerLayout(官方侧滑菜单)的简单使用
- 3.1.1 基于监听的事件处理机制
- 3.2 基于回调的事件处理机制
- 3.3 Handler消息传递机制浅析
- 3.4 TouchListener PK OnTouchEvent + 多点触碰
- 3.5 监听EditText的内容变化
- 3.6 响应系统设置的事件(Configuration类)
- 3.7 AnsyncTask异步任务
- 3.8 Gestures(手势)
- 4.1.1 Activity初学乍练
- 4.1.2 Activity初窥门径
- 4.1.3 Activity登堂入室
- 4.2.1 Service初涉
- 4.2.2 Service进阶
- 4.2.3 Service精通
- 4.3.1 BroadcastReceiver牛刀小试
- 4.3.2 BroadcastReceiver庖丁解牛
- 4.4.2 ContentProvider再探——Document Provider
- 4.5.1 Intent的基本使用
- 4.5.2 Intent之复杂数据的传递
- 5.1 Fragment基本概述
- 5.2.1 Fragment实例精讲——底部导航栏的实现(方法1)
- 5.2.2 Fragment实例精讲——底部导航栏的实现(方法2)
- 5.2.3 Fragment实例精讲——底部导航栏的实现(方法3)
- 5.2.4 Fragment实例精讲——底部导航栏+ViewPager滑动切换页面
- 5.2.5 Fragment实例精讲——新闻(购物)类App列表Fragment的简单实现
- 6.1 数据存储与访问之——文件存储读写
- 6.2 数据存储与访问之——SharedPreferences保存用户偏好参数
- 6.3.1 数据存储与访问之——初见SQLite数据库
- 6.3.2 数据存储与访问之——又见SQLite数据库
- 7.1.1 Android网络编程要学的东西与Http协议学习
- 7.1.2 Android Http请求头与响应头的学习
- 7.1.3 Android HTTP请求方式:HttpURLConnection
- 7.1.4 Android HTTP请求方式:HttpClient
- 7.2.1 Android XML数据解析
- 7.2.2 Android JSON数据解析
- 7.3.1 Android 文件上传
- 7.3.2 Android 文件下载(1)
- 7.3.3 Android 文件下载(2)
- 7.4 Android 调用 WebService
- 7.5.1 WebView(网页视图)基本用法
- 7.5.2 WebView和JavaScrip交互基础
- 7.5.3 Android 4.4后WebView的一些注意事项
- 7.5.4 WebView文件下载
- 7.5.5 WebView缓存问题
- 7.5.6 WebView处理网页返回的错误码信息
- 7.6.1 Socket学习网络基础准备
- 7.6.2 基于TCP协议的Socket通信(1)
- 7.6.3 基于TCP协议的Socket通信(2)
- 7.6.4 基于UDP协议的Socket通信
- 8.1.1 Android中的13种Drawable小结 Part 1
- 8.1.2 Android中的13种Drawable小结 Part 2
- 8.1.3 Android中的13种Drawable小结 Part 3
- 8.2.1 Bitmap(位图)全解析 Part 1
- 8.2.2 Bitmap引起的OOM问题
- 8.3.1 三个绘图工具类详解
- 8.3.2 绘图类实战示例
- 8.3.3 Paint API之—— MaskFilter(面具)
- 8.3.4 Paint API之—— Xfermode与PorterDuff详解(一)
- 8.3.5 Paint API之—— Xfermode与PorterDuff详解(二)
- 8.3.6 Paint API之—— Xfermode与PorterDuff详解(三)
- 8.3.7 Paint API之—— Xfermode与PorterDuff详解(四)
- 8.3.8 Paint API之—— Xfermode与PorterDuff详解(五)
- 8.3.9 Paint API之—— ColorFilter(颜色过滤器)(1/3)
- 8.3.10 Paint API之—— ColorFilter(颜色过滤器)(2-3)
- 8.3.11 Paint API之—— ColorFilter(颜色过滤器)(3-3)
- 8.3.12 Paint API之—— PathEffect(路径效果)
- 8.3.13 Paint API之—— Shader(图像渲染)
- 8.3.14 Paint几个枚举/常量值以及ShadowLayer阴影效果
- 8.3.15 Paint API之——Typeface(字型)
- 8.3.16 Canvas API详解(Part 1)
- 8.3.17 Canvas API详解(Part 2)剪切方法合集
- 8.3.18 Canvas API详解(Part 3)Matrix和drawBitmapMash
- 8.4.1 Android动画合集之帧动画
- 8.4.2 Android动画合集之补间动画
- 8.4.3 Android动画合集之属性动画-初见
- 8.4.4 Android动画合集之属性动画-又见
- 9.1 使用SoundPool播放音效(Duang~)
- 9.2 MediaPlayer播放音频与视频
- 9.3 使用Camera拍照
- 9.4 使用MediaRecord录音
- 10.1 TelephonyManager(电话管理器)
- 10.2 SmsManager(短信管理器)
- 10.3 AudioManager(音频管理器)
- 10.4 Vibrator(振动器)
- 10.5 AlarmManager(闹钟服务)
- 10.6 PowerManager(电源服务)
- 10.7 WindowManager(窗口管理服务)
- 10.8 LayoutInflater(布局服务)
- 10.9 WallpaperManager(壁纸管理器)
- 10.10 传感器专题(1)——相关介绍
- 10.11 传感器专题(2)——方向传感器
- 10.12 传感器专题(3)——加速度/陀螺仪传感器
- 10.12 传感器专题(4)——其他传感器了解
- 10.14 Android GPS初涉
- 11.0《2015最新Android基础入门教程》完结散花~
