# 2.6.1 PopupWindow(悬浮框)的基本使用
## 本节引言:
> 本节给大家带来的是最后一个用于显示信息的UI控件——PopupWindow(悬浮框),如果你想知道 他长什么样子,你可以打开你手机的QQ,长按列表中的某项,这个时候后弹出一个黑色的小 对话框,这种就是PopupWindow了,和AlertDialog对话框不同的是,他的位置可以是随意的;
>
> 另外AlertDialog是非堵塞线程的,而PopupWindow则是堵塞线程的!而官方有这样一句话来介绍 PopupWindow:
>
> **A popup window that can be used to display an arbitrary view. The popup window is**
>
> **a floating container that appears on top of the current activity.**
>
> 大概意思是:一个弹出窗口控件,可以用来显示任意View,而且会浮动在当前activity的顶部
>
> 下面我们就来对这个控件进行学习~
>
> 官方文档:[PopupWindow](http://androiddoc.qiniudn.com/reference/android/widget/PopupWindow.html)
## 1.相关方法解读
### 1)几个常用的构造方法
> 我们在文档中可以看到,提供给我们的PopupWindow的构造方法有九种之多,这里只贴实际 开发中用得较多的几个构造方法:
>
> * **public PopupWindow (Context context)**
> * **public PopupWindow(View contentView, int width, int height)**
> * **public PopupWindow(View contentView)**
> * **public PopupWindow(View contentView, int width, int height, boolean focusable)**
>
> 参数就不用多解释了吧,contentView是PopupWindow显示的View,focusable是否显示焦点
### 2)常用的一些方法
> 下面介绍几个用得较多的一些方法,其他的可自行查阅文档:
>
> * **setContentView**(View contentView):设置PopupWindow显示的View
> * **getContentView**():获得PopupWindow显示的View
> * **showAsDropDown(View anchor)**:相对某个控件的位置(正左下方),无偏移
> * **showAsDropDown(View anchor, int xoff, int yoff)**:相对某个控件的位置,有偏移
> * **showAtLocation(View parent, int gravity, int x, int y)**: 相对于父控件的位置(例如正中央Gravity.CENTER,下方Gravity.BOTTOM等),可以设置偏移或无偏移 PS:parent这个参数只要是activity中的view就可以了!
> * **setWidth/setHeight**:设置宽高,也可以在构造方法那里指定好宽高, 除了可以写具体的值,还可以用WRAP_CONTENT或MATCH_PARENT, popupWindow的width和height属性直接和第一层View相对应。
> * **setFocusable(true)**:设置焦点,PopupWindow弹出后,所有的触屏和物理按键都由PopupWindows 处理。其他任何事件的响应都必须发生在PopupWindow消失之后,(home 等系统层面的事件除外)。 比如这样一个PopupWindow出现的时候,按back键首先是让PopupWindow消失,第二次按才是退出 activity,准确的说是想退出activity你得首先让PopupWindow消失,因为不并是任何情况下按back PopupWindow都会消失,必须在PopupWindow设置了背景的情况下 。
> * **setAnimationStyle(int):**设置动画效果
## 2.使用代码示例
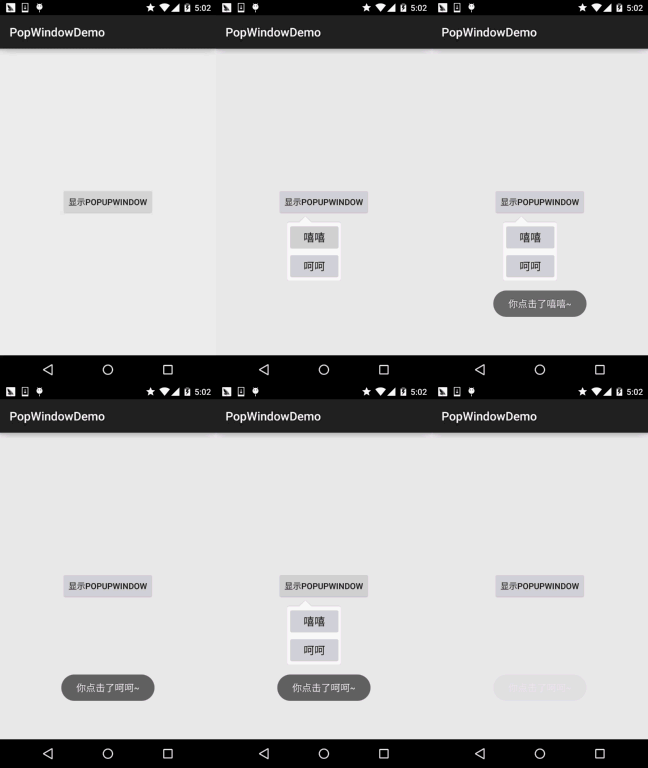
**运行效果图**:

**实现关键代码**:
先贴下动画文件:**anim_pop.xml**:
```
<?xml version="1.0" encoding="utf-8"?>
<set xmlns:android="http://schemas.android.com/apk/res/android">
<alpha android:fromAlpha="0"
android:toAlpha="1"
android:duration="2000">
</alpha>
</set>
```
接着是popupWindow的布局:**item_popip.xml**:
```
<?xml version="1.0" encoding="utf-8"?>
<LinearLayout xmlns:android="http://schemas.android.com/apk/res/android"
android:layout_width="match_parent"
android:layout_height="match_parent"
android:background="@drawable/ic_pop_bg"
android:orientation="vertical">
<Button
android:id="@+id/btn_xixi"
android:layout_width="wrap_content"
android:layout_height="wrap_content"
android:padding="5dp"
android:text="嘻嘻"
android:textSize="18sp" />
<Button
android:id="@+id/btn_hehe"
android:layout_width="wrap_content"
android:layout_height="wrap_content"
android:padding="5dp"
android:text="呵呵"
android:textSize="18sp" />
</LinearLayout>
```
**MainActivity.java**:
```
public class MainActivity extends AppCompatActivity {
private Button btn_show;
private Context mContext;
@Override
protected void onCreate(Bundle savedInstanceState) {
super.onCreate(savedInstanceState);
setContentView(R.layout.activity_main);
mContext = MainActivity.this;
btn_show = (Button) findViewById(R.id.btn_show);
btn_show.setOnClickListener(new View.OnClickListener() {
@Override
public void onClick(View v) {
initPopWindow(v);
}
});
}
private void initPopWindow(View v) {
View view = LayoutInflater.from(mContext).inflate(R.layout.item_popup, null, false);
Button btn_xixi = (Button) view.findViewById(R.id.btn_xixi);
Button btn_hehe = (Button) view.findViewById(R.id.btn_hehe);
//1.构造一个PopupWindow,参数依次是加载的View,宽高
final PopupWindow popWindow = new PopupWindow(view,
ViewGroup.LayoutParams.WRAP_CONTENT, ViewGroup.LayoutParams.WRAP_CONTENT, true);
popWindow.setAnimationStyle(R.anim.anim_pop); //设置加载动画
//这些为了点击非PopupWindow区域,PopupWindow会消失的,如果没有下面的
//代码的话,你会发现,当你把PopupWindow显示出来了,无论你按多少次后退键
//PopupWindow并不会关闭,而且退不出程序,加上下述代码可以解决这个问题
popWindow.setTouchable(true);
popWindow.setTouchInterceptor(new View.OnTouchListener() {
@Override
public boolean onTouch(View v, MotionEvent event) {
return false;
// 这里如果返回true的话,touch事件将被拦截
// 拦截后 PopupWindow的onTouchEvent不被调用,这样点击外部区域无法dismiss
}
});
popWindow.setBackgroundDrawable(new ColorDrawable(0x00000000)); //要为popWindow设置一个背景才有效
//设置popupWindow显示的位置,参数依次是参照View,x轴的偏移量,y轴的偏移量
popWindow.showAsDropDown(v, 50, 0);
//设置popupWindow里的按钮的事件
btn_xixi.setOnClickListener(new View.OnClickListener() {
@Override
public void onClick(View v) {
Toast.makeText(MainActivity.this, "你点击了嘻嘻~", Toast.LENGTH_SHORT).show();
}
});
btn_hehe.setOnClickListener(new View.OnClickListener() {
@Override
public void onClick(View v) {
Toast.makeText(MainActivity.this, "你点击了呵呵~", Toast.LENGTH_SHORT).show();
popWindow.dismiss();
}
});
}
}
```
## 3.示例代码下载
[PopWindowDemo.zip](http://www.runoob.com/wp-content/uploads/2015/10/PopWindowDemo.zip)
## 本节小结:
> 时间关系,并没有想到好一点的示例,就写了一个简单的demo,应该能满足简单的需要,另外 如果想深入研究下PopupWindow的话可看下述的参考文献:
> [Android PopupWindow的使用和分析](http://www.cnblogs.com/mengdd/p/3569127.html)
> [Android PopupWindow详解](http://www.jcodecraeer.com/a/anzhuokaifa/androidkaifa/2014/0702/1627.html)
> 嗯,就说这么多,谢谢~
- 1.0 Android基础入门教程
- 1.0.1 2015年最新Android基础入门教程目录
- 1.1 背景相关与系统架构分析
- 1.2 开发环境搭建
- 1.2.1 使用Eclipse + ADT + SDK开发Android APP
- 1.2.2 使用Android Studio开发Android APP
- 1.3 SDK更新不了问题解决
- 1.4 Genymotion模拟器安装
- 1.5.1 Git使用教程之本地仓库的基本操作
- 1.5.2 Git之使用GitHub搭建远程仓库
- 1.6 .9(九妹)图片怎么玩
- 1.7 界面原型设计
- 1.8 工程相关解析(各种文件,资源访问)
- 1.9 Android程序签名打包
- 1.11 反编译APK获取代码&资源
- 2.1 View与ViewGroup的概念
- 2.2.1 LinearLayout(线性布局)
- 2.2.2 RelativeLayout(相对布局)
- 2.2.3 TableLayout(表格布局)
- 2.2.4 FrameLayout(帧布局)
- 2.2.5 GridLayout(网格布局)
- 2.2.6 AbsoluteLayout(绝对布局)
- 2.3.1 TextView(文本框)详解
- 2.3.2 EditText(输入框)详解
- 2.3.3 Button(按钮)与ImageButton(图像按钮)
- 2.3.4 ImageView(图像视图)
- 2.3.5.RadioButton(单选按钮)&Checkbox(复选框)
- 2.3.6 开关按钮ToggleButton和开关Switch
- 2.3.7 ProgressBar(进度条)
- 2.3.8 SeekBar(拖动条)
- 2.3.9 RatingBar(星级评分条)
- 2.4.1 ScrollView(滚动条)
- 2.4.2 Date & Time组件(上)
- 2.4.3 Date & Time组件(下)
- 2.4.4 Adapter基础讲解
- 2.4.5 ListView简单实用
- 2.4.6 BaseAdapter优化
- 2.4.7ListView的焦点问题
- 2.4.8 ListView之checkbox错位问题解决
- 2.4.9 ListView的数据更新问题
- 2.5.0 构建一个可复用的自定义BaseAdapter
- 2.5.1 ListView Item多布局的实现
- 2.5.2 GridView(网格视图)的基本使用
- 2.5.3 Spinner(列表选项框)的基本使用
- 2.5.4 AutoCompleteTextView(自动完成文本框)的基本使用
- 2.5.5 ExpandableListView(可折叠列表)的基本使用
- 2.5.6 ViewFlipper(翻转视图)的基本使用
- 2.5.7 Toast(吐司)的基本使用
- 2.5.8 Notification(状态栏通知)详解
- 2.5.9 AlertDialog(对话框)详解
- 2.6.0 其他几种常用对话框基本使用
- 2.6.1 PopupWindow(悬浮框)的基本使用
- 2.6.2 菜单(Menu)
- 2.6.3 ViewPager的简单使用
- 2.6.4 DrawerLayout(官方侧滑菜单)的简单使用
- 3.1.1 基于监听的事件处理机制
- 3.2 基于回调的事件处理机制
- 3.3 Handler消息传递机制浅析
- 3.4 TouchListener PK OnTouchEvent + 多点触碰
- 3.5 监听EditText的内容变化
- 3.6 响应系统设置的事件(Configuration类)
- 3.7 AnsyncTask异步任务
- 3.8 Gestures(手势)
- 4.1.1 Activity初学乍练
- 4.1.2 Activity初窥门径
- 4.1.3 Activity登堂入室
- 4.2.1 Service初涉
- 4.2.2 Service进阶
- 4.2.3 Service精通
- 4.3.1 BroadcastReceiver牛刀小试
- 4.3.2 BroadcastReceiver庖丁解牛
- 4.4.2 ContentProvider再探——Document Provider
- 4.5.1 Intent的基本使用
- 4.5.2 Intent之复杂数据的传递
- 5.1 Fragment基本概述
- 5.2.1 Fragment实例精讲——底部导航栏的实现(方法1)
- 5.2.2 Fragment实例精讲——底部导航栏的实现(方法2)
- 5.2.3 Fragment实例精讲——底部导航栏的实现(方法3)
- 5.2.4 Fragment实例精讲——底部导航栏+ViewPager滑动切换页面
- 5.2.5 Fragment实例精讲——新闻(购物)类App列表Fragment的简单实现
- 6.1 数据存储与访问之——文件存储读写
- 6.2 数据存储与访问之——SharedPreferences保存用户偏好参数
- 6.3.1 数据存储与访问之——初见SQLite数据库
- 6.3.2 数据存储与访问之——又见SQLite数据库
- 7.1.1 Android网络编程要学的东西与Http协议学习
- 7.1.2 Android Http请求头与响应头的学习
- 7.1.3 Android HTTP请求方式:HttpURLConnection
- 7.1.4 Android HTTP请求方式:HttpClient
- 7.2.1 Android XML数据解析
- 7.2.2 Android JSON数据解析
- 7.3.1 Android 文件上传
- 7.3.2 Android 文件下载(1)
- 7.3.3 Android 文件下载(2)
- 7.4 Android 调用 WebService
- 7.5.1 WebView(网页视图)基本用法
- 7.5.2 WebView和JavaScrip交互基础
- 7.5.3 Android 4.4后WebView的一些注意事项
- 7.5.4 WebView文件下载
- 7.5.5 WebView缓存问题
- 7.5.6 WebView处理网页返回的错误码信息
- 7.6.1 Socket学习网络基础准备
- 7.6.2 基于TCP协议的Socket通信(1)
- 7.6.3 基于TCP协议的Socket通信(2)
- 7.6.4 基于UDP协议的Socket通信
- 8.1.1 Android中的13种Drawable小结 Part 1
- 8.1.2 Android中的13种Drawable小结 Part 2
- 8.1.3 Android中的13种Drawable小结 Part 3
- 8.2.1 Bitmap(位图)全解析 Part 1
- 8.2.2 Bitmap引起的OOM问题
- 8.3.1 三个绘图工具类详解
- 8.3.2 绘图类实战示例
- 8.3.3 Paint API之—— MaskFilter(面具)
- 8.3.4 Paint API之—— Xfermode与PorterDuff详解(一)
- 8.3.5 Paint API之—— Xfermode与PorterDuff详解(二)
- 8.3.6 Paint API之—— Xfermode与PorterDuff详解(三)
- 8.3.7 Paint API之—— Xfermode与PorterDuff详解(四)
- 8.3.8 Paint API之—— Xfermode与PorterDuff详解(五)
- 8.3.9 Paint API之—— ColorFilter(颜色过滤器)(1/3)
- 8.3.10 Paint API之—— ColorFilter(颜色过滤器)(2-3)
- 8.3.11 Paint API之—— ColorFilter(颜色过滤器)(3-3)
- 8.3.12 Paint API之—— PathEffect(路径效果)
- 8.3.13 Paint API之—— Shader(图像渲染)
- 8.3.14 Paint几个枚举/常量值以及ShadowLayer阴影效果
- 8.3.15 Paint API之——Typeface(字型)
- 8.3.16 Canvas API详解(Part 1)
- 8.3.17 Canvas API详解(Part 2)剪切方法合集
- 8.3.18 Canvas API详解(Part 3)Matrix和drawBitmapMash
- 8.4.1 Android动画合集之帧动画
- 8.4.2 Android动画合集之补间动画
- 8.4.3 Android动画合集之属性动画-初见
- 8.4.4 Android动画合集之属性动画-又见
- 9.1 使用SoundPool播放音效(Duang~)
- 9.2 MediaPlayer播放音频与视频
- 9.3 使用Camera拍照
- 9.4 使用MediaRecord录音
- 10.1 TelephonyManager(电话管理器)
- 10.2 SmsManager(短信管理器)
- 10.3 AudioManager(音频管理器)
- 10.4 Vibrator(振动器)
- 10.5 AlarmManager(闹钟服务)
- 10.6 PowerManager(电源服务)
- 10.7 WindowManager(窗口管理服务)
- 10.8 LayoutInflater(布局服务)
- 10.9 WallpaperManager(壁纸管理器)
- 10.10 传感器专题(1)——相关介绍
- 10.11 传感器专题(2)——方向传感器
- 10.12 传感器专题(3)——加速度/陀螺仪传感器
- 10.12 传感器专题(4)——其他传感器了解
- 10.14 Android GPS初涉
- 11.0《2015最新Android基础入门教程》完结散花~
