# 1. 前言
对于滑动菜单,其实也就是常见的侧滑。
# 2. 实现
它是一个布局,在布局中允许放入两个直接子控件:第一个子控件是主屏幕中显示的内容,第二个子控件是滑动菜单中显示的内容。
~~~
<?xml version="1.0" encoding="utf-8"?>
<androidx.drawerlayout.widget.DrawerLayout xmlns:android="http://schemas.android.com/apk/res/android"
xmlns:tools="http://schemas.android.com/tools"
xmlns:app="http://schemas.android.com/apk/res-auto"
android:layout_width="match_parent"
android:layout_height="match_parent"
tools:context=".MainActivity"
>
<!--使用FAB,需要使用androidx.coordinatorlayout.widget.CoordinatorLayout包裹起来-->
<androidx.coordinatorlayout.widget.CoordinatorLayout
android:layout_width="match_parent"
android:layout_height="match_parent">
<!--引入下拉刷新控件-->
<androidx.swiperefreshlayout.widget.SwipeRefreshLayout
android:id="@+id/swiperefreshLayout"
android:layout_width="match_parent"
android:layout_height="match_parent"
>
<!-- 将内容包裹起来 -->
<TextView
android:layout_width="wrap_content"
android:layout_height="?attr/actionBarSize"
android:text="测试下拉刷新"
/>
</androidx.swiperefreshlayout.widget.SwipeRefreshLayout>
<com.google.android.material.floatingactionbutton.FloatingActionButton
android:layout_width="wrap_content"
android:layout_height="wrap_content"
android:src="@drawable/ic_baseline_add_24"
app:elevation="8dp"
android:layout_gravity="bottom|end"
android:layout_margin="16dp"
/>
</androidx.coordinatorlayout.widget.CoordinatorLayout>
<!--侧滑菜单内容-->
<TextView
android:layout_width="match_parent"
android:background="@color/black"
android:layout_height="match_parent"
android:layout_gravity="start"
android:text="@string/app_name"
android:textColor="@color/white"
/>
</androidx.drawerlayout.widget.DrawerLayout>
~~~
`layout_gravity`这个属性是必须指定的,因为我们需要告诉`DrawerLayout`滑动菜单是在屏幕的左边还是右边,指定`left`表示滑动菜单在左边,指定`right`表示滑动菜单在右边。这里我指定了`start`,表示会根据系统语言进行判断,如果系统语言是从左往右的,比如英语、汉语,滑动菜单就在左边,如果系统语言是从右往左的,比如阿拉伯语,滑动菜单就在右边。
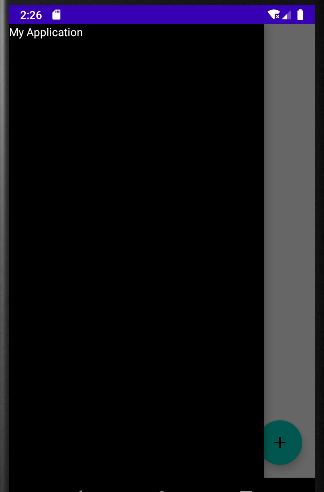
侧滑后效果:

# 3. 加入导航按钮
很多用户可能根本就不知道有这个功能,所以可以在`Toolbar`的最左边加入一个导航按钮,点击按钮也会将滑动菜单的内容展示出来。那么,这里需要将`Toolbar`加入到这个布局文件中:
~~~
<?xml version="1.0" encoding="utf-8"?>
<androidx.drawerlayout.widget.DrawerLayout xmlns:android="http://schemas.android.com/apk/res/android"
xmlns:app="http://schemas.android.com/apk/res-auto"
xmlns:tools="http://schemas.android.com/tools"
android:layout_width="match_parent"
android:layout_height="match_parent"
tools:context=".MainActivity">
<!--使用FAB,需要使用androidx.coordinatorlayout.widget.CoordinatorLayout包裹起来-->
<androidx.coordinatorlayout.widget.CoordinatorLayout
android:layout_width="match_parent"
android:layout_height="match_parent">
<!-- 将内容包裹起来 -->
<androidx.appcompat.widget.Toolbar
android:id="@+id/toolbar"
android:layout_width="match_parent"
android:layout_height="?attr/actionBarSize"
android:background="@color/teal_200"></androidx.appcompat.widget.Toolbar>
<!--引入下拉刷新控件-->
<androidx.swiperefreshlayout.widget.SwipeRefreshLayout
android:id="@+id/swiperefreshLayout"
android:layout_width="match_parent"
android:layout_height="match_parent"
android:layout_marginTop="?attr/actionBarSize">
<!--下拉刷新的内容-->
<TextView
android:layout_width="wrap_content"
android:layout_height="?attr/actionBarSize"
android:text="测试下拉刷新" />
</androidx.swiperefreshlayout.widget.SwipeRefreshLayout>
<!--FAB悬浮按钮-->
<com.google.android.material.floatingactionbutton.FloatingActionButton
android:layout_width="wrap_content"
android:layout_height="wrap_content"
android:layout_gravity="bottom|end"
android:layout_margin="16dp"
android:src="@drawable/ic_baseline_add_24"
app:elevation="8dp" />
</androidx.coordinatorlayout.widget.CoordinatorLayout>
<!--侧滑菜单内容-->
<TextView
android:layout_width="match_parent"
android:layout_height="match_parent"
android:layout_gravity="start"
android:background="@color/black"
android:text="@string/app_name"
android:textColor="@color/white" />
</androidx.drawerlayout.widget.DrawerLayout>
~~~
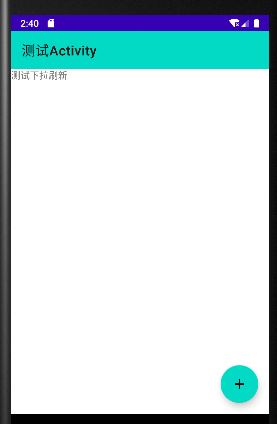
此时效果:

然后,我们需要在`Toolbar`的左边加入一个菜单图标。对应的代码:
~~~
class TestActivity : AppCompatActivity() {
// 找到控件
val swiperefreshLayout by lazy { findViewById<SwipeRefreshLayout>(R.id.swiperefreshLayout) }
val toolbar by lazy { findViewById<Toolbar>(R.id.toolbar) }
val drawerlayout by lazy { findViewById<DrawerLayout>(R.id.drawerlayout) }
override fun onCreate(savedInstanceState: Bundle?) {
super.onCreate(savedInstanceState)
setContentView(R.layout.activity_test)
// 设置下拉刷新的圆圈的颜色
swiperefreshLayout.setColorSchemeResources(R.color.purple_700)
// 模拟数据耗时请求
swiperefreshLayout.setOnRefreshListener {
refershData()
}
// 设置Toolbar
setSupportActionBar(toolbar)
supportActionBar?.setDisplayHomeAsUpEnabled(true)
toolbar.setNavigationIcon(R.drawable.ic_baseline_menu_24)
toolbar.setNavigationOnClickListener {
// 打开侧滑
drawerlayout.openDrawer(GravityCompat.START)
}
}
fun refershData() {
// 模拟请求,耗时两秒结束
thread {
Thread.sleep(2000)
runOnUiThread {
// 设置停止下拉刷新
swiperefreshLayout.isRefreshing = false
}
}
}
}
~~~
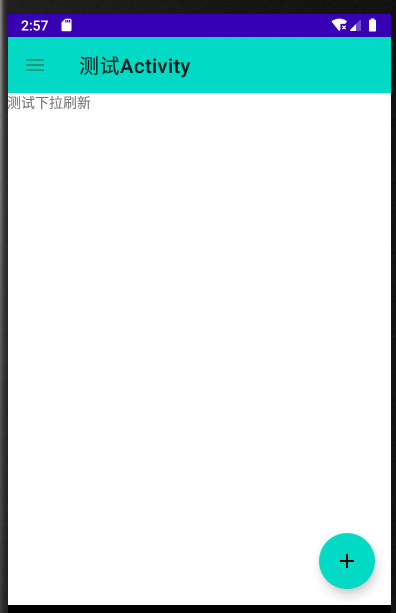
效果:

点击左边的菜单按钮可以显示侧滑菜单。当然,对于事件的监听还是可以使用`Toolbar`中介绍的:
~~~
override fun onOptionsItemSelected(item: MenuItem): Boolean {
// item.itemId
}
~~~
- 介绍
- UI
- MaterialButton
- MaterialButtonToggleGroup
- 字体相关设置
- Material Design
- Toolbar
- 下拉刷新
- 可折叠式标题栏
- 悬浮按钮
- 滑动菜单DrawerLayout
- NavigationView
- 可交互提示
- CoordinatorLayout
- 卡片式布局
- 搜索框SearchView
- 自定义View
- 简单封装单选
- RecyclerView
- xml设置点击样式
- adb
- 连接真机
- 小技巧
- 通过字符串ID获取资源
- 自定义View组件
- 使用系统控件重新组合
- 旋转菜单
- 轮播图
- 下拉输入框
- 自定义VIew
- 图片组合的开关按钮
- 自定义ViewPager
- 联系人快速索引案例
- 使用ListView定义侧滑菜单
- 下拉粘黏效果
- 滑动冲突
- 滑动冲突之非同向冲突
- onMeasure
- 绘制字体
- 设置画笔Paint
- 贝赛尔曲线
- Invalidate和PostInvalidate
- super.onTouchEvent(event)?
- setShadowLayer与阴影效果
- Shader
- ImageView的scaleType属性
- 渐变
- LinearGradient
- 图像混合模式
- PorterDuffXfermode
- 橡皮擦效果
- Matrix
- 离屏绘制
- Canvas和图层
- Canvas简介
- Canvas中常用操作总结
- Shape
- 圆角属性
- Android常见动画
- Android动画简介
- View动画
- 自定义View动画
- View动画的特殊使用场景
- LayoutAnimation
- Activity的切换转场效果
- 属性动画
- 帧动画
- 属性动画监听
- 插值器和估值器
- 工具
- dp和px的转换
- 获取屏幕宽高
- JNI
- javah命令
- C和Java相互调用
- WebView
- Android Studio快捷键
- Bitmap和Drawable图像
- Bitmap简要介绍
- 图片缩放和裁剪效果
- 创建指定颜色的Bitmap图像
- Gradle本地仓库
- Gradle小技巧
- RxJava+Okhttp+Retrofit构建网络模块
- 服务器相关配置
- node环境配置
- 3D特效
