资源文件都可以在百度云盘中找到:
链接:https://pan.baidu.com/s/1EegFNEv6X2yqi6cJ9iStJQ
提取码:f6zp
___
为了实现下拉框,这里首先定义主布局文件:
~~~
<?xml version="1.0" encoding="utf-8"?>
<RelativeLayout xmlns:android="http://schemas.android.com/apk/res/android"
xmlns:tools="http://schemas.android.com/tools"
android:layout_width="match_parent"
android:layout_height="match_parent"
tools:context=".MainActivity">
<EditText
android:hint="请输入内容"
android:id="@+id/editText"
android:layout_centerInParent="true"
android:layout_width="wrap_content"
android:layout_height="wrap_content"
android:paddingRight="42dp" />
<ImageView
android:layout_width="wrap_content"
android:layout_height="wrap_content"
android:src="@drawable/down_arrow"
android:layout_alignRight="@id/editText"
android:layout_alignTop="@id/editText"
>
</ImageView>
</RelativeLayout>
~~~
对应效果:

然后就需要为其添加动态点击事件,以及弹出窗口,对于弹出窗口这里使用popupwindow。也就是在下拉图片点击的时候,就弹出菜单:
~~~
/**
* 下拉框
*/
class MainActivity : AppCompatActivity() {
val editText by lazy {findViewById<EditText>(R.id.editText)}
val imageview by lazy {findViewById<ImageView>(R.id.imageview)}
var listView: ListView? = null
var popupWindow: PopupWindow? = null
val datas = listOf("123", "测试", "123", "测试", "123", "测试")
override fun onCreate(savedInstanceState: Bundle?) {
super.onCreate(savedInstanceState)
setContentView(R.layout.activity_main)
listView = ListView(this)
listView?.adapter = MyListViewAdapter(this, R.layout.item, datas.toMutableList())
imageview.setOnClickListener(object : View.OnClickListener{
override fun onClick(v: View?) {
// 创建PopupWindow
if(popupWindow == null){
popupWindow = PopupWindow()
popupWindow?.width = editText.width
popupWindow?.height = dp2pix(200f)
// 指定了布局为动态创建的ListView
popupWindow?.contentView = listView
popupWindow?.isFocusable = true // 设置焦点,系统就会把各种事件交给popup来处理
}
popupWindow?.showAsDropDown(editText, 0, 0)
}
})
}
fun dp2pix(value: Float): Int{
return (resources.displayMetrics.density * value).toInt()
}
}
~~~
由于我们在上面代码中指定了popupWindow的布局为一个ListView,这里我们就需要定义一个适配器对象:
~~~
class MyListViewAdapter(context: Context, resource: Int, datas: MutableList<String>): BaseAdapter(){
var mCtx: Context = context
var mDatas: MutableList<String> = datas
var mResId: Int = resource
override fun getCount(): Int {
return mDatas.size
}
override fun getItem(position: Int): Any {
return position
}
override fun getItemId(position: Int): Long {
return position.toLong()
}
override fun getView(position: Int, convertView: View?, parent: ViewGroup?): View {
var view: MyViewHolder? = null
var tempView: View? = null
if(convertView == null){
tempView = View.inflate(mCtx, mResId, null) as View
view = MyViewHolder()
view.title = tempView.findViewById<TextView>(R.id.textView)
view.delete = tempView.findViewById<ImageView>(R.id.delete)
} else {
tempView = convertView
view = tempView.getTag() as MyViewHolder
}
// 设置标题
val msg = mDatas.get(position)
view.title?.text = msg
// 设置删除按钮监听
view.delete?.setOnClickListener(object : View.OnClickListener{
override fun onClick(v: View?) {
mDatas.remove(msg)
// 通知数据发生改变
notifyDataSetChanged()
}
})
// 缓存实例化的view
tempView.setTag(view)
return tempView
}
inner class MyViewHolder{
var delete: ImageView? = null
var title: TextView? = null
}
}
~~~
当然这里按道理应该使用RecyclerView,因为是巩固和复习一下kotlin这个语言,所以选择了使用ListView。对应的布局item.xml:
~~~
<LinearLayout xmlns:android="http://schemas.android.com/apk/res/android"
xmlns:app="http://schemas.android.com/apk/res-auto"
android:layout_width="match_parent"
android:orientation="horizontal"
android:layout_height="match_parent">
<TextView
android:id="@+id/textView"
android:layout_width="wrap_content"
android:layout_height="wrap_content"
android:padding="10dp"
android:text="请输入内容"
android:layout_weight="4"
android:layout_gravity="center"
android:textColor="@color/black"
android:textSize="20sp"/>
<ImageView
android:id="@+id/delete"
android:layout_weight="1"
android:layout_gravity="center"
android:layout_width="wrap_content"
android:layout_height="wrap_content"
app:srcCompat="@drawable/delete" />
</LinearLayout>
~~~
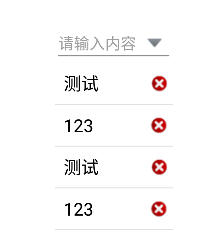
最终效果就是点击下拉框可展开,然后弹出一个下拉框:

点击X可以进行该项的移除,当然也可以为每项添加一个事件,然后为EditText赋值:
~~~
listView?.setOnItemClickListener(object :AdapterView.OnItemClickListener{
override fun onItemClick(
parent: AdapterView<*>?,
view: View?,
position: Int,
id: Long
) {
editText.setText(datas[position])
// 关闭窗口
popupWindow?.apply {
if(isShowing){
popupWindow?.dismiss()
popupWindow = null
}
}
}
})
~~~
- 介绍
- UI
- MaterialButton
- MaterialButtonToggleGroup
- 字体相关设置
- Material Design
- Toolbar
- 下拉刷新
- 可折叠式标题栏
- 悬浮按钮
- 滑动菜单DrawerLayout
- NavigationView
- 可交互提示
- CoordinatorLayout
- 卡片式布局
- 搜索框SearchView
- 自定义View
- 简单封装单选
- RecyclerView
- xml设置点击样式
- adb
- 连接真机
- 小技巧
- 通过字符串ID获取资源
- 自定义View组件
- 使用系统控件重新组合
- 旋转菜单
- 轮播图
- 下拉输入框
- 自定义VIew
- 图片组合的开关按钮
- 自定义ViewPager
- 联系人快速索引案例
- 使用ListView定义侧滑菜单
- 下拉粘黏效果
- 滑动冲突
- 滑动冲突之非同向冲突
- onMeasure
- 绘制字体
- 设置画笔Paint
- 贝赛尔曲线
- Invalidate和PostInvalidate
- super.onTouchEvent(event)?
- setShadowLayer与阴影效果
- Shader
- ImageView的scaleType属性
- 渐变
- LinearGradient
- 图像混合模式
- PorterDuffXfermode
- 橡皮擦效果
- Matrix
- 离屏绘制
- Canvas和图层
- Canvas简介
- Canvas中常用操作总结
- Shape
- 圆角属性
- Android常见动画
- Android动画简介
- View动画
- 自定义View动画
- View动画的特殊使用场景
- LayoutAnimation
- Activity的切换转场效果
- 属性动画
- 帧动画
- 属性动画监听
- 插值器和估值器
- 工具
- dp和px的转换
- 获取屏幕宽高
- JNI
- javah命令
- C和Java相互调用
- WebView
- Android Studio快捷键
- Bitmap和Drawable图像
- Bitmap简要介绍
- 图片缩放和裁剪效果
- 创建指定颜色的Bitmap图像
- Gradle本地仓库
- Gradle小技巧
- RxJava+Okhttp+Retrofit构建网络模块
- 服务器相关配置
- node环境配置
- 3D特效
