
[TOC]
### 1\. 安装环境要求
> you need to install Storm's dependencies on Nimbus and the worker machines. These are:
>
> 1. Java 7+ (Apache Storm 1.x is tested through travis ci against both java 7 and java 8 JDKs)
> 2. Python 2.6.6 (Python 3.x should work too, but is not tested as part of our CI enviornment)
按照[官方文档](http://storm.apache.org/releases/1.2.2/Setting-up-a-Storm-cluster.html) 的说明:storm 运行依赖于 Java 7+ 和 Python 2.6.6 +,所以需要预先安装这两个软件。由于这两个软件在多个框架中都有依赖,其安装步骤单独整理至 :
* [Linux 环境下 JDK 安装](https://github.com/heibaiying/BigData-Notes/blob/master/notes/installation/Linux%E4%B8%8BJDK%E5%AE%89%E8%A3%85.md)
* [Linux 环境下 Python 安装](https://github.com/heibaiying/BigData-Notes/blob/master/notes/installation/Linux%E4%B8%8BPython%E5%AE%89%E8%A3%85.md)
### 2\. 下载并解压
下载并解压,官方下载地址:[storm.apache.org/downloads.h…](http://storm.apache.org/downloads.html)
~~~
# tar -zxvf apache-storm-1.2.2.tar.gz
~~~
### 3\. 配置环境变量
~~~
# vim /etc/profile
~~~
添加环境变量:
~~~
export STORM_HOME=/usr/app/apache-storm-1.2.2
export PATH=$STORM_HOME/bin:$PATH
复制代码
~~~
使得配置的环境变量生效:
~~~
# source /etc/profile
~~~
### 4\. 启动相关进程
因为要启动多个进程,所以统一采用后台进程的方式启动。进入到 `${STORM_HOME}/bin` 目录下,依次执行下面的命令:
~~~
# 启动zookeeper
nohup sh storm dev-zookeeper &
# 启动主节点 nimbus
nohup sh storm nimbus &
# 启动从节点 supervisor
nohup sh storm supervisor &
# 启动UI界面 ui
nohup sh storm ui &
# 启动日志查看服务 logviewer
nohup sh storm logviewer &
~~~
### 5\. 验证是否启动成功
验证方式一:jps 查看进程:
~~~
[root@hadoop001 app]# jps
1074 nimbus
1283 Supervisor
620 dev_zookeeper
1485 core
9630 logviewer
~~~
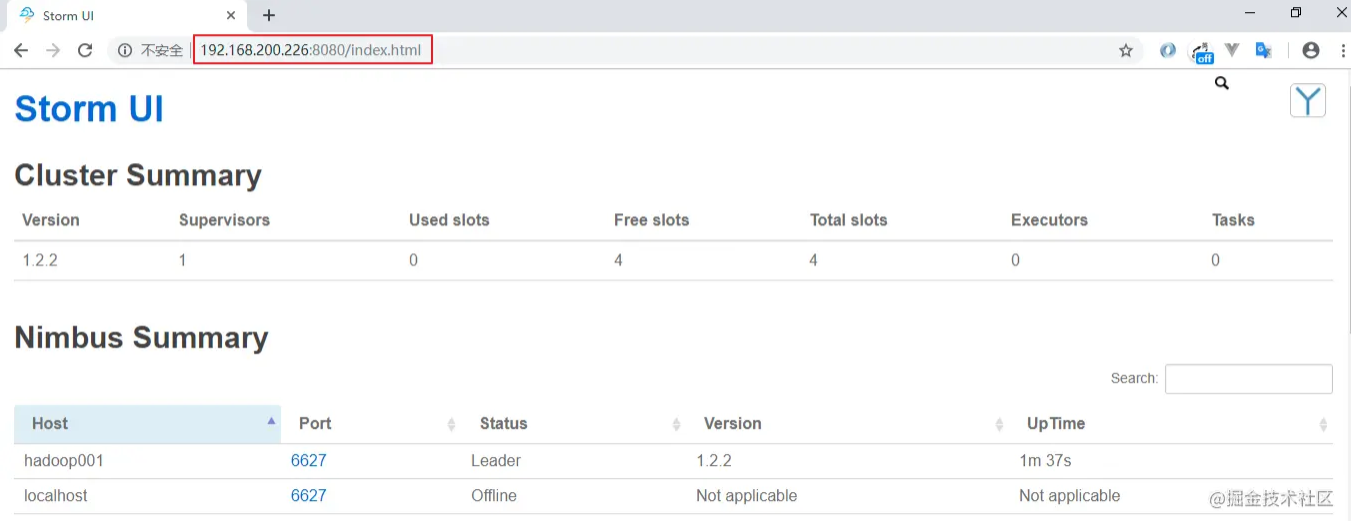
验证方式二: 访问 8080 端口,查看 Web-UI 界面:
作者:heibaiying
链接:https://juejin.cn/post/6844903950035091464
来源:掘金
著作权归作者所有。商业转载请联系作者获得授权,非商业转载请注明出处。
- 一.JVM
- 1.1 java代码是怎么运行的
- 1.2 JVM的内存区域
- 1.3 JVM运行时内存
- 1.4 JVM内存分配策略
- 1.5 JVM类加载机制与对象的生命周期
- 1.6 常用的垃圾回收算法
- 1.7 JVM垃圾收集器
- 1.8 CMS垃圾收集器
- 1.9 G1垃圾收集器
- 2.面试相关文章
- 2.1 可能是把Java内存区域讲得最清楚的一篇文章
- 2.0 GC调优参数
- 2.1GC排查系列
- 2.2 内存泄漏和内存溢出
- 2.2.3 深入理解JVM-hotspot虚拟机对象探秘
- 1.10 并发的可达性分析相关问题
- 二.Java集合架构
- 1.ArrayList深入源码分析
- 2.Vector深入源码分析
- 3.LinkedList深入源码分析
- 4.HashMap深入源码分析
- 5.ConcurrentHashMap深入源码分析
- 6.HashSet,LinkedHashSet 和 LinkedHashMap
- 7.容器中的设计模式
- 8.集合架构之面试指南
- 9.TreeSet和TreeMap
- 三.Java基础
- 1.基础概念
- 1.1 Java程序初始化的顺序是怎么样的
- 1.2 Java和C++的区别
- 1.3 反射
- 1.4 注解
- 1.5 泛型
- 1.6 字节与字符的区别以及访问修饰符
- 1.7 深拷贝与浅拷贝
- 1.8 字符串常量池
- 2.面向对象
- 3.关键字
- 4.基本数据类型与运算
- 5.字符串与数组
- 6.异常处理
- 7.Object 通用方法
- 8.Java8
- 8.1 Java 8 Tutorial
- 8.2 Java 8 数据流(Stream)
- 8.3 Java 8 并发教程:线程和执行器
- 8.4 Java 8 并发教程:同步和锁
- 8.5 Java 8 并发教程:原子变量和 ConcurrentMap
- 8.6 Java 8 API 示例:字符串、数值、算术和文件
- 8.7 在 Java 8 中避免 Null 检查
- 8.8 使用 Intellij IDEA 解决 Java 8 的数据流问题
- 四.Java 并发编程
- 1.线程的实现/创建
- 2.线程生命周期/状态转换
- 3.线程池
- 4.线程中的协作、中断
- 5.Java锁
- 5.1 乐观锁、悲观锁和自旋锁
- 5.2 Synchronized
- 5.3 ReentrantLock
- 5.4 公平锁和非公平锁
- 5.3.1 说说ReentrantLock的实现原理,以及ReentrantLock的核心源码是如何实现的?
- 5.5 锁优化和升级
- 6.多线程的上下文切换
- 7.死锁的产生和解决
- 8.J.U.C(java.util.concurrent)
- 0.简化版(快速复习用)
- 9.锁优化
- 10.Java 内存模型(JMM)
- 11.ThreadLocal详解
- 12 CAS
- 13.AQS
- 0.ArrayBlockingQueue和LinkedBlockingQueue的实现原理
- 1.DelayQueue的实现原理
- 14.Thread.join()实现原理
- 15.PriorityQueue 的特性和原理
- 16.CyclicBarrier的实际使用场景
- 五.Java I/O NIO
- 1.I/O模型简述
- 2.Java NIO之缓冲区
- 3.JAVA NIO之文件通道
- 4.Java NIO之套接字通道
- 5.Java NIO之选择器
- 6.基于 Java NIO 实现简单的 HTTP 服务器
- 7.BIO-NIO-AIO
- 8.netty(一)
- 9.NIO面试题
- 六.Java设计模式
- 1.单例模式
- 2.策略模式
- 3.模板方法
- 4.适配器模式
- 5.简单工厂
- 6.门面模式
- 7.代理模式
- 七.数据结构和算法
- 1.什么是红黑树
- 2.二叉树
- 2.1 二叉树的前序、中序、后序遍历
- 3.排序算法汇总
- 4.java实现链表及链表的重用操作
- 4.1算法题-链表反转
- 5.图的概述
- 6.常见的几道字符串算法题
- 7.几道常见的链表算法题
- 8.leetcode常见算法题1
- 9.LRU缓存策略
- 10.二进制及位运算
- 10.1.二进制和十进制转换
- 10.2.位运算
- 11.常见链表算法题
- 12.算法好文推荐
- 13.跳表
- 八.Spring 全家桶
- 1.Spring IOC
- 2.Spring AOP
- 3.Spring 事务管理
- 4.SpringMVC 运行流程和手动实现
- 0.Spring 核心技术
- 5.spring如何解决循环依赖问题
- 6.springboot自动装配原理
- 7.Spring中的循环依赖解决机制中,为什么要三级缓存,用二级缓存不够吗
- 8.beanFactory和factoryBean有什么区别
- 九.数据库
- 1.mybatis
- 1.1 MyBatis-# 与 $ 区别以及 sql 预编译
- Mybatis系列1-Configuration
- Mybatis系列2-SQL执行过程
- Mybatis系列3-之SqlSession
- Mybatis系列4-之Executor
- Mybatis系列5-StatementHandler
- Mybatis系列6-MappedStatement
- Mybatis系列7-参数设置揭秘(ParameterHandler)
- Mybatis系列8-缓存机制
- 2.浅谈聚簇索引和非聚簇索引的区别
- 3.mysql 证明为什么用limit时,offset很大会影响性能
- 4.MySQL中的索引
- 5.数据库索引2
- 6.面试题收集
- 7.MySQL行锁、表锁、间隙锁详解
- 8.数据库MVCC详解
- 9.一条SQL查询语句是如何执行的
- 10.MySQL 的 crash-safe 原理解析
- 11.MySQL 性能优化神器 Explain 使用分析
- 12.mysql中,一条update语句执行的过程是怎么样的?期间用到了mysql的哪些log,分别有什么作用
- 十.Redis
- 0.快速复习回顾Redis
- 1.通俗易懂的Redis数据结构基础教程
- 2.分布式锁(一)
- 3.分布式锁(二)
- 4.延时队列
- 5.位图Bitmaps
- 6.Bitmaps(位图)的使用
- 7.Scan
- 8.redis缓存雪崩、缓存击穿、缓存穿透
- 9.Redis为什么是单线程、及高并发快的3大原因详解
- 10.布隆过滤器你值得拥有的开发利器
- 11.Redis哨兵、复制、集群的设计原理与区别
- 12.redis的IO多路复用
- 13.相关redis面试题
- 14.redis集群
- 十一.中间件
- 1.RabbitMQ
- 1.1 RabbitMQ实战,hello world
- 1.2 RabbitMQ 实战,工作队列
- 1.3 RabbitMQ 实战, 发布订阅
- 1.4 RabbitMQ 实战,路由
- 1.5 RabbitMQ 实战,主题
- 1.6 Spring AMQP 的 AMQP 抽象
- 1.7 Spring AMQP 实战 – 整合 RabbitMQ 发送邮件
- 1.8 RabbitMQ 的消息持久化与 Spring AMQP 的实现剖析
- 1.9 RabbitMQ必备核心知识
- 2.RocketMQ 的几个简单问题与答案
- 2.Kafka
- 2.1 kafka 基础概念和术语
- 2.2 Kafka的重平衡(Rebalance)
- 2.3.kafka日志机制
- 2.4 kafka是pull还是push的方式传递消息的?
- 2.5 Kafka的数据处理流程
- 2.6 Kafka的脑裂预防和处理机制
- 2.7 Kafka中partition副本的Leader选举机制
- 2.8 如果Leader挂了的时候,follower没来得及同步,是否会出现数据不一致
- 2.9 kafka的partition副本是否会出现脑裂情况
- 十二.Zookeeper
- 0.什么是Zookeeper(漫画)
- 1.使用docker安装Zookeeper伪集群
- 3.ZooKeeper-Plus
- 4.zk实现分布式锁
- 5.ZooKeeper之Watcher机制
- 6.Zookeeper之选举及数据一致性
- 十三.计算机网络
- 1.进制转换:二进制、八进制、十六进制、十进制之间的转换
- 2.位运算
- 3.计算机网络面试题汇总1
- 十四.Docker
- 100.面试题收集合集
- 1.美团面试常见问题总结
- 2.b站部分面试题
- 3.比心面试题
- 4.腾讯面试题
- 5.哈罗部分面试
- 6.笔记
- 十五.Storm
- 1.Storm和流处理简介
- 2.Storm 核心概念详解
- 3.Storm 单机版本环境搭建
- 4.Storm 集群环境搭建
- 5.Storm 编程模型详解
- 6.Storm 项目三种打包方式对比分析
- 7.Storm 集成 Redis 详解
- 8.Storm 集成 HDFS 和 HBase
- 9.Storm 集成 Kafka
- 十六.Elasticsearch
- 1.初识ElasticSearch
- 2.文档基本CRUD、集群健康检查
- 3.shard&replica
- 4.document核心元数据解析及ES的并发控制
- 5.document的批量操作及数据路由原理
- 6.倒排索引
- 十七.分布式相关
- 1.分布式事务解决方案一网打尽
- 2.关于xxx怎么保证高可用的问题
- 3.一致性hash原理与实现
- 4.微服务注册中心 Nacos 比 Eureka的优势
- 5.Raft 协议算法
- 6.为什么微服务架构中需要网关
- 0.CAP与BASE理论
- 十八.Dubbo
- 1.快速掌握Dubbo常规应用
- 2.Dubbo应用进阶
- 3.Dubbo调用模块详解
- 4.Dubbo调用模块源码分析
- 6.Dubbo协议模块