在使用`npm`的时候,我们加入了`--registry=https://registry.npm.taobao.org`参考,来将注册服务器指向了阿里提供的服务器。优秀的阿里同时也为我们准备了`maven`的国内服务器。本节中,我们共同学习如何将`maven`源指向阿里提供的国内服务器。
## 介绍
`MAVEN`的官方为:[https://maven.apache.org/](https://maven.apache.org/),看官方地址我们能看出来,这个东西其实是`apache`的。所以如果说官方的`maven`仓库,那也应该是`apache`的,地址如下:[https://mvnrepository.com/](https://mvnrepository.com/),习惯性的被称为中央仓库(central repository),这也是`maven`会默认查找的仓库,大多数的包都位于这个仓库上。此外`MAVEN`也是支持非中央仓库的,比如`google`仓库,`spring`仓库,还有我们今天要使用的阿里仓库。但使用非中央仓库需要一些设置,如何设置这些信息正是本节要讲的内容。设置完非中央仓库后,`maven` 在查找依赖的时候,会优先查找设置的仓库,如果找不到则会继续找中央仓库。
阿里的仓库服务[https://maven.aliyun.com/mvn/view](https://maven.aliyun.com/mvn/view),主要是为了解决由于网络造成的问题,所以其仓库的内容同步了几个主要仓库的内容:
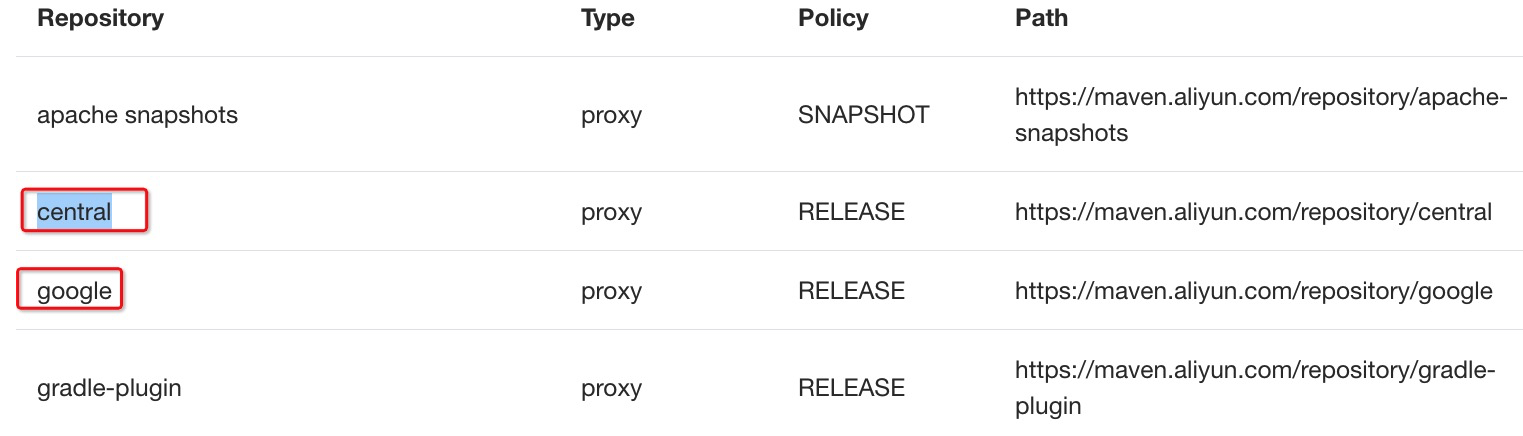
上图表示:我们可以使用https://maven.aliyun.com/repository/central来替换中央仓库,可以使用https://maven.aliyun.com/repository/google来替换google仓库。
## 查看MAVEN配置文件
在sheel中执行`mvn -X`后会出现一系列的信息,我们从中找到如下关键字:`[DEBUG] Reading global settings from`,比如我的找到的是:
```
[DEBUG] Reading global settings from /usr/local/Cellar/maven/3.5.2/libexec/conf/settings.xml
[DEBUG] Reading user settings from /Users/panjie/.m2/settings.xml
```
上述信息提示了maven的全局配置文件及用户定义的配置文件的位置分别为:`/usr/local/Cellar/maven/3.5.2/libexec/conf/settings.xml`及`/Users/panjie/.m2/settings.xml`。
## 设置仓库
接下来我们尝试编辑用户自定义配置文件,比如我刚刚查看自己的电配置文件位于:`/Users/panjie/.m2/settings.xml`。
>[info] 如果无此文件则复制一份全局配置文件过来,按提示复制一下就好。比如此时应复制`/usr/local/Cellar/maven/3.5.2/libexec/conf/settings.xml 至 /Users/panjie/.m2/settings.xml`。
找到`<mirrors>`标签及`</mirrors>`标签,删除其中的注释并添加如下代码:
```xml
<mirror>
<id>aliyunmaven</id>
<mirrorOf>*</mirrorOf>
<name>阿里云公共仓库</name>
<url>https://maven.aliyun.com/repository/central</url>
</mirror>
```
添加后的样子如下:
```xml
<mirrors>
<mirror>
<id>aliyunmaven</id>
<mirrorOf>*</mirrorOf>
<name>阿里云公共仓库</name>
<url>https://maven.aliyun.com/repository/central</url>
</mirror>
</mirrors>
```
此时,再执行`mvn install`时便会首先由aliyun的仓库下载的。
- 序言
- 第一章:Hello World
- 第一节:Angular准备工作
- 1 Node.js
- 2 npm
- 3 WebStorm
- 第二节:Hello Angular
- 第三节:Spring Boot准备工作
- 1 JDK
- 2 MAVEN
- 3 IDEA
- 第四节:Hello Spring Boot
- 1 Spring Initializr
- 2 Hello Spring Boot!
- 3 maven国内源配置
- 4 package与import
- 第五节:Hello Spring Boot + Angular
- 1 依赖注入【前】
- 2 HttpClient获取数据【前】
- 3 数据绑定【前】
- 4 回调函数【选学】
- 第二章 教师管理
- 第一节 数据库初始化
- 第二节 CRUD之R查数据
- 1 原型初始化【前】
- 2 连接数据库【后】
- 3 使用JDBC读取数据【后】
- 4 前后台对接
- 5 ng-if【前】
- 6 日期管道【前】
- 第三节 CRUD之C增数据
- 1 新建组件并映射路由【前】
- 2 模板驱动表单【前】
- 3 httpClient post请求【前】
- 4 保存数据【后】
- 5 组件间调用【前】
- 第四节 CRUD之U改数据
- 1 路由参数【前】
- 2 请求映射【后】
- 3 前后台对接【前】
- 4 更新数据【前】
- 5 更新某个教师【后】
- 6 路由器链接【前】
- 7 观察者模式【前】
- 第五节 CRUD之D删数据
- 1 绑定到用户输入事件【前】
- 2 删除某个教师【后】
- 第六节 代码重构
- 1 文件夹化【前】
- 2 优化交互体验【前】
- 3 相对与绝对地址【前】
- 第三章 班级管理
- 第一节 JPA初始化数据表
- 第二节 班级列表
- 1 新建模块【前】
- 2 初识单元测试【前】
- 3 初始化原型【前】
- 4 面向对象【前】
- 5 测试HTTP请求【前】
- 6 测试INPUT【前】
- 7 测试BUTTON【前】
- 8 @RequestParam【后】
- 9 Repository【后】
- 10 前后台对接【前】
- 第三节 新增班级
- 1 初始化【前】
- 2 响应式表单【前】
- 3 测试POST请求【前】
- 4 JPA插入数据【后】
- 5 单元测试【后】
- 6 惰性加载【前】
- 7 对接【前】
- 第四节 编辑班级
- 1 FormGroup【前】
- 2 x、[x]、{{x}}与(x)【前】
- 3 模拟路由服务【前】
- 4 测试间谍spy【前】
- 5 使用JPA更新数据【后】
- 6 分层开发【后】
- 7 前后台对接
- 8 深入imports【前】
- 9 深入exports【前】
- 第五节 选择教师组件
- 1 初始化【前】
- 2 动态数据绑定【前】
- 3 初识泛型
- 4 @Output()【前】
- 5 @Input()【前】
- 6 再识单元测试【前】
- 7 其它问题
- 第六节 删除班级
- 1 TDD【前】
- 2 TDD【后】
- 3 前后台对接
- 第四章 学生管理
- 第一节 引入Bootstrap【前】
- 第二节 NAV导航组件【前】
- 1 初始化
- 2 Bootstrap格式化
- 3 RouterLinkActive
- 第三节 footer组件【前】
- 第四节 欢迎界面【前】
- 第五节 新增学生
- 1 初始化【前】
- 2 选择班级组件【前】
- 3 复用选择组件【前】
- 4 完善功能【前】
- 5 MVC【前】
- 6 非NULL校验【后】
- 7 唯一性校验【后】
- 8 @PrePersist【后】
- 9 CM层开发【后】
- 10 集成测试
- 第六节 学生列表
- 1 分页【后】
- 2 HashMap与LinkedHashMap
- 3 初识综合查询【后】
- 4 综合查询进阶【后】
- 5 小试综合查询【后】
- 6 初始化【前】
- 7 M层【前】
- 8 单元测试与分页【前】
- 9 单选与多选【前】
- 10 集成测试
- 第七节 编辑学生
- 1 初始化【前】
- 2 嵌套组件测试【前】
- 3 功能开发【前】
- 4 JsonPath【后】
- 5 spyOn【后】
- 6 集成测试
- 7 @Input 异步传值【前】
- 8 值传递与引入传递
- 9 @PreUpdate【后】
- 10 表单验证【前】
- 第八节 删除学生
- 1 CSS选择器【前】
- 2 confirm【前】
- 3 功能开发与测试【后】
- 4 集成测试
- 5 定制提示框【前】
- 6 引入图标库【前】
- 第九节 集成测试
- 第五章 登录与注销
- 第一节:普通登录
- 1 原型【前】
- 2 功能设计【前】
- 3 功能设计【后】
- 4 应用登录组件【前】
- 5 注销【前】
- 6 保留登录状态【前】
- 第二节:你是谁
- 1 过滤器【后】
- 2 令牌机制【后】
- 3 装饰器模式【后】
- 4 拦截器【前】
- 5 RxJS操作符【前】
- 6 用户登录与注销【后】
- 7 个人中心【前】
- 8 拦截器【后】
- 9 集成测试
- 10 单例模式
- 第六章 课程管理
- 第一节 新增课程
- 1 初始化【前】
- 2 嵌套组件测试【前】
- 3 async管道【前】
- 4 优雅的测试【前】
- 5 功能开发【前】
- 6 实体监听器【后】
- 7 @ManyToMany【后】
- 8 集成测试【前】
- 9 异步验证器【前】
- 10 详解CORS【前】
- 第二节 课程列表
- 第三节 果断
- 1 初始化【前】
- 2 分页组件【前】
- 2 分页组件【前】
- 3 综合查询【前】
- 4 综合查询【后】
- 4 综合查询【后】
- 第节 班级列表
- 第节 教师列表
- 第节 编辑课程
- TODO返回机制【前】
- 4 弹出框组件【前】
- 5 多路由出口【前】
- 第节 删除课程
- 第七章 权限管理
- 第一节 AOP
- 总结
- 开发规范
- 备用