本节将展示如何在没有后台的情况下模拟后台数据,完成组件C层的开发。
# 定义接口
后台此时虽然尚不存在,但接口规范则一定有了。比如在获取教师列表时,团队成员根据原型和团队规范讨论后定义了如下接口。
```
GET /Klass
```
##### 参数 Parameters
| type | name | Description | Schema |
| --- | --- | --- | --- |
| **Query** | **name** <br> *requried* | 班级名称 | string |
##### 响应(返回值)Responses
| HTTP Code | Description | Schema |
| --- | --- | --- |
| **200** | OK | `Array<Teacher>`|
转换为语言描述:使用`GET /Klass`来请求班级的所有数据,在请求中必须传入`name`参数,该参数的类型为`String`;请求成功后,返回状态码为`200`,返回数据为班级数组。
# 数据请求
根据原型的功能需求,C层代码如下:
klass/index/index.component.ts
```
import {Component, OnInit} from '@angular/core';
import {Klass} from '../../norm/entity/Klass';
import {Teacher} from '../../norm/entity/Teacher';
import {HttpClient} from '@angular/common/http';
@Component({
selector: 'app-index',
templateUrl: './index.component.html',
styleUrls: ['./index.component.sass']
})
export class IndexComponent implements OnInit {
private message = '';
private url = 'http://localhost:8080/Klass';
/*查询参数*/
params = {
name: ''
};
/* 班级 */
klasses;
constructor(private httpClient: HttpClient) {
}
ngOnInit() {
this.onQuery();
}
/**
* 附带参数发起数据查询
*/
onQuery(): void {
this.httpClient.get(this.url, {params: this.params}➊)
.subscribe(data => {
this.klasses = data;
}, () => {
console.log(`请求${this.url}发生错误`);
});
}
}
```
* ➊ 查询条件放到`HttpClient.get`接收的第二个参数的`params`属性中。
> `HttpClient.get(string)`与`HttpClient.get(string, {})`都是发起`get`请求的正确写法。当发起`get`请求时需要附加其它信息的时候,我们使用`HttpClient.get(string, {})`,并在第二个参数`{}`将特定的信息写入。
## 测试
`ng test`进行测试,得到以后错误信息:
```
NullInjectorError: StaticInjectorError(DynamicTestModule)\[IndexComponent -> HttpClient\]: StaticInjectorError(Platform: core)\[IndexComponent -> HttpClient\]: NullInjectorError: No provider for HttpClient!
```
上面是说发生了`空注入器`异常,具体的原因是在构建`IndexComponent`时`没有找到HttpClient`的提供者。基于以下理论:
* 依赖注入:在构造函数中声明所需要的对象类型,`angular`会自动给我们一个对象。
* 依赖间的关系发生在`module`层面,我们如果想使用`HttpClient`,那么必须在`module`中声明我们需要`HttpClientModule`。
我们发现问题的原因在于:进行测试时,没有在`module`层面声明需要`HttpClientModule`来帮忙。我们又知道`klassIndex`组件属于`klass`模块,所以尝试向klass.module.ts中添加`import`。
```
klass/klass.module.ts
import {NgModule} from '@angular/core';
import {IndexComponent} from './index/index.component';
import {HttpClientModule} from '@angular/common/http'; ✚
/**
* 班级模块
*/
@NgModule({
declarations: [IndexComponent],
imports: [HttpClientModule] ✚
})
export class KlassModule {
}
```
再试测试,发现错误仍然存在。
> 当发现历史的理论不足以支撑当前的现象时,恭喜你,你的理论知识马上会随着解决当前问题而提升。而且此理论一旦提升就很难忘却,是真真切切的学习到心里了。
这个原因是这样:此时的单元测试是对象是`组件`这个独立体,在进行测试时单元测试并没有将它集成到某个`模块`中,所以即使我们在`klass模块`中添加了相关的依赖,由于单元测试根本就没有获取`模块`中的信息,当然也就不会生效了。
# 初探单元测试
在单元测试时,单元测试会临时生成了一个测试`Module`,然后再将待测试的`Component`变到此测试`Module`中。所以在测试过程中,被测试组件所依赖的`Moudle`为测试`Module`。
klass/index/index.component.spec.ts
```
beforeEach(async(() => { ➊
TestBed.configureTestingModule({ ➋
declarations: [IndexComponent] ➌
})
.compileComponents(); ➍
}));
beforeEach(() => { ➊
fixture = TestBed.createComponent(IndexComponent); ➎
component = fixture.componentInstance; ➏
fixture.detectChanges(); ➐
});
it('should create', () => { ➑
expect(component).toBeTruthy(); ➒
});
```
* ➊ 每次执行本文件的测试用例前,都执行一次此方法中的内容。
* ➋ 为测试平台配置测试模块。
* ➌ 将待测组件添加到测试平台中。
* ➍ 编译组件。
* ➎ 创建包含IndexComponent的容器(固定装置)。
* ➏ 获取该容器(固定装置)的组件。
* ➐ 查看组件是否发生了变化,如发生变化则重新渲染组件。
* ➑ 声明测试用例。
* ➒ 预测组件被成功的创建了出来。
通过上述代码的分析,我们大体能够得到以下信息:
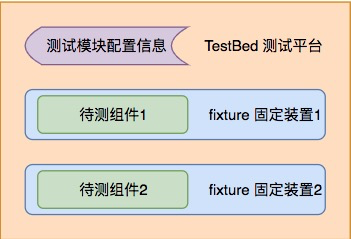
总结如下:
* [ ] `TestBed`是个可以配置测试模块的`测试平台`,对测试模块进行配置后通过`compile 编译`来预生成`component 组件`(这有点类似于C语言,先编译再运行)。
* [ ] 每个组件都有一个包含自己的容器,该容器可以监测组件是否发生变化。
* [ ] 容器是由测试平台创建出来的,而组件是由容器创建出来的。
# 配置单元测试
由于刚刚的理论,解决刚刚的问题就不再困难了,既然需要在测试平台上进行测试模块的配置,那我们将`HttpClientModule`引入到测试模块即可:
klass/index/index.component.spec.ts
```
beforeEach(async(() => {
TestBed.configureTestingModule({
declarations: [IndexComponent],
imports: [HttpClientModule] ✚
})
.compileComponents();
}));
```
保存后单元测试正常通过,也恰好的验证了我们前面的猜想。
# 模似HTTP请求
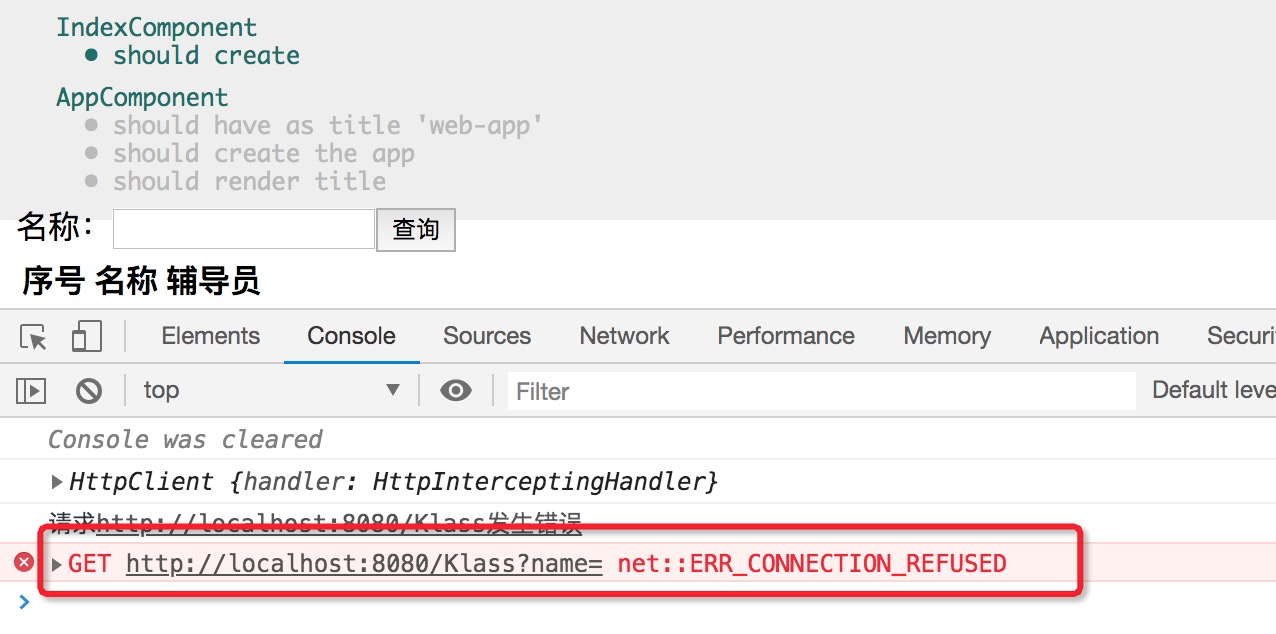
`HttpClientModule`中的`HttpClient`是用于正常的数据请求的,如果我们此时后台相应的接口存在是可以完成正常的请求的。但如果前台的开发早于后台,在无后台支持的情况下`HttpClientModule`中的`HttpClient`向预定的接口发起请求,则会在控制台中得到以下网络请求错误。
此时,我们急切的需要一个能够由我们自定义返回结果的、供我们在开发时使用的`HttpClient`。强大的angular为我们准备了`HttpClientTestingModule`,`HttpClientTestingModule`中的`HttpClient`拥有着与`HttpClientModule`中的`HttpClient`相同的外表,但也同时拥有完美支持测试的不一样的内涵。
与`HttpClientModule`相同,`HttpClientTestingModule`同样也拥有一个`HttpClient`,这两个`HttpClient`在使用方法上完全相同,唯一的不同便是前面的进行数据请求时发起的是真实的请求,而后一个发起的则是模拟的请求。我们不旦可以定义返回的数据的内容,还可以定义返回数据的时间。
klass/index/index.component.spec.ts
```
import {HttpClientTestingModule} from '@angular/common/http/testing'; ①
beforeEach(async(() => {
TestBed.configureTestingModule({
declarations: [IndexComponent],
imports: [HttpClientTestingModule] ➊
})
.compileComponents();
}));
```
* ➊ 使用`HttpClientTestingModule`替换`HttpClientModule`
此时我们观察控制台,数据请求的报错信息已经不再出现。为了进一步的弄清楚整个的流程,我们在`klass/index/index.component.ts`的`onQuery`方法中加入以下测试代码:
```
/**
* 用户点击查询按钮后触发
*/
onQuery(): void {
console.log('执行onQuery'); ✚
this.httpClient.get(this.url, {params: this.params})
.subscribe(data => {
console.log('成功执行请求', data); ✚
this.klasses = data;
}, () => {
console.log(`请求${this.url}发生错误`); ✚
});
}
```
测试:
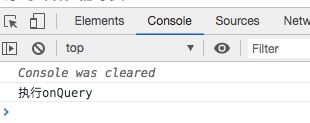
测试说明`onQuery`方法被正确的执行了;也成功的对可观察的`this.httpClient.get(this.url, {params: this.params})`进行了`subscribe 订阅`,但该观察者无论是成功的数据还是失败的数据,都没有发送给我们。这是因为前面我们刚刚描述过的:`HttpClientTestingModule`中的`HttpClient`何时发送数据,发送什么样的数据都是由我们在测试中决定的。
## 返回数据
在测试中我们如此的返回测试数据。
klass/index/index.component.spec.ts
```
import {async, ComponentFixture, TestBed} from '@angular/core/testing';
import {IndexComponent} from './index.component';
import {HttpClientTestingModule, HttpTestingController} from '@angular/common/http/testing'; ①
import {Klass} from '../../norm/entity/Klass'; ①
import {Teacher} from '../../norm/entity/Teacher'; ①
fdescribe('IndexComponent', () => {
let component: IndexComponent;
let fixture: ComponentFixture<IndexComponent>;
let httpTestingController: HttpTestingController; ②
beforeEach(async(() => {
TestBed.configureTestingModule({
declarations: [IndexComponent],
imports: [HttpClientTestingModule]
})
.compileComponents();
}));
beforeEach(() => {
httpTestingController = TestBed.get(HttpTestingController); ➊
fixture = TestBed.createComponent(IndexComponent);
component = fixture.componentInstance;
fixture.detectChanges();
});
it('should create', () => {
expect(component).toBeTruthy();
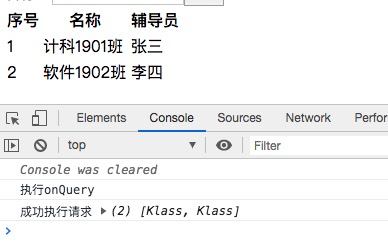
const req = httpTestingController.expectOne('http://localhost:8080/Klass?name='); ➋
const klasses = [ ➌
new Klass(1, '计科1901班', new Teacher(1, 'zhagnsan', '张三')),
new Klass(2, '软件1902班', new Teacher(2, 'lisi', '李四'))
];
req.flush(klasses); ➍
fixture.detectChanges(); ➎
});
});
```
* ➊ 获取`HttpTestingController Http测试控制器`
* ➋ 预测已经向`http://localhost:8080/Klass?name=`发起了请求。
* ➌ 定义返回值。
* ➍ 使用klasses数据回应`http://localhost:8080/Klass?name=`请求。
* ➎ 查看组件是否发生了变化,如发生变化则重新渲染组件。
**请思考:** 为什么是`http://localhost:8080/Klass?name=`而不是`http://localhost:8080/Klass`呢?
### 测试
# 参考文档
| 名称 | 链接 | 预计学习时长(分) |
| --- | --- | --- |
| 源码地址 | [https://github.com/mengyunzhi/spring-boot-and-angular-guild/releases/tag/step3.2.5](https://github.com/mengyunzhi/spring-boot-and-angular-guild/releases/tag/step3.2.5) | - |
| 测试Http请求 | [https://www.angular.cn/guide/http#testing-http-requests](https://www.angular.cn/guide/http#testing-http-requests) | 15 |
| 单独测试组件 | [https://www.angular.cn/guide/testing#component-class-testing](https://www.angular.cn/guide/testing#component-class-testing) | 15 |
| detectchanges | [https://www.angular.cn/guide/testing#detectchanges](https://www.angular.cn/guide/testing#detectchanges) | | 10 |
- 序言
- 第一章:Hello World
- 第一节:Angular准备工作
- 1 Node.js
- 2 npm
- 3 WebStorm
- 第二节:Hello Angular
- 第三节:Spring Boot准备工作
- 1 JDK
- 2 MAVEN
- 3 IDEA
- 第四节:Hello Spring Boot
- 1 Spring Initializr
- 2 Hello Spring Boot!
- 3 maven国内源配置
- 4 package与import
- 第五节:Hello Spring Boot + Angular
- 1 依赖注入【前】
- 2 HttpClient获取数据【前】
- 3 数据绑定【前】
- 4 回调函数【选学】
- 第二章 教师管理
- 第一节 数据库初始化
- 第二节 CRUD之R查数据
- 1 原型初始化【前】
- 2 连接数据库【后】
- 3 使用JDBC读取数据【后】
- 4 前后台对接
- 5 ng-if【前】
- 6 日期管道【前】
- 第三节 CRUD之C增数据
- 1 新建组件并映射路由【前】
- 2 模板驱动表单【前】
- 3 httpClient post请求【前】
- 4 保存数据【后】
- 5 组件间调用【前】
- 第四节 CRUD之U改数据
- 1 路由参数【前】
- 2 请求映射【后】
- 3 前后台对接【前】
- 4 更新数据【前】
- 5 更新某个教师【后】
- 6 路由器链接【前】
- 7 观察者模式【前】
- 第五节 CRUD之D删数据
- 1 绑定到用户输入事件【前】
- 2 删除某个教师【后】
- 第六节 代码重构
- 1 文件夹化【前】
- 2 优化交互体验【前】
- 3 相对与绝对地址【前】
- 第三章 班级管理
- 第一节 JPA初始化数据表
- 第二节 班级列表
- 1 新建模块【前】
- 2 初识单元测试【前】
- 3 初始化原型【前】
- 4 面向对象【前】
- 5 测试HTTP请求【前】
- 6 测试INPUT【前】
- 7 测试BUTTON【前】
- 8 @RequestParam【后】
- 9 Repository【后】
- 10 前后台对接【前】
- 第三节 新增班级
- 1 初始化【前】
- 2 响应式表单【前】
- 3 测试POST请求【前】
- 4 JPA插入数据【后】
- 5 单元测试【后】
- 6 惰性加载【前】
- 7 对接【前】
- 第四节 编辑班级
- 1 FormGroup【前】
- 2 x、[x]、{{x}}与(x)【前】
- 3 模拟路由服务【前】
- 4 测试间谍spy【前】
- 5 使用JPA更新数据【后】
- 6 分层开发【后】
- 7 前后台对接
- 8 深入imports【前】
- 9 深入exports【前】
- 第五节 选择教师组件
- 1 初始化【前】
- 2 动态数据绑定【前】
- 3 初识泛型
- 4 @Output()【前】
- 5 @Input()【前】
- 6 再识单元测试【前】
- 7 其它问题
- 第六节 删除班级
- 1 TDD【前】
- 2 TDD【后】
- 3 前后台对接
- 第四章 学生管理
- 第一节 引入Bootstrap【前】
- 第二节 NAV导航组件【前】
- 1 初始化
- 2 Bootstrap格式化
- 3 RouterLinkActive
- 第三节 footer组件【前】
- 第四节 欢迎界面【前】
- 第五节 新增学生
- 1 初始化【前】
- 2 选择班级组件【前】
- 3 复用选择组件【前】
- 4 完善功能【前】
- 5 MVC【前】
- 6 非NULL校验【后】
- 7 唯一性校验【后】
- 8 @PrePersist【后】
- 9 CM层开发【后】
- 10 集成测试
- 第六节 学生列表
- 1 分页【后】
- 2 HashMap与LinkedHashMap
- 3 初识综合查询【后】
- 4 综合查询进阶【后】
- 5 小试综合查询【后】
- 6 初始化【前】
- 7 M层【前】
- 8 单元测试与分页【前】
- 9 单选与多选【前】
- 10 集成测试
- 第七节 编辑学生
- 1 初始化【前】
- 2 嵌套组件测试【前】
- 3 功能开发【前】
- 4 JsonPath【后】
- 5 spyOn【后】
- 6 集成测试
- 7 @Input 异步传值【前】
- 8 值传递与引入传递
- 9 @PreUpdate【后】
- 10 表单验证【前】
- 第八节 删除学生
- 1 CSS选择器【前】
- 2 confirm【前】
- 3 功能开发与测试【后】
- 4 集成测试
- 5 定制提示框【前】
- 6 引入图标库【前】
- 第九节 集成测试
- 第五章 登录与注销
- 第一节:普通登录
- 1 原型【前】
- 2 功能设计【前】
- 3 功能设计【后】
- 4 应用登录组件【前】
- 5 注销【前】
- 6 保留登录状态【前】
- 第二节:你是谁
- 1 过滤器【后】
- 2 令牌机制【后】
- 3 装饰器模式【后】
- 4 拦截器【前】
- 5 RxJS操作符【前】
- 6 用户登录与注销【后】
- 7 个人中心【前】
- 8 拦截器【后】
- 9 集成测试
- 10 单例模式
- 第六章 课程管理
- 第一节 新增课程
- 1 初始化【前】
- 2 嵌套组件测试【前】
- 3 async管道【前】
- 4 优雅的测试【前】
- 5 功能开发【前】
- 6 实体监听器【后】
- 7 @ManyToMany【后】
- 8 集成测试【前】
- 9 异步验证器【前】
- 10 详解CORS【前】
- 第二节 课程列表
- 第三节 果断
- 1 初始化【前】
- 2 分页组件【前】
- 2 分页组件【前】
- 3 综合查询【前】
- 4 综合查询【后】
- 4 综合查询【后】
- 第节 班级列表
- 第节 教师列表
- 第节 编辑课程
- TODO返回机制【前】
- 4 弹出框组件【前】
- 5 多路由出口【前】
- 第节 删除课程
- 第七章 权限管理
- 第一节 AOP
- 总结
- 开发规范
- 备用