新增课程时需要选择绑定的班级,班级的个数可以是多个,此时适用于使用checkbox实现。为增加其复用性,本节将其直接打造为一个共享组件。并在课程新增中使用该组件完成班级的选择。
# 功能开发
公用的组件加入到CoreModule中:
```
panjiedeMac-Pro:web-app panjie$ cd src/app/core/
panjiedeMac-Pro:core panjie$ ng g c multipleSelect
CREATE src/app/core/multiple-select/multiple-select.component.sass (0 bytes)
CREATE src/app/core/multiple-select/multiple-select.component.html (30 bytes)
CREATE src/app/core/multiple-select/multiple-select.component.spec.ts (685 bytes)
CREATE src/app/core/multiple-select/multiple-select.component.ts (305 bytes)
UPDATE src/app/core/core.module.ts (486 bytes)
```
## V层
src/app/core/multiple-select/multiple-select.component.html
```html
<div>
<label class="label" *ngFor="let data of list$➊ | async➋">
<input type="checkbox"
(change)="onChange(data)➌"> {{data.name}}
</label>
</div>
```
* ➊ 定义变量时以$结尾,表明该变量为一个可观察(订阅)的数据源
* ➋ angular提供的async管道实现了自动订阅观察的数据源
* ➌ checkbox被点击时触发change事件
>[success] async 管道会订阅一个 Observable 或 Promise,并返回它发出的最近一个值。 当新值到来时,async 管道就会把该组件标记为需要进行变更检测。当组件被销毁时,async 管道就会自动取消订阅,以消除潜在的内存泄露问题。
src/app/core/multiple-select/multiple-select.component.sass
```sass
label
margin-right: 1em
```
## C层
src/app/core/multiple-select/multiple-select.component.ts
```typescript
import {Component, EventEmitter, Input, OnInit, Output} from '@angular/core';
import {Observable} from 'rxjs';
@Component({
selector: 'app-multiple-select',
templateUrl: './multiple-select.component.html',
styleUrls: ['./multiple-select.component.sass']
})
export class MultipleSelectComponent implements OnInit {
/** 数据列表 */
@Input()
list$: Observable<Array<{ name: string }>>;
/** 事件弹射器,用户点选后将最终的结点弹射出去 */
@Output()
changed = new EventEmitter<Array<any>>();
constructor() {
}
/** 用户选择的对象 */
selectedObjects = new Array<any>();
ngOnInit() {
}
/**
* 点击某个checkbox后触发的函数
* 如果列表中已存在该项,则移除该项
* 如果列表中不存在该项,则添加该项
*/
onChange(data: any) {
let found = false;
this.selectedObjects.forEach((value, index) => {
if (data === value) {
found = true;
this.selectedObjects.splice(index, 1);
}
});
if (!found) {
this.selectedObjects.push(data);
}
this.changed.emit(this.selectedObjects);
}
}
```
## 单元测试
src/app/core/multiple-select/multiple-select.component.spec.ts
```typescript
import {async, ComponentFixture, fakeAsync, TestBed, tick} from '@angular/core/testing';
import {MultipleSelectComponent} from './multiple-select.component';
import {Subject} from 'rxjs';
import {Course} from '../../norm/entity/course';
import {By} from '@angular/platform-browser';
describe('MultipleSelectComponent', () => {
let component: MultipleSelectComponent;
let fixture: ComponentFixture<MultipleSelectComponent>;
beforeEach(async(() => {
TestBed.configureTestingModule({
declarations: [MultipleSelectComponent],
imports: []
})
.compileComponents();
}));
beforeEach(() => {
fixture = TestBed.createComponent(MultipleSelectComponent);
component = fixture.componentInstance;
fixture.detectChanges();
});
it('数据绑定测试', () => { ➊
const subject = new Subject<Course[]>();
component.list$ = subject.asObservable();
// 由于V层直接使用了异步async管道绑定的观察者
// 所以在给C层对list$赋值后
// 使用detectChanges将此值传送给V层
fixture.detectChanges();
// 当V层成功的绑定到数据源后,使用以下代码发送数据,才能够被V层接收到
subject.next([new Course({id: 1, name: 'test1'}),
new Course({id: 2, name: 'test2'})]);
fixture.detectChanges();
// 断言生成了两个label
const div = fixture.debugElement.query(By.css('div'));
expect(div.children.length).toBe(2);
});
it('点选测试', () => {
// 准备观察者
const subject = new Subject<Course[]>();
component.list$ = subject.asObservable();
fixture.detectChanges();
// 发送数据
const course = new Course({id: 1, name: 'test1'});
subject.next([course]);
fixture.detectChanges();
// 获取checkbox并点击断言
const checkBox: HTMLInputElement = fixture.debugElement.query(By.css('input[type="checkbox"]')).nativeElement as HTMLInputElement;
spyOn(component, 'onChange');
checkBox.click();
expect(component.onChange).toHaveBeenCalledWith(course);
});
it('onChange -> 选中', () => {
expect(component.selectedObjects.length).toBe(0);
const course = new Course();
component.onChange(course);
expect(component.selectedObjects.length).toBe(1);
expect(component.selectedObjects[0]).toBe(course);
});
it('onChange -> 取消选中', () => {
const course = new Course();
component.selectedObjects.push(course);
expect(component.selectedObjects.length).toBe(1);
component.onChange(course);
expect(component.selectedObjects.length).toBe(0);
});
it('onChange -> 弹射数据', () => {
let result: Array<any>;
component.changed.subscribe((data) => {
result = data;
});
const course = new Course();
component.onChange(course);
expect(result[0]).toBe(course);
});
});
```
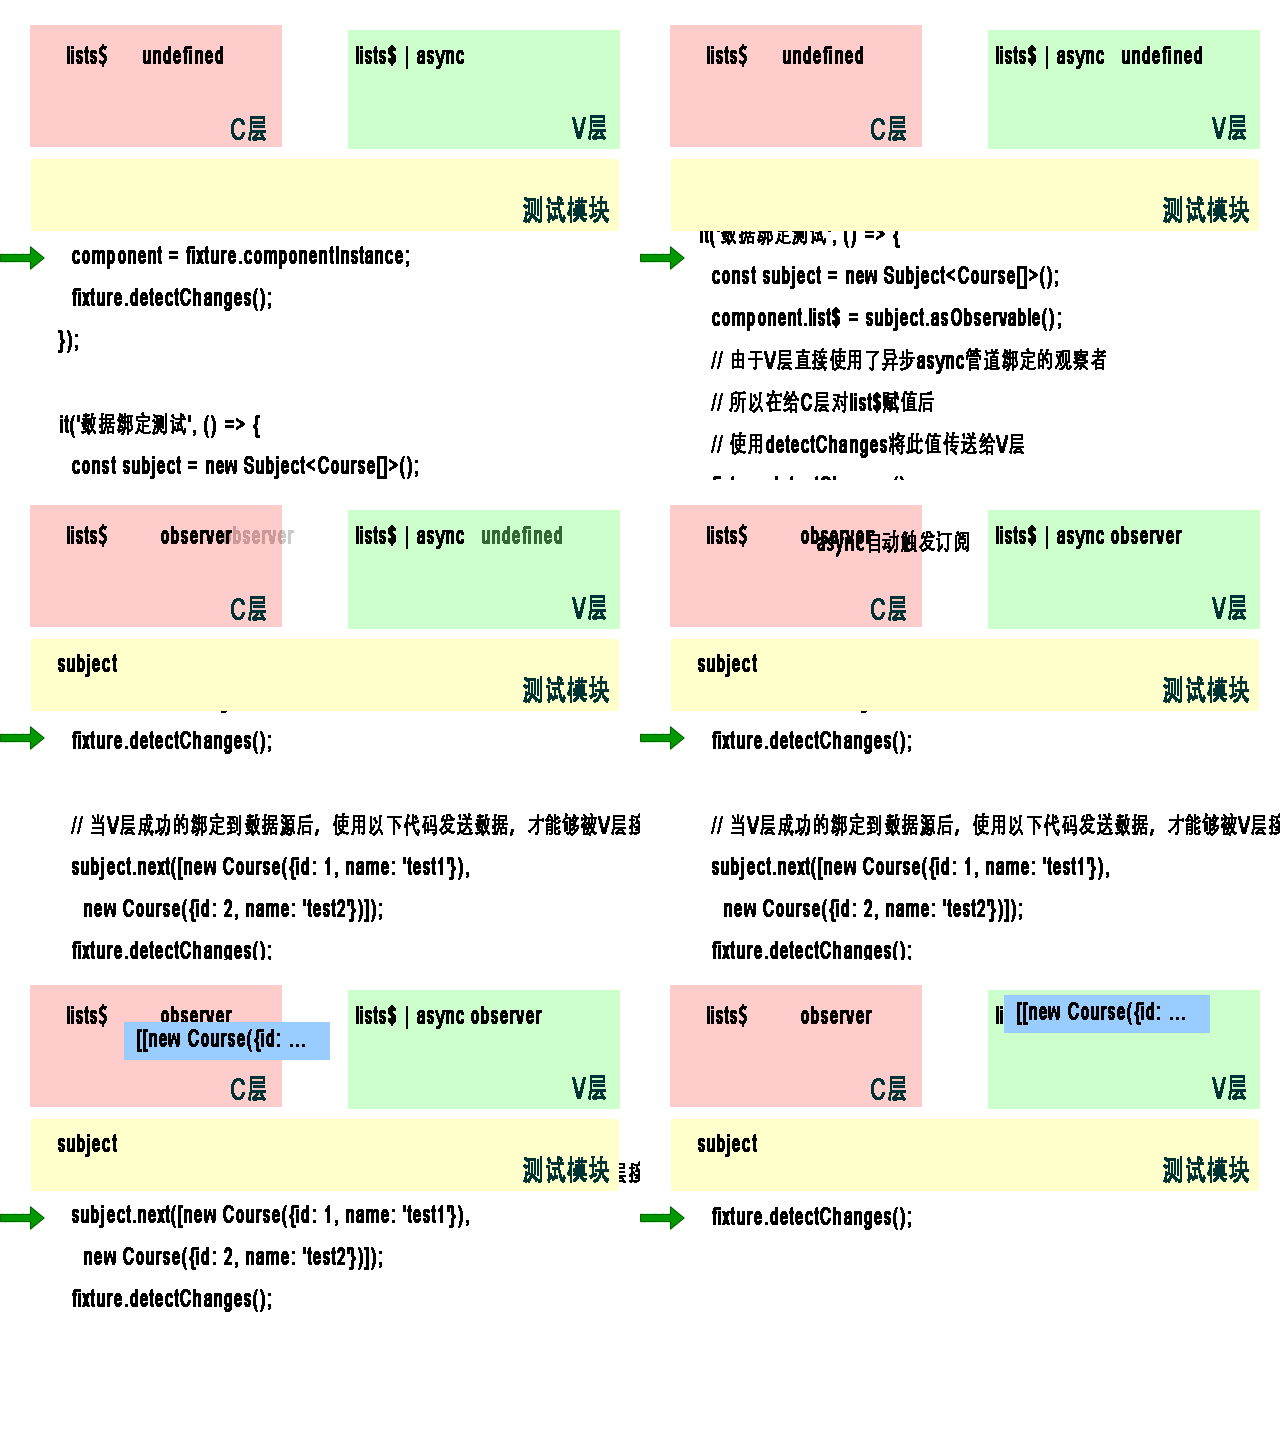
在V中使用了async管道实现了自动订阅数据源的功能。➊ 处对应的数据流大概如下:

# 参考文档
| 名称 | 链接 | 预计学习时长(分) |
| --- | --- | --- |
| 源码地址 | [https://github.com/mengyunzhi/spring-boot-and-angular-guild/releases/tag/step6.1.3](https://github.com/mengyunzhi/spring-boot-and-angular-guild/releases/tag/step6.1.3) | - |
| AsyncPipe | [https://angular.cn/api/common/AsyncPipe](https://angular.cn/api/common/AsyncPipe) | 5 |
- 序言
- 第一章:Hello World
- 第一节:Angular准备工作
- 1 Node.js
- 2 npm
- 3 WebStorm
- 第二节:Hello Angular
- 第三节:Spring Boot准备工作
- 1 JDK
- 2 MAVEN
- 3 IDEA
- 第四节:Hello Spring Boot
- 1 Spring Initializr
- 2 Hello Spring Boot!
- 3 maven国内源配置
- 4 package与import
- 第五节:Hello Spring Boot + Angular
- 1 依赖注入【前】
- 2 HttpClient获取数据【前】
- 3 数据绑定【前】
- 4 回调函数【选学】
- 第二章 教师管理
- 第一节 数据库初始化
- 第二节 CRUD之R查数据
- 1 原型初始化【前】
- 2 连接数据库【后】
- 3 使用JDBC读取数据【后】
- 4 前后台对接
- 5 ng-if【前】
- 6 日期管道【前】
- 第三节 CRUD之C增数据
- 1 新建组件并映射路由【前】
- 2 模板驱动表单【前】
- 3 httpClient post请求【前】
- 4 保存数据【后】
- 5 组件间调用【前】
- 第四节 CRUD之U改数据
- 1 路由参数【前】
- 2 请求映射【后】
- 3 前后台对接【前】
- 4 更新数据【前】
- 5 更新某个教师【后】
- 6 路由器链接【前】
- 7 观察者模式【前】
- 第五节 CRUD之D删数据
- 1 绑定到用户输入事件【前】
- 2 删除某个教师【后】
- 第六节 代码重构
- 1 文件夹化【前】
- 2 优化交互体验【前】
- 3 相对与绝对地址【前】
- 第三章 班级管理
- 第一节 JPA初始化数据表
- 第二节 班级列表
- 1 新建模块【前】
- 2 初识单元测试【前】
- 3 初始化原型【前】
- 4 面向对象【前】
- 5 测试HTTP请求【前】
- 6 测试INPUT【前】
- 7 测试BUTTON【前】
- 8 @RequestParam【后】
- 9 Repository【后】
- 10 前后台对接【前】
- 第三节 新增班级
- 1 初始化【前】
- 2 响应式表单【前】
- 3 测试POST请求【前】
- 4 JPA插入数据【后】
- 5 单元测试【后】
- 6 惰性加载【前】
- 7 对接【前】
- 第四节 编辑班级
- 1 FormGroup【前】
- 2 x、[x]、{{x}}与(x)【前】
- 3 模拟路由服务【前】
- 4 测试间谍spy【前】
- 5 使用JPA更新数据【后】
- 6 分层开发【后】
- 7 前后台对接
- 8 深入imports【前】
- 9 深入exports【前】
- 第五节 选择教师组件
- 1 初始化【前】
- 2 动态数据绑定【前】
- 3 初识泛型
- 4 @Output()【前】
- 5 @Input()【前】
- 6 再识单元测试【前】
- 7 其它问题
- 第六节 删除班级
- 1 TDD【前】
- 2 TDD【后】
- 3 前后台对接
- 第四章 学生管理
- 第一节 引入Bootstrap【前】
- 第二节 NAV导航组件【前】
- 1 初始化
- 2 Bootstrap格式化
- 3 RouterLinkActive
- 第三节 footer组件【前】
- 第四节 欢迎界面【前】
- 第五节 新增学生
- 1 初始化【前】
- 2 选择班级组件【前】
- 3 复用选择组件【前】
- 4 完善功能【前】
- 5 MVC【前】
- 6 非NULL校验【后】
- 7 唯一性校验【后】
- 8 @PrePersist【后】
- 9 CM层开发【后】
- 10 集成测试
- 第六节 学生列表
- 1 分页【后】
- 2 HashMap与LinkedHashMap
- 3 初识综合查询【后】
- 4 综合查询进阶【后】
- 5 小试综合查询【后】
- 6 初始化【前】
- 7 M层【前】
- 8 单元测试与分页【前】
- 9 单选与多选【前】
- 10 集成测试
- 第七节 编辑学生
- 1 初始化【前】
- 2 嵌套组件测试【前】
- 3 功能开发【前】
- 4 JsonPath【后】
- 5 spyOn【后】
- 6 集成测试
- 7 @Input 异步传值【前】
- 8 值传递与引入传递
- 9 @PreUpdate【后】
- 10 表单验证【前】
- 第八节 删除学生
- 1 CSS选择器【前】
- 2 confirm【前】
- 3 功能开发与测试【后】
- 4 集成测试
- 5 定制提示框【前】
- 6 引入图标库【前】
- 第九节 集成测试
- 第五章 登录与注销
- 第一节:普通登录
- 1 原型【前】
- 2 功能设计【前】
- 3 功能设计【后】
- 4 应用登录组件【前】
- 5 注销【前】
- 6 保留登录状态【前】
- 第二节:你是谁
- 1 过滤器【后】
- 2 令牌机制【后】
- 3 装饰器模式【后】
- 4 拦截器【前】
- 5 RxJS操作符【前】
- 6 用户登录与注销【后】
- 7 个人中心【前】
- 8 拦截器【后】
- 9 集成测试
- 10 单例模式
- 第六章 课程管理
- 第一节 新增课程
- 1 初始化【前】
- 2 嵌套组件测试【前】
- 3 async管道【前】
- 4 优雅的测试【前】
- 5 功能开发【前】
- 6 实体监听器【后】
- 7 @ManyToMany【后】
- 8 集成测试【前】
- 9 异步验证器【前】
- 10 详解CORS【前】
- 第二节 课程列表
- 第三节 果断
- 1 初始化【前】
- 2 分页组件【前】
- 2 分页组件【前】
- 3 综合查询【前】
- 4 综合查询【后】
- 4 综合查询【后】
- 第节 班级列表
- 第节 教师列表
- 第节 编辑课程
- TODO返回机制【前】
- 4 弹出框组件【前】
- 5 多路由出口【前】
- 第节 删除课程
- 第七章 权限管理
- 第一节 AOP
- 总结
- 开发规范
- 备用