# update
update的开发方法较getById方法稍微复杂一些有限。按开发的步骤首先进行初始化工作如下:
服务接口:
```
public interface StudentService {
...
/**
* 更新学生
* @param id ID
* @param student 更新的学生信息
* @return 学生
*/
Student update(Long id, Student student);
```
服务实现类:
```
public class StudentServiceImpl implements StudentService {
...
@Override
public Student update(Long id, Student student) {
return null;
}
```
C层:
```
public class StudentController {
...
public Student update(Long id, Student student) {
return null;
}
```
## M层功能开发与测试
做为新手,在进行更新的代码编写前应该首先来到[3.4.5](https://www.kancloud.cn/yunzhiclub/springboot_angular_guide/1368364)、[3.4.6](https://www.kancloud.cn/yunzhiclub/springboot_angular_guide/1368365) 回顾一下更新数据的思想。有了参考的代码后,完成更新学生的功能便会相对简单许多。
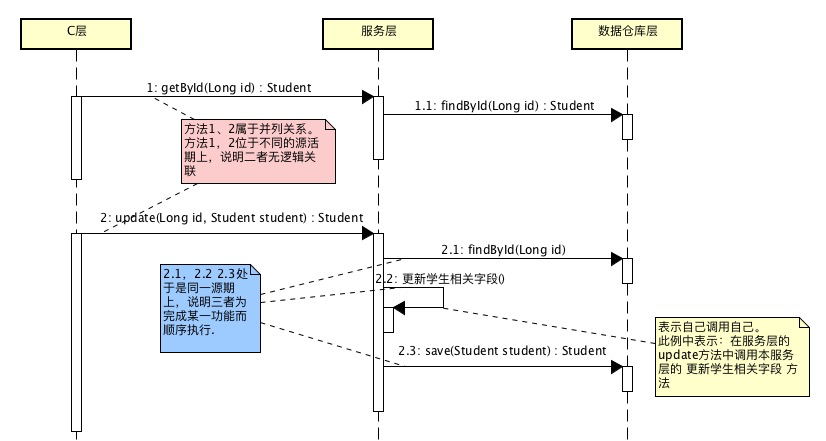
参考实序图:

其功能性的代码应该大概长这样:
```
public class StudentServiceImpl implements StudentService {
...
@Override
public Student update(Long id, Student student) { ➊
Student oldStudent = this.studentRepository.findById(id).get(); ➋
Student newStudent = this.updateFields(student,oldStudent); ➌
return this.studentRepository.save(newStudent); ➍
}
/**
* 更新学生
* @param newStudent 新学生信息
* @param oldStudent 老学生信息
* @return 更新后的学生信息
*/
public Student updateFields(Student newStudent, Student oldStudent) {
// 更新各个字段后返回更新后的学生
return null;
}
```
* ➊ 对应时序图中的序号2
* ➋ 对应时序图中的序号2.1
* ➌ 对应时序图中的序号2.2
* ➍ 对应时序图中的序号2.3
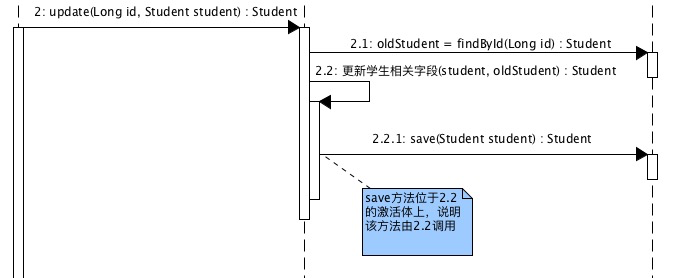
如果如下定义时序图:

则功能性代码就应该变成这样:
```
public class StudentServiceImpl implements StudentService {
...
@Override
public Student update(Long id, Student student) {
Student oldStudent = this.studentRepository.findById(id).get();
return this.updateFields(student,oldStudent);
}
/**
* 更新学生
* @param newStudent 新学生信息
* @param oldStudent 老学生信息
* @return 更新后的学生信息
*/
public Student updateFields(Student newStudent, Student oldStudent) {
// 更新各个字段
// 更新各个字段
return this.studentRepository.save(newStudent);
}
```
从功能实现上这两种方法难分伯仲,但就可测试性而言,第二种时序图在为其准备一些调用替身(spy)时会更轻松一些。为此,本例中采取第二个时序图做为开发方案。
### 单元测试
虽然单元测试逻辑并不复杂,但提前写点注释整理下思路也大有益处。
```
public class StudentServiceImplTest {
...
@Test
public void update() {
// 准备替身及调用替身后的模拟返回值
// 调用update方法测试
// 断言传入参数符合预期
// 断言返回值符合预期
}
@Test
public void updateFields() {
// 准备替身
// 调用updateFields方法
// 断言传入替身的参数符合预期(更新了学生信息)
// 断言返回值符合预期
}
```
完善测试代码:
```
@Test
public void update() {
// 准备替身及调用替身后的模拟返回值
// 第一个替身(间谍)
Long id = new Random().nextLong();
Student mockResultStudent = new Student();
Mockito.when(this.studentRepository.findById(id)).thenReturn(Optional.of(mockResultStudent));
// 第二个替身
```
# Mockito.spy
准备第一个替身我们已经轻车熟路,先准备测试的参数再准备相应的返回值。但第二个替身就不那么简单了。这是因为此时要构造的替身与我们测试的方法位于同一个对象上。也就是我们要保证执行 `this.studentService`这个对象的update方法时执行是真实的方法,在但这个真实的update方法中调用本对象的`updateFields`时执行的却是替身的方法。前面已有的知识要么该整个对象做为真实的对象看待,比如此时的`this.studentService`,要么将整个对象做为替身来看待,比如此时的`this.studentRepository`。但还没有学习过如何将一个真实的对象的部分方法保留的同时,又将特定的方法变成替身方法(在部分方法上创建间谍)。实际上,笔者也尝试查找过此类的解决方案。最终约以失败告终。`Mockito`貌似早就得知了此时的需求,所以提供了另外一种思路来解决当前面临的问题。虽然没有办法把一个真实的对象的部分方法替换掉,但是可以由真实对象的clone出一个替身。此时这个替身具有两个特点:1.该替身由于是由真实的对象clone而来,所以真实对象上方法具有的功能,该替身上的方法中均有。2.由于其本质是替身,所以可以在该替身的任意方法上安排间谍。这样一来便基于`this.studentService`clone出一个替身,将替换掉该替身上的`updateFields`方法,从而对`update`方法进行测试了。
> 我们说的替身(间谍)有两种:第一种是对象的替身,该替身拥有原对的所有的功能。第二种是方法的替身(间谍),一旦某个方法被安排了间谍,那么访问该方法那么间谍将替待原方法接受调用并替待原方法返回数据。
具体代码如下:
```
@Test
public void update() {
// 准备替身及调用替身后的模拟返回值
// 第一个替身(间谍)
Long id = new Random().nextLong();
Student mockResultStudent = new Student();
Mockito.when(this.studentRepository.findById(id)).thenReturn(Optional.of(mockResultStudent)); ➍
// 第二个替身.
StudentService studentServiceSpy = Mockito.spy(this.studentService); ➊
StudentServiceImpl studentServiceImplSpy = (StudentServiceImpl) studentServiceSpy; ★➋
Student mockResultStudent1 = new Student();
Mockito.doReturn(mockResultStudent1).when(studentServiceImplSpy).updateFields(Mockito.any(Student.class), Mockito.any(Student.class)); ➌
```
* ➊ 由this.studentService clone出一个替身,该替身具有原studentService中的所有功能及属性
* ➋ 由于updateFields方法未存在于StudentService接口上而是存在于StudentServiceImpl。所以我们没有办法对类型是StudentService的对象设置updateFields方法的替身。
* ➋ 但虽然注入时声明的为StudentService,但实际注入的为StudentServiceImpl。所以实际上当前的this.studentService是基于StudentServiceImpl创建的实例,也就是说当前的this.studentService是有updateFields方法的。
* ➋ 基于此,在这里可以使用类型转换将其转换为StudentServiceImpl。
* ★ 看不懂的话可以暂时略过,照着抄上就好了。这就像乘客网上约一辆出租车时并没有约定其有座椅加热功能,但租车平台派送过来的车带了座椅加热功能。虽然这个功能并没有在规定的列表中,但它的确是实实在在的存在于当前的出租车了。
* ➌ 注意此处的语法为:Mockito.doReturn().when()。区别于➍处的Mockito.when().thenReturn()
>[success] Mockito.doReturn().when() VS Mockito.when().thenReturn():大多数时候,这两种用法无区别,推荐优先使用Mockito.when().thenReturn()。但与Mockito.spy配合使用时,则只能用Mockito.doReturn().when()。延伸阅读:[Mockito: doReturn vs thenReturn](https://sangsoonam.github.io/2019/02/04/mockito-doreturn-vs-thenreturn.html)
替身设置完毕后,正式开始进行功能测试:
```
@Test
public void update() {
// 准备替身及调用替身后的模拟返回值
// 第一个替身(间谍)
Long id = new Random().nextLong();
Student mockResultStudent = new Student();
Mockito.when(this.studentRepository.findById(id)).thenReturn(Optional.of(mockResultStudent));
// 第二个替身. 1. 由this.studentService clone出一个替身,该替身具有原studentService中的所有功能及属性
StudentService studentServiceSpy = Mockito.spy(this.studentService);
// 由于updateFields方法并不存在于StudentService接口上,所以预对updateFields设置替身
// 则需要对类型进行转制转换
// (虽然注入时声明的为StudentService,但实际注入的为StudentServiceImpl,这是强制转换的基础)
StudentServiceImpl studentServiceImplSpy = (StudentServiceImpl) studentServiceSpy;
Student mockResultStudent1 = new Student();
Mockito.doReturn(mockResultStudent1).when(studentServiceImplSpy).updateFields(Mockito.any(Student.class), Mockito.any(Student.class));
// 调用update方法测试
Student student = new Student();
Student resultStudent = studentServiceImplSpy.update(id, student);
// 断言传入第一个替身参数符合预期
ArgumentCaptor<Long> longArgumentCaptor = ArgumentCaptor.forClass(Long.class);
Mockito.verify(this.studentRepository).findById(longArgumentCaptor.capture());
Assertions.assertThat(longArgumentCaptor.getValue()).isEqualTo(id);
// 断言第二个替身参数符合预期:参数1为传入update方法的学生,参数2为替身1的返回值
ArgumentCaptor<Student> studentArgumentCaptor = ArgumentCaptor.forClass(Student.class);
ArgumentCaptor<Student> studentArgumentCaptor1 = ArgumentCaptor.forClass(Student.class);
Mockito.verify(studentServiceImplSpy).updateFields(studentArgumentCaptor.capture(), studentArgumentCaptor1.capture());
Assertions.assertThat(studentArgumentCaptor.getValue()).isEqualTo(student);
Assertions.assertThat(studentArgumentCaptor1.getValue()).isEqualTo(mockResultStudent);
// 断言返回值就是第二个替身的返回值
Assertions.assertThat(resultStudent).isEqualTo(mockResultStudent1);
}
```
### updateFields
本方法主要是使用新传入的学生信息更新原学生信息,并把更新后的信息存入数据库。最后返回更新后的学生。则测试功能点有二:1. 更新学生信息。2.调用数据仓库并返回其返回值
```
@Test
public void updateFields() {
// 准备替身
Student mockResultStudent = new Student();
Mockito.when(this.studentRepository.save(Mockito.any(Student.class))).thenReturn(mockResultStudent);
// 调用updateFields方法
StudentServiceImpl studentServiceImpl = (StudentServiceImpl) this.studentService;
Student newStudent = new Student();
newStudent.setKlass(new Klass()); ➊
newStudent.setName(RandomString.make(8)); ➊
newStudent.setSno(RandomString.make(4)); ➊
Student oldStudent = new Student(); ➋
oldStudent.setId(new Random().nextLong()); ➋
Student resultStudent = studentServiceImpl.updateFields(newStudent, oldStudent);
// 断言传入替身的参数符合预期(更新了学生信息)
ArgumentCaptor<Student> studentArgumentCaptor = ArgumentCaptor.forClass(Student.class);
Mockito.verify(this.studentRepository).save(studentArgumentCaptor.capture());
Student editedStudent = studentArgumentCaptor.getValue();
Assertions.assertThat(editedStudent.getId()).isEqualTo(oldStudent.getId()); ➌
Assertions.assertThat(editedStudent.getName()).isEqualTo(newStudent.getName()); ➍
Assertions.assertThat(editedStudent.getSno()).isEqualTo(newStudent.getSno()); ➍
Assertions.assertThat(editedStudent.getKlass()).isEqualTo(newStudent.getKlass()); ➍
// 断言返回值符合预期
Assertions.assertThat(resultStudent).isEqualTo(mockResultStudent);
}
```
* ➊ 准备更新的信息
* ➋ 设置老学生ID
* ➌ 断言老学生id不变
* ➍ 断言其它信息更新成功
功能代码如下:
```
public class StudentServiceImpl implements StudentService {
...
/**
* 更新学生
* @param newStudent 新学生信息
* @param oldStudent 老学生信息
* @return 更新后的学生信息
*/
public Student updateFields(Student newStudent, Student oldStudent) {
oldStudent.setSno(newStudent.getSno());
oldStudent.setName(newStudent.getName());
oldStudent.setKlass(newStudent.getKlass());
return this.studentRepository.save(oldStudent);
}
```
单元测试通过。
## C层
单元测试初始化如下:
```
public class StudentControllerTest {
...
@Test
public void update() {
// 准备传入参数的数据
// 准备服务层替身被调用后的返回数据
// 按接口规范发起请求,断言状态码正常,接收的数据符合预期
// 断言C层进行了数据转发(替身接收的参数值符合预期)
}
```
补充测试代码如下:
```
@Test
public void update() throws Exception {
// 准备传入参数的数据
Long id = new Random().nextLong();
// 准备服务层替身被调用后的返回数据
Student mockResult = new Student();
mockResult.setId(id);
mockResult.setName(RandomString.make(6));
mockResult.setSno(RandomString.make(4));
mockResult.setKlass(new Klass());
mockResult.getKlass().setId(new Random().nextLong());
mockResult.getKlass().setName(RandomString.make(10));
Mockito.when(this.studentService.update(Mockito.anyLong(), Mockito.any(Student.class))).thenReturn(mockResult);
JSONObject studentJsonObject = new JSONObject(); ➊
JSONObject klassJsonObject = new JSONObject(); ➊
studentJsonObject.put("sno", RandomString.make(4));
studentJsonObject.put("name", RandomString.make(6));
klassJsonObject.put("id", new Random().nextLong());
studentJsonObject.put("klass", klassJsonObject);
// 按接口规范发起请求,断言状态码正常,接收的数据符合预期
String url = "/Student/" + id.toString();
this.mockMvc
.perform(MockMvcRequestBuilders.put(url)
.content(studentJsonObject.toString())
.contentType(MediaType.APPLICATION_JSON_UTF8))
.andExpect(MockMvcResultMatchers.status().isOk())
.andExpect(MockMvcResultMatchers.jsonPath("id").value(id)) ➋
.andExpect(MockMvcResultMatchers.jsonPath("sno").exists()) ➌
.andExpect(MockMvcResultMatchers.jsonPath("name").exists()) ➌
.andExpect(MockMvcResultMatchers.jsonPath("klass.id").exists()) ➌
.andExpect(MockMvcResultMatchers.jsonPath("klass.name").exists()) ➌
;
// 断言C层进行了数据转发(替身接收的参数值符合预期)
ArgumentCaptor<Long> longArgumentCaptor = ArgumentCaptor.forClass(Long.class);
ArgumentCaptor<Student> studentArgumentCaptor = ArgumentCaptor.forClass(Student.class);
Mockito.verify(this.studentService).update(longArgumentCaptor.capture(), studentArgumentCaptor.capture());
Assertions.assertThat(longArgumentCaptor.getValue()).isEqualTo(id);
Student resultStudent = studentArgumentCaptor.getValue();
Assertions.assertThat(resultStudent.getSno()).isEqualTo(studentJsonObject.get("sno"));
Assertions.assertThat(resultStudent.getName()).isEqualTo(studentJsonObject.get("name"));
Assertions.assertThat(resultStudent.getKlass().getId()).isEqualTo(klassJsonObject.get("id"));
Assertions.assertThat(resultStudent.getKlass().getName()).isEqualTo(klassJsonObject.get("name"));
}
```
* ➊ 构造json数据
* ➋ 同上一小节的测试,断言ID值符合预期
* ➌ ID符合预期,则说明返回的对象是正确的。那么此时只需要验证返回了前台需要的字段即可
运行单元测试并按提示完成功能代码或修正单元测试代码:
```
java.lang.AssertionError: Status
Expected :200
Actual :405
```
期望状态码200,但接收到了405。405对应的是:Request method not supported。在上个小节中C层进行第一次单元测试时接收的状态码为404。与上一小节相同,在这同样是由于没有定义`RequestMapping`引发的错误,但为何此时接收的是405而不是404呢?这是由于向后台以地址 `/Student/id`发起请求时,此地址正好对应了`getById`方法的请求路径:
```
public class StudentController {
...
@GetMapping("{id}")
public Student getById(@PathVariable Long id) {
return this.studentService.findById(id);
}
```
虽然请求路径对应上了,但请求的方法在getById方法上规定是的get,而非此时发起的`put`。也就是说当发生405错误时,说明找到了对应的请求路径,而请求路径对应的请求方法却未对应成功。而404错误说明根本未找到对应的请求路径。
如下修正代码:
```
public class StudentController {
...
@PutMapping("{id}") ✚
public Student update(Long id, Student student) {
return null;
}
```
再次进行单元测试,发生了如下错误:
```
.andExpect(MockMvcResultMatchers.jsonPath("id").value(id))
java.lang.AssertionError: No value at JSON path "id"
```
它说没有在返回的json字符串上找到想到的id属性,出现该错误首先想到的是由于C层中返回null引起的。所以首先想到的修正C层中的调用:
```java
public class StudentController {
...
@PutMapping("{id}")
public Student update(Long id, Student student) {
return this.studentService.update(id, student); ✚
}
```
再次执行单元测试,错误依旧。这是由于我们的间谍设置`Mockito.when(this.studentService.update(Mockito.anyLong(), Mockito.any(Student.class))).thenReturn(mockResult)`没有起作用。该间谍设置的意思是:当`this.studentService.update`传入的第一个参数的值的类型为`Long`,且传入的第二个参数的值的类型为`Student`时,将`mockResult`做为返回值返回。
debug一下看看更清晰:


debug发现此时的id为null,而null并不属于类型Long。所以并不符合间谍设置中:`传入的第一个参数的值的类型为`Long\`\`的条件,当然也就没有执行间谍设置的程序了。
id为null的原因是由于没有设置`@PathVariable`:
```
public class StudentController {
...
@PutMapping("{id}")
public Student update(@PathVariable✚ Long id, Student student) {
return this.studentService.update(id, student);
}
```
再次运行单元测试:
```
Assertions.assertThat(resultStudent.getSno()).isEqualTo(studentJsonObject.get("sno"));
org.junit.ComparisonFailure:
Expected :"ZEUg"
Actual :null
```
它说在断言传值时发生了错误,期望的是一个随机值,但却收到了null。按数据流向分析,产生此错误的原因也有三个:0:根本就没有向C层传值。1. C层根据就没有成功接收到相应的值。 2. C层虽然成功接收到了,但却没有成功的进行转发。在本例中,属于错误1:C层中并没有成功的接收。
```
public class StudentController {
...
@PutMapping("{id}")
public Student update(@PathVariable Long id, @RequestBody✚ Student student) {
return this.studentService.update(id, student);
}
```
单元测试显示如下错误:
```
Assertions.assertThat(resultStudent.getKlass().getId()).isEqualTo(klassJsonObject.get("id"));
Assertions.assertThat(resultStudent.getKlass().getName()).isEqualTo(klassJsonObject.get("name")); ✓
org.json.JSONException: No value for name
```
在断言参数转发时发现了错误。此错误类型同上一点。要么压根没发送,要么发送了没接收,要么接收了没转发到下一个节点。而学生的接收与转发是整体性的,既然已经接收并转发了klass的id, 那么klass的name也必然会被成功的接收并转发。此时问题点便聚集在第0点:根本没有向C层传值。
```
public class StudentControllerTest {
...
klassJsonObject.put("id", new Random().nextLong());
klassJsonObject.put("name", RandomString.make(6)); ✚
studentJsonObject.put("klass", klassJsonObject);
```
再次运行单元测试,通过。
# 参考文档
| 名称 | 链接 | 预计学习时长(分) |
| --- | --- | --- |
| 源码地址 | [https://github.com/mengyunzhi/spring-boot-and-angular-guild/releases/tag/step4.7.5](https://github.com/mengyunzhi/spring-boot-and-angular-guild/releases/tag/step4.7.5) | \- |
| Mockito.spy | [https://javadoc.io/doc/org.mockito/mockito-core/latest/org/mockito/Mockito.html#spy-T-](https://javadoc.io/doc/org.mockito/mockito-core/latest/org/mockito/Mockito.html#spy-T-) | \- |
- 序言
- 第一章:Hello World
- 第一节:Angular准备工作
- 1 Node.js
- 2 npm
- 3 WebStorm
- 第二节:Hello Angular
- 第三节:Spring Boot准备工作
- 1 JDK
- 2 MAVEN
- 3 IDEA
- 第四节:Hello Spring Boot
- 1 Spring Initializr
- 2 Hello Spring Boot!
- 3 maven国内源配置
- 4 package与import
- 第五节:Hello Spring Boot + Angular
- 1 依赖注入【前】
- 2 HttpClient获取数据【前】
- 3 数据绑定【前】
- 4 回调函数【选学】
- 第二章 教师管理
- 第一节 数据库初始化
- 第二节 CRUD之R查数据
- 1 原型初始化【前】
- 2 连接数据库【后】
- 3 使用JDBC读取数据【后】
- 4 前后台对接
- 5 ng-if【前】
- 6 日期管道【前】
- 第三节 CRUD之C增数据
- 1 新建组件并映射路由【前】
- 2 模板驱动表单【前】
- 3 httpClient post请求【前】
- 4 保存数据【后】
- 5 组件间调用【前】
- 第四节 CRUD之U改数据
- 1 路由参数【前】
- 2 请求映射【后】
- 3 前后台对接【前】
- 4 更新数据【前】
- 5 更新某个教师【后】
- 6 路由器链接【前】
- 7 观察者模式【前】
- 第五节 CRUD之D删数据
- 1 绑定到用户输入事件【前】
- 2 删除某个教师【后】
- 第六节 代码重构
- 1 文件夹化【前】
- 2 优化交互体验【前】
- 3 相对与绝对地址【前】
- 第三章 班级管理
- 第一节 JPA初始化数据表
- 第二节 班级列表
- 1 新建模块【前】
- 2 初识单元测试【前】
- 3 初始化原型【前】
- 4 面向对象【前】
- 5 测试HTTP请求【前】
- 6 测试INPUT【前】
- 7 测试BUTTON【前】
- 8 @RequestParam【后】
- 9 Repository【后】
- 10 前后台对接【前】
- 第三节 新增班级
- 1 初始化【前】
- 2 响应式表单【前】
- 3 测试POST请求【前】
- 4 JPA插入数据【后】
- 5 单元测试【后】
- 6 惰性加载【前】
- 7 对接【前】
- 第四节 编辑班级
- 1 FormGroup【前】
- 2 x、[x]、{{x}}与(x)【前】
- 3 模拟路由服务【前】
- 4 测试间谍spy【前】
- 5 使用JPA更新数据【后】
- 6 分层开发【后】
- 7 前后台对接
- 8 深入imports【前】
- 9 深入exports【前】
- 第五节 选择教师组件
- 1 初始化【前】
- 2 动态数据绑定【前】
- 3 初识泛型
- 4 @Output()【前】
- 5 @Input()【前】
- 6 再识单元测试【前】
- 7 其它问题
- 第六节 删除班级
- 1 TDD【前】
- 2 TDD【后】
- 3 前后台对接
- 第四章 学生管理
- 第一节 引入Bootstrap【前】
- 第二节 NAV导航组件【前】
- 1 初始化
- 2 Bootstrap格式化
- 3 RouterLinkActive
- 第三节 footer组件【前】
- 第四节 欢迎界面【前】
- 第五节 新增学生
- 1 初始化【前】
- 2 选择班级组件【前】
- 3 复用选择组件【前】
- 4 完善功能【前】
- 5 MVC【前】
- 6 非NULL校验【后】
- 7 唯一性校验【后】
- 8 @PrePersist【后】
- 9 CM层开发【后】
- 10 集成测试
- 第六节 学生列表
- 1 分页【后】
- 2 HashMap与LinkedHashMap
- 3 初识综合查询【后】
- 4 综合查询进阶【后】
- 5 小试综合查询【后】
- 6 初始化【前】
- 7 M层【前】
- 8 单元测试与分页【前】
- 9 单选与多选【前】
- 10 集成测试
- 第七节 编辑学生
- 1 初始化【前】
- 2 嵌套组件测试【前】
- 3 功能开发【前】
- 4 JsonPath【后】
- 5 spyOn【后】
- 6 集成测试
- 7 @Input 异步传值【前】
- 8 值传递与引入传递
- 9 @PreUpdate【后】
- 10 表单验证【前】
- 第八节 删除学生
- 1 CSS选择器【前】
- 2 confirm【前】
- 3 功能开发与测试【后】
- 4 集成测试
- 5 定制提示框【前】
- 6 引入图标库【前】
- 第九节 集成测试
- 第五章 登录与注销
- 第一节:普通登录
- 1 原型【前】
- 2 功能设计【前】
- 3 功能设计【后】
- 4 应用登录组件【前】
- 5 注销【前】
- 6 保留登录状态【前】
- 第二节:你是谁
- 1 过滤器【后】
- 2 令牌机制【后】
- 3 装饰器模式【后】
- 4 拦截器【前】
- 5 RxJS操作符【前】
- 6 用户登录与注销【后】
- 7 个人中心【前】
- 8 拦截器【后】
- 9 集成测试
- 10 单例模式
- 第六章 课程管理
- 第一节 新增课程
- 1 初始化【前】
- 2 嵌套组件测试【前】
- 3 async管道【前】
- 4 优雅的测试【前】
- 5 功能开发【前】
- 6 实体监听器【后】
- 7 @ManyToMany【后】
- 8 集成测试【前】
- 9 异步验证器【前】
- 10 详解CORS【前】
- 第二节 课程列表
- 第三节 果断
- 1 初始化【前】
- 2 分页组件【前】
- 2 分页组件【前】
- 3 综合查询【前】
- 4 综合查询【后】
- 4 综合查询【后】
- 第节 班级列表
- 第节 教师列表
- 第节 编辑课程
- TODO返回机制【前】
- 4 弹出框组件【前】
- 5 多路由出口【前】
- 第节 删除课程
- 第七章 权限管理
- 第一节 AOP
- 总结
- 开发规范
- 备用