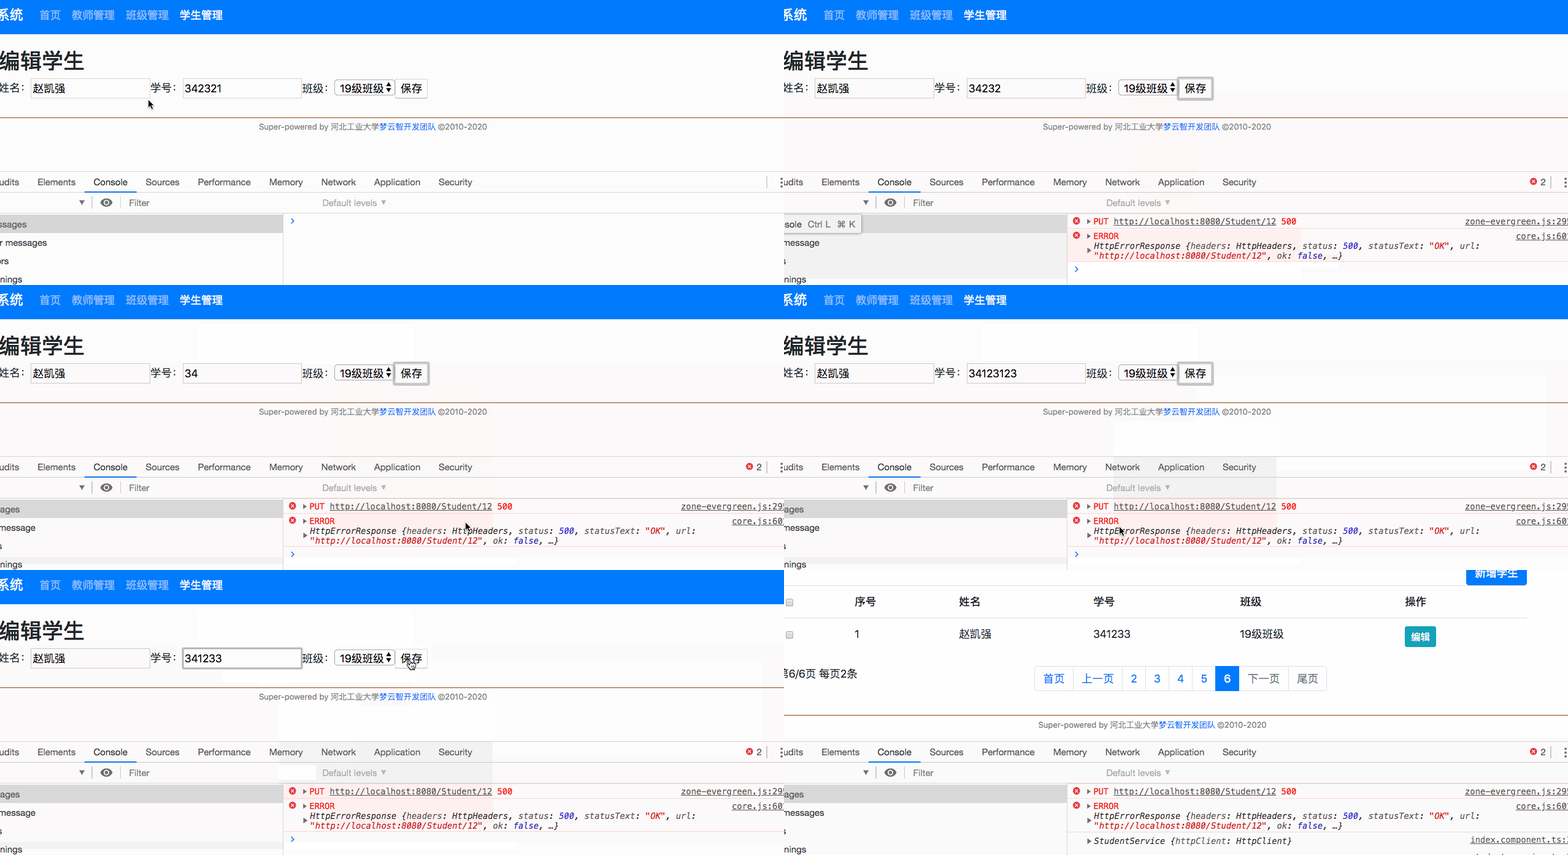
启动数据库、后台、前后并准备一些基础的测试数据后,来查看一个前面单元测试中遗漏的BUG。

在编辑学生的过程时,可以任意的变更学位的位数,任意的修改学生的姓名。而完全忽略掉了本章第五节新增学生时对学号、姓名的长度做的校验。相信任何程序员都接受不了当前的现实。
只所以会这样还要看看历史上对学号、姓名进行校验的代码:
entity/Student.java
```java
/**
* 在实体保存到数据库以前,执行1次
* 1. 校验name 字段长度为2-20
* 2. 校验sno 字段长为为6
*/
@PrePersist // ★
public void perPersis() {
if (this.name != null ) {
if (this.name.length() < 2) {
throw new DataIntegrityViolationException("name length less than 2");
}
if (this.name.length() > 20) {
throw new DataIntegrityViolationException("name length more than 20");
}
}
if (this.sno != null) {
if (this.sno.length() != 6) {
throw new DataIntegrityViolationException("sno length must be 6");
}
}
}
```
* ★ 重点在这。 @PrePersist注解的作用时,在持久化(保存)之前。而非在更新之前。
虽然在代码层面,保存与更新都是调用了`save`方法。但hibernate还是能自动的区分出当前执行的是保存操作还是更新操作的。
# @PreUpdate
`@PrePersist`中`@`代表注解,`Pre`意为在什么之前,`Persist`译为持久化也就是保存。起到的作用是:在数据保存之前执行此注解下的内容。Hibernate同时还提供了另一个用于更新之前执行某个方法的注解:`@PreUpdate`。测试如下:
entity/Student.java
```java
@PreUpdate
public void perUpdate() {
System.out.println("正在执行更新操作: " + this.id.toString());
}
```
然后临时将`src/main/resources/application.propertions`中的`spring.jpa.hibernate.ddl-auto=create-drop`改为`spring.jpa.hibernate.ddl-auto=update`。然后重新启动后台应用并于前面重新进行测试数据的初始化工作。
> [info] create-drop:启动应用时创建数据表,停止应用时删除数据表。update:启动应用时更新数据表(如有更新内容),停止应用时什么也不做。
测试如下:

接下来,可以将prePersist()方法中的代码复制到 preUpdate()方法中来达到与新增学生相同的校验效果。也可以这样:
entity/Student.java
```java
@PreUpdate
public void perUpdate() {
this.perPersis();
}
```
也可以达到相同的验证效果。

# 单元测试
虽然前台后依赖式开发(前台的开发依赖于后台,后台的开发也依赖于前台)貌似很简单,但每次修改完代码都要用鼠标键盘执行相同的操作,这对做为不甘寂寞的程序员而言却显得难以接受。相较于这种依赖式的,每次变更代码后都要复要的操作鼠标键盘式的测试,笔者更愿意选择用代码来测试代码的方式。
有了新增学生的测试经验,编辑的学生的测试也就不难了。测试的思想为:先新增一个学生,然后分别使用不符合要求的姓名、学号来更新此学生,断言在更新过程中发生异常。最后再用符合要求的姓名、学号来更新此学生,断言更新成功。
请按上述思路参考新增学生的校验尝试自行完成单元测试。**提示:**更新操作校验失败时将发生`TransactionSystemException`异常。
<hr>
参考代码如下:
entity/StudentTest.java
```java
@Test(expected = TransactionSystemException.class)
public void updateNameLengthToLongTest() {
// 第一次调用save执行保存操作
this.studentRepository.save(student);
this.student.setName("123456789012345678901");
// 第二次调用save执行更新操作
this.studentRepository.save(student);
}
@Test(expected = TransactionSystemException.class)
public void updateNameLengthToShortTest() {
this.studentRepository.save(student);
this.student.setName("1");
this.studentRepository.save(student);
}
/**
* 先后执行100次随机学号
* 当学号为6位时,更新成功
* 当学号不是6位时,更新时发生异常
*/
@Test
public void updateSnoLengthTest() {
this.studentRepository.save(student);
for (int i = 1; i <= 100; i++) {
this.student.setSno(RandomString.make(i));
boolean called = false;
try {
this.studentRepository.save(student);
} catch (TransactionSystemException e) {
called = true;
}
if (i != 6) {
Assertions.assertThat(called).isTrue();
} else {
Assertions.assertThat(called).isFalse();
}
}
}
```
除此以外Spring还提供了功能相似的 `PostLoad`、`PostPersist`、`PostRemove`、`PreRemove`注解,官方文档说明如下:
| Type | Description |
| --- | --- |
| @PrePersist | Executed before the entity manager persist operation is actually executed or cascaded. This call is synchronous with the persist operation. |
| @PreRemove | Executed before the entity manager remove operation is actually executed or cascaded. This call is synchronous with the remove operation. |
| @PostPersist | Executed after the entity manager persist operation is actually executed or cascaded. This call is invoked after the database INSERT is executed. |
| @PostRemove | Executed after the entity manager remove operation is actually executed or cascaded. This call is synchronous with the remove operation. |
| @PreUpdate | Executed before the database UPDATE operation. |
| @PostUpdate | Executed after the database UPDATE operation. |
| @PostLoad | Executed after an entity has been loaded into the current persistence context or an entity has been refreshed. |
请自行翻译尝试。
# 参考文档
| 名称 | 链接 | 预计学习时长(分) |
| --- | --- | --- |
| 源码地址 | [https://github.com/mengyunzhi/spring-boot-and-angular-guild/releases/tag/step4.7.9](https://github.com/mengyunzhi/spring-boot-and-angular-guild/releases/tag/step4.7.9) | - |
| Hibernate: Entity listeners and Callback methods | [https://docs.jboss.org/hibernate/core/4.0/hem/en-US/html/listeners.html#d0e2985](https://docs.jboss.org/hibernate/core/4.0/hem/en-US/html/listeners.html#d0e2985) | 10 |
- 序言
- 第一章:Hello World
- 第一节:Angular准备工作
- 1 Node.js
- 2 npm
- 3 WebStorm
- 第二节:Hello Angular
- 第三节:Spring Boot准备工作
- 1 JDK
- 2 MAVEN
- 3 IDEA
- 第四节:Hello Spring Boot
- 1 Spring Initializr
- 2 Hello Spring Boot!
- 3 maven国内源配置
- 4 package与import
- 第五节:Hello Spring Boot + Angular
- 1 依赖注入【前】
- 2 HttpClient获取数据【前】
- 3 数据绑定【前】
- 4 回调函数【选学】
- 第二章 教师管理
- 第一节 数据库初始化
- 第二节 CRUD之R查数据
- 1 原型初始化【前】
- 2 连接数据库【后】
- 3 使用JDBC读取数据【后】
- 4 前后台对接
- 5 ng-if【前】
- 6 日期管道【前】
- 第三节 CRUD之C增数据
- 1 新建组件并映射路由【前】
- 2 模板驱动表单【前】
- 3 httpClient post请求【前】
- 4 保存数据【后】
- 5 组件间调用【前】
- 第四节 CRUD之U改数据
- 1 路由参数【前】
- 2 请求映射【后】
- 3 前后台对接【前】
- 4 更新数据【前】
- 5 更新某个教师【后】
- 6 路由器链接【前】
- 7 观察者模式【前】
- 第五节 CRUD之D删数据
- 1 绑定到用户输入事件【前】
- 2 删除某个教师【后】
- 第六节 代码重构
- 1 文件夹化【前】
- 2 优化交互体验【前】
- 3 相对与绝对地址【前】
- 第三章 班级管理
- 第一节 JPA初始化数据表
- 第二节 班级列表
- 1 新建模块【前】
- 2 初识单元测试【前】
- 3 初始化原型【前】
- 4 面向对象【前】
- 5 测试HTTP请求【前】
- 6 测试INPUT【前】
- 7 测试BUTTON【前】
- 8 @RequestParam【后】
- 9 Repository【后】
- 10 前后台对接【前】
- 第三节 新增班级
- 1 初始化【前】
- 2 响应式表单【前】
- 3 测试POST请求【前】
- 4 JPA插入数据【后】
- 5 单元测试【后】
- 6 惰性加载【前】
- 7 对接【前】
- 第四节 编辑班级
- 1 FormGroup【前】
- 2 x、[x]、{{x}}与(x)【前】
- 3 模拟路由服务【前】
- 4 测试间谍spy【前】
- 5 使用JPA更新数据【后】
- 6 分层开发【后】
- 7 前后台对接
- 8 深入imports【前】
- 9 深入exports【前】
- 第五节 选择教师组件
- 1 初始化【前】
- 2 动态数据绑定【前】
- 3 初识泛型
- 4 @Output()【前】
- 5 @Input()【前】
- 6 再识单元测试【前】
- 7 其它问题
- 第六节 删除班级
- 1 TDD【前】
- 2 TDD【后】
- 3 前后台对接
- 第四章 学生管理
- 第一节 引入Bootstrap【前】
- 第二节 NAV导航组件【前】
- 1 初始化
- 2 Bootstrap格式化
- 3 RouterLinkActive
- 第三节 footer组件【前】
- 第四节 欢迎界面【前】
- 第五节 新增学生
- 1 初始化【前】
- 2 选择班级组件【前】
- 3 复用选择组件【前】
- 4 完善功能【前】
- 5 MVC【前】
- 6 非NULL校验【后】
- 7 唯一性校验【后】
- 8 @PrePersist【后】
- 9 CM层开发【后】
- 10 集成测试
- 第六节 学生列表
- 1 分页【后】
- 2 HashMap与LinkedHashMap
- 3 初识综合查询【后】
- 4 综合查询进阶【后】
- 5 小试综合查询【后】
- 6 初始化【前】
- 7 M层【前】
- 8 单元测试与分页【前】
- 9 单选与多选【前】
- 10 集成测试
- 第七节 编辑学生
- 1 初始化【前】
- 2 嵌套组件测试【前】
- 3 功能开发【前】
- 4 JsonPath【后】
- 5 spyOn【后】
- 6 集成测试
- 7 @Input 异步传值【前】
- 8 值传递与引入传递
- 9 @PreUpdate【后】
- 10 表单验证【前】
- 第八节 删除学生
- 1 CSS选择器【前】
- 2 confirm【前】
- 3 功能开发与测试【后】
- 4 集成测试
- 5 定制提示框【前】
- 6 引入图标库【前】
- 第九节 集成测试
- 第五章 登录与注销
- 第一节:普通登录
- 1 原型【前】
- 2 功能设计【前】
- 3 功能设计【后】
- 4 应用登录组件【前】
- 5 注销【前】
- 6 保留登录状态【前】
- 第二节:你是谁
- 1 过滤器【后】
- 2 令牌机制【后】
- 3 装饰器模式【后】
- 4 拦截器【前】
- 5 RxJS操作符【前】
- 6 用户登录与注销【后】
- 7 个人中心【前】
- 8 拦截器【后】
- 9 集成测试
- 10 单例模式
- 第六章 课程管理
- 第一节 新增课程
- 1 初始化【前】
- 2 嵌套组件测试【前】
- 3 async管道【前】
- 4 优雅的测试【前】
- 5 功能开发【前】
- 6 实体监听器【后】
- 7 @ManyToMany【后】
- 8 集成测试【前】
- 9 异步验证器【前】
- 10 详解CORS【前】
- 第二节 课程列表
- 第三节 果断
- 1 初始化【前】
- 2 分页组件【前】
- 2 分页组件【前】
- 3 综合查询【前】
- 4 综合查询【后】
- 4 综合查询【后】
- 第节 班级列表
- 第节 教师列表
- 第节 编辑课程
- TODO返回机制【前】
- 4 弹出框组件【前】
- 5 多路由出口【前】
- 第节 删除课程
- 第七章 权限管理
- 第一节 AOP
- 总结
- 开发规范
- 备用