有了前面`Hello World`的经验,我们如下完成前后台的对接工作。
# 引用HttpClientModule模块
app.module.ts
```js
import { BrowserModule } from '@angular/platform-browser';
import { NgModule } from '@angular/core';
import { AppRoutingModule } from './app-routing.module';
import { AppComponent } from './app.component';
import {HttpClientModule} from '@angular/common/http'; // ➊
@NgModule({
declarations: [
AppComponent
],
imports: [
BrowserModule,
AppRoutingModule,
HttpClientModule // ➋
],
providers: [],
bootstrap: [AppComponent]
})
export class AppModule { }
```
* 说明要引用的模块所在的具体位置,并引入到当前文件中。
* 将要引用的模块引入到angular中。
# 注入HttpClient对象
app.component.ts
```js
import {Component} from '@angular/core';
import {HttpClient} from '@angular/common/http'; // ➊
@Component({
selector: 'app-root',
templateUrl: './app.component.html',
styleUrls: ['./app.component.sass']
})
export class AppComponent {
title = 'web-app';
// 定义教师数组
teachers = new Array(
{
id: 1,
name: '张三',
username: 'zhangsan',
email: 'zhangsan@yunzhiclub.com',
sex: '男',
},
{
id: 2,
name: '李四',
username: 'lisi',
email: 'lisi@yunzhiclub.com',
sex: '女',
}
);
constructor(private httpClient: HttpClient) { // ➋
}
}
```
* ➊ 说明要引用的模块所在的具体位置,并引入到当前文件中。
* ➋ 将HttpClient对象注入到当前的组件中。
# 发起请求
在前面的小节中,我们直接在构造函数中进行数据的请求。虽然在当前的系统中,这样做并没有发现在有任何的问题,但这种做法是官方强烈禁止的,官方的建议是:只在构造函数中完成依赖注入,其它的初始化的操作应该放到`ngOnInit`中进行。按此思想,我们对原组件进行改造。
```js
import {Component, OnInit} from '@angular/core';
import {HttpClient} from '@angular/common/http';
@Component({
selector: 'app-root',
templateUrl: './app.component.html',
styleUrls: ['./app.component.sass']
})
/**
* 实现OnInit接口,该接口规定了ngOnInit方法。
* angular在组件准备完毕后,将自动调用ngOnInit方法
*/
export class AppComponent implements OnInit {
// 定义教师数组
teachers = new Array();
constructor(private httpClient: HttpClient) {
}
/**
* 该方法将在组件准备完毕后被调用
*/
ngOnInit() {
/* 后台数据的请求地址,如果变量定义后不再重新赋值,则应该使用const来定义 */
const url = 'http://localhost:8080/Teacher/';
/* 定义success方法,用于数据请求成功后回调 */
const success = function(response) {
console.log(response);
/*注意:这样写是不正确的,因为this的作用域是本function,而不是本class*/
this.teachers = response;
};
/* 定义error方法,用于数据请求失败时被调用 */
const error = function(response) {
console.log(response);
console.error('请求出错');
};
/* 使用get方法请求url,请求一旦成功后,将调用传入success方法;如果请求失败,将调用error方法 */
this.httpClient.get(url)
.subscribe(success, error);
}
}
```
# 测试
我们此时启动前后台,然后打开浏览器的控制台,并查看控制台中发生了什么。

如果你前面的章节学习的够踏实,那么在测试以前相信已已经断言此处将发生一个CORS的错误。由于当前我们当前访问的前台的地址是`[http://localhost:4200/](http://localhost:4200/)`而发起的请求的地址为`http://localhost:8080/Teacher/`。这两个地址并没有在一个域上,所以引起了浏览器的CORS保护。浏览器这么做并没有错,这完全是在保护使用者。
> 域的三要素:协议、地址、端口号。
## 增加跨域设置
我们来到后台在getAll方法上增加如下代码:
```java
@CrossOrigin("*")
```
重新启动后台,并刷新网页,相同的问题又发生了:
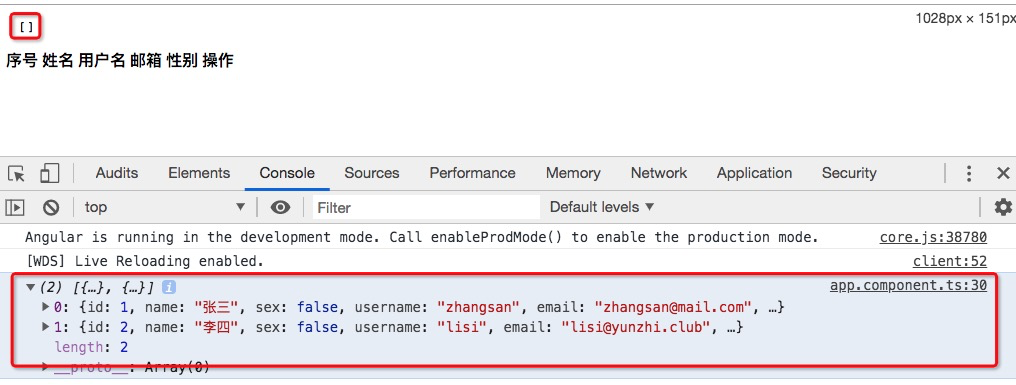
控制台成功的打印了请求返回的数据,但由于`this`作用域的不同,并没有按我们的想法成功的传入至`teachers`。
> 同样的错误,我们力争不出现两遍,这就要求我们当发生错误并成功解决后,把发生问题的情景描述清楚、把解决问题的思路理清楚,然后把它们持久化到我们自己的BLOG中。
## 解决this作用域
```js
const self = this; ➊
/* 后台数据的请求地址,如果变量定义后不再重新赋值,则应该使用const来定义 */
const url = 'http://localhost:8080/Teacher/';
/* 定义success方法,用于数据请求成功后回调 */
const success = function(response) {
console.log(response);
self.teachers = response; ➋
};
```
* ➊在此,将this赋值给self(有人也习惯用const what = this;意思是一样的那)。
* ➋此时调用的self即相当于组件中的this。
## 箭头函数
除了上面的方法以外,我们还可以使用`ES6`标准下的箭头函数来解决这个问题。
改写前:
```js
/* 定义success方法,用于数据请求成功后回调 */
const success = function(response) {
console.log(response);
/*注意:这样写是不正确的,因为this的作用域是本function,而不是本class*/
self.teachers = response;
};
```
改写后:
```js
/* 定义success方法,用于数据请求成功后回调 */
const success = (response) => { ➊
console.log(response);
this.teachers = response; ➋
};
```
* ➊ 由 `function (response)`改写为`(response) =>`
* ➋ 此时在这的`this`便是指此组件了。
## 测试
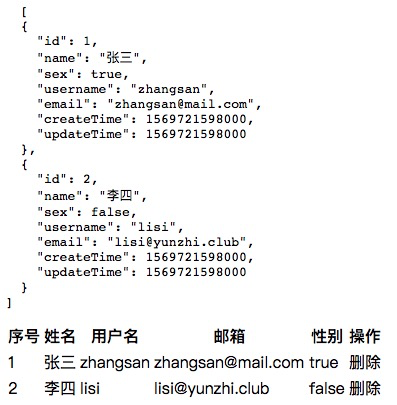
此时浏览器已为我们自动刷新了页面,查看最终的效果如下:
# 本节小测
* ➊将error改成箭头函数
* ➋将success, error变成匿名箭头函数,直接在调用`subscribe`时传入。
## 上节答案
猜有时候是可以解决我们大部分问题的,每个阶段都需要猜的辅助。所以无论你上节的答案是什么,只要能解决你对上节问题的疑惑,那么就是正确可取的。如果我们不小心猜对了,应该惊叹于自己强大的预测能力;如果不小心猜错了,那么当有一天我们自己发现这个错误或是被其它人指出的时候,就变成了我们知识升华的时候。
我的猜测步骤駋下: 首先,在数据库中增加测试代码;其次,在java中增加测试代码;最后,打断点进行测试。
```java
@GetMapping("test")
public void test() {
/* 定义实现了RowCallbackHandler接口的对象*/
RowCallbackHandler rowCallbackHandler = new RowCallbackHandler() {
@Override
public void processRow(ResultSet resultSet) throws SQLException {
logger.info(resultSet.getString("name_ascii"));
logger.info(resultSet.getString("name_gb2312"));
logger.info(resultSet.getString("name_utf8"));
logger.info(resultSet.getString("name_utf8mb4"));
}
};
/*定义查询字符串*/
String queryString = "select * from test";
jdbcTemplate.query(queryString, rowCallbackHandler);
}
```
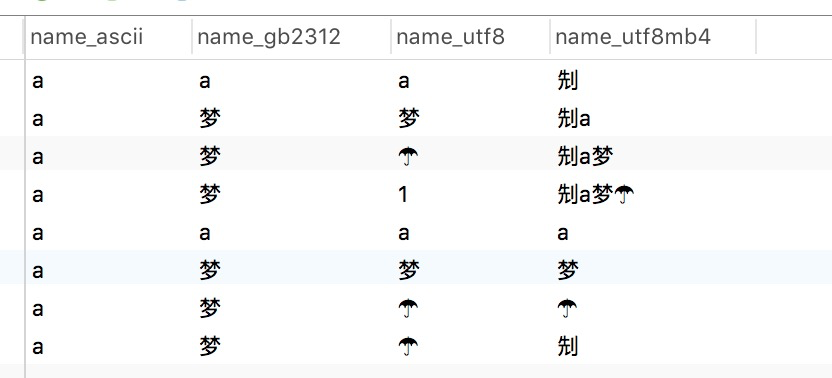
测试:
全部可用ascii编码表示时 `a a a a`
不可用acsii编码表示,但可用gb2312表示时 `a 梦 梦 梦`
不可用acsii编码,不可用gb2312,但可用utf8表示时。`a 梦 ☂ ☂`
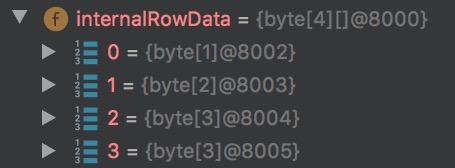
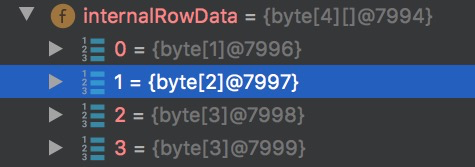
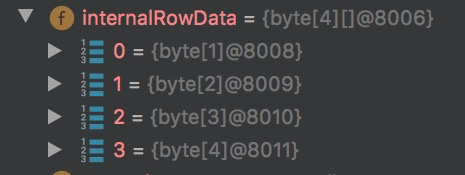
仅可用utf8mb4表示时 `a 梦 ☂ 𠜎`
字符混合时
那么,我猜测spring配合mysql完成了以下规则:
① 无论字段指定了什么编码规则,能用ascii表示就用ascii表示。
② gb2312编码下存储非ascii可表示字符必占用2个字节。
③ utf8编码下存储非ascii可表示字符必占用3个字节。
④ utf8mb4编码下存储非ascii可表示字符时:
➀ 适用于utf8编码的,直接使用utf8编码,占用3个字节。
➁ 不适用utf8编码的,使用utf8mb4编码,占用4个字节。
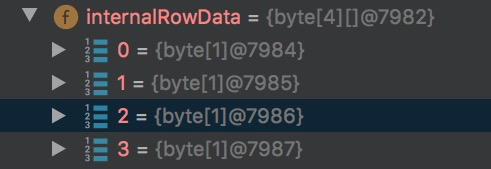
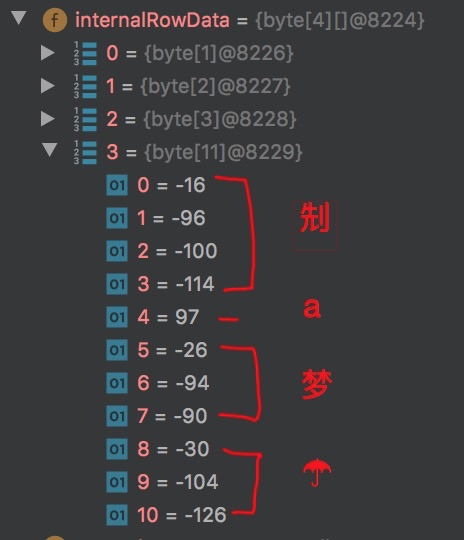
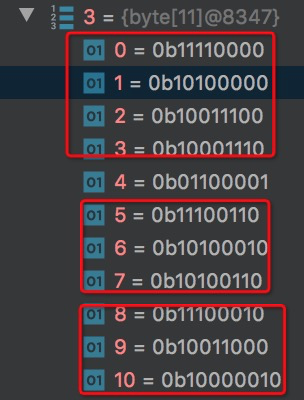
⑤ 系统之所以能够根据将11个字节长度的数组正确的分成`𠜎a梦☂`,是因为在编码时可能有以下规则:
➀ ascii编码中使用了 0 - 127,即 0000 0000 - 0111 1111 。它们的共同特点是:第1位是0。
➁ 再做字符串转换时,发现第1位为0,则表示其为ascii编码。该字符的字长为1个字节。
➂ 再做字符串转换时,发现前缀为110,则表示该编码的字长为2个字节。
➃ 再做字符串转换时, 发面前缀为1110时,则表示该编码的字长为3个字符。
➄ 再做字符串转换时, 发面前缀为11110时,则表示该编码的字长为4个字符。
# 参考文档
| 名称 | 链接 | 预计学习时长(分) |
| --- | --- | --- |
| angular http 请求 | [https://www.angular.cn/guide/http](https://www.angular.cn/guide/http) | 15 |
| onInit | [https://www.angular.cn/guide/lifecycle-hooks#oninit](https://www.angular.cn/guide/lifecycle-hooks#oninit) | 10 |
| 箭头函数 | [http://es6.ruanyifeng.com/#docs/function#%E7%AE%AD%E5%A4%B4%E5%87%BD%E6%95%B0](http://es6.ruanyifeng.com/#docs/function#%E7%AE%AD%E5%A4%B4%E5%87%BD%E6%95%B0) | 30 |
| Enabling Cross Origin Requests for a RESTful Web Service | [https://spring.io/guides/gs/rest-service-cors/](https://spring.io/guides/gs/rest-service-cors/) | 15 |
| 源码 | https://github.com/mengyunzhi/spring-boot-and-angular-guild/releases/tag/step2.2.4 |
- 序言
- 第一章:Hello World
- 第一节:Angular准备工作
- 1 Node.js
- 2 npm
- 3 WebStorm
- 第二节:Hello Angular
- 第三节:Spring Boot准备工作
- 1 JDK
- 2 MAVEN
- 3 IDEA
- 第四节:Hello Spring Boot
- 1 Spring Initializr
- 2 Hello Spring Boot!
- 3 maven国内源配置
- 4 package与import
- 第五节:Hello Spring Boot + Angular
- 1 依赖注入【前】
- 2 HttpClient获取数据【前】
- 3 数据绑定【前】
- 4 回调函数【选学】
- 第二章 教师管理
- 第一节 数据库初始化
- 第二节 CRUD之R查数据
- 1 原型初始化【前】
- 2 连接数据库【后】
- 3 使用JDBC读取数据【后】
- 4 前后台对接
- 5 ng-if【前】
- 6 日期管道【前】
- 第三节 CRUD之C增数据
- 1 新建组件并映射路由【前】
- 2 模板驱动表单【前】
- 3 httpClient post请求【前】
- 4 保存数据【后】
- 5 组件间调用【前】
- 第四节 CRUD之U改数据
- 1 路由参数【前】
- 2 请求映射【后】
- 3 前后台对接【前】
- 4 更新数据【前】
- 5 更新某个教师【后】
- 6 路由器链接【前】
- 7 观察者模式【前】
- 第五节 CRUD之D删数据
- 1 绑定到用户输入事件【前】
- 2 删除某个教师【后】
- 第六节 代码重构
- 1 文件夹化【前】
- 2 优化交互体验【前】
- 3 相对与绝对地址【前】
- 第三章 班级管理
- 第一节 JPA初始化数据表
- 第二节 班级列表
- 1 新建模块【前】
- 2 初识单元测试【前】
- 3 初始化原型【前】
- 4 面向对象【前】
- 5 测试HTTP请求【前】
- 6 测试INPUT【前】
- 7 测试BUTTON【前】
- 8 @RequestParam【后】
- 9 Repository【后】
- 10 前后台对接【前】
- 第三节 新增班级
- 1 初始化【前】
- 2 响应式表单【前】
- 3 测试POST请求【前】
- 4 JPA插入数据【后】
- 5 单元测试【后】
- 6 惰性加载【前】
- 7 对接【前】
- 第四节 编辑班级
- 1 FormGroup【前】
- 2 x、[x]、{{x}}与(x)【前】
- 3 模拟路由服务【前】
- 4 测试间谍spy【前】
- 5 使用JPA更新数据【后】
- 6 分层开发【后】
- 7 前后台对接
- 8 深入imports【前】
- 9 深入exports【前】
- 第五节 选择教师组件
- 1 初始化【前】
- 2 动态数据绑定【前】
- 3 初识泛型
- 4 @Output()【前】
- 5 @Input()【前】
- 6 再识单元测试【前】
- 7 其它问题
- 第六节 删除班级
- 1 TDD【前】
- 2 TDD【后】
- 3 前后台对接
- 第四章 学生管理
- 第一节 引入Bootstrap【前】
- 第二节 NAV导航组件【前】
- 1 初始化
- 2 Bootstrap格式化
- 3 RouterLinkActive
- 第三节 footer组件【前】
- 第四节 欢迎界面【前】
- 第五节 新增学生
- 1 初始化【前】
- 2 选择班级组件【前】
- 3 复用选择组件【前】
- 4 完善功能【前】
- 5 MVC【前】
- 6 非NULL校验【后】
- 7 唯一性校验【后】
- 8 @PrePersist【后】
- 9 CM层开发【后】
- 10 集成测试
- 第六节 学生列表
- 1 分页【后】
- 2 HashMap与LinkedHashMap
- 3 初识综合查询【后】
- 4 综合查询进阶【后】
- 5 小试综合查询【后】
- 6 初始化【前】
- 7 M层【前】
- 8 单元测试与分页【前】
- 9 单选与多选【前】
- 10 集成测试
- 第七节 编辑学生
- 1 初始化【前】
- 2 嵌套组件测试【前】
- 3 功能开发【前】
- 4 JsonPath【后】
- 5 spyOn【后】
- 6 集成测试
- 7 @Input 异步传值【前】
- 8 值传递与引入传递
- 9 @PreUpdate【后】
- 10 表单验证【前】
- 第八节 删除学生
- 1 CSS选择器【前】
- 2 confirm【前】
- 3 功能开发与测试【后】
- 4 集成测试
- 5 定制提示框【前】
- 6 引入图标库【前】
- 第九节 集成测试
- 第五章 登录与注销
- 第一节:普通登录
- 1 原型【前】
- 2 功能设计【前】
- 3 功能设计【后】
- 4 应用登录组件【前】
- 5 注销【前】
- 6 保留登录状态【前】
- 第二节:你是谁
- 1 过滤器【后】
- 2 令牌机制【后】
- 3 装饰器模式【后】
- 4 拦截器【前】
- 5 RxJS操作符【前】
- 6 用户登录与注销【后】
- 7 个人中心【前】
- 8 拦截器【后】
- 9 集成测试
- 10 单例模式
- 第六章 课程管理
- 第一节 新增课程
- 1 初始化【前】
- 2 嵌套组件测试【前】
- 3 async管道【前】
- 4 优雅的测试【前】
- 5 功能开发【前】
- 6 实体监听器【后】
- 7 @ManyToMany【后】
- 8 集成测试【前】
- 9 异步验证器【前】
- 10 详解CORS【前】
- 第二节 课程列表
- 第三节 果断
- 1 初始化【前】
- 2 分页组件【前】
- 2 分页组件【前】
- 3 综合查询【前】
- 4 综合查询【后】
- 4 综合查询【后】
- 第节 班级列表
- 第节 教师列表
- 第节 编辑课程
- TODO返回机制【前】
- 4 弹出框组件【前】
- 5 多路由出口【前】
- 第节 删除课程
- 第七章 权限管理
- 第一节 AOP
- 总结
- 开发规范
- 备用