# 9K WebDriver – 定位元素:第 2 部分(按`className`,`linkText`,`partialLinkText`)
> 原文: [https://javabeginnerstutorial.com/selenium/9k-webdriver-locating-elements-2/](https://javabeginnerstutorial.com/selenium/9k-webdriver-locating-elements-2/)
朋友! 让我们今天更深入地研究一下定位元素的更多策略。 在这篇文章中,我们将重点放在
* `className`
* `LinkText`
* `partialLinkText`
### 按类名称定位
类名称不过是用于设置 Web 元素样式的 CSS 类名称。 重要的是要注意页面上的许多 Web 元素可能具有相同的`className`。 在这种情况下,可以使用`findElements`方法,并且可以为结果建立索引。 请参考通过`tagName`策略定位(解释以及[先前文章](https://javabeginnerstutorial.com/selenium/9j-webdriver-locating-elements-1/)中提供的示例)。 如果我们有一个具有唯一`className`的元素,或者被测元素是该页面中使用该`className`的第一个元素,则`findElement`将执行此任务。
**语法**:`driver.findElement(By.className("element_class_name"))`*
**说明**:找到具有匹配 CSS 类名称的第一个元素。
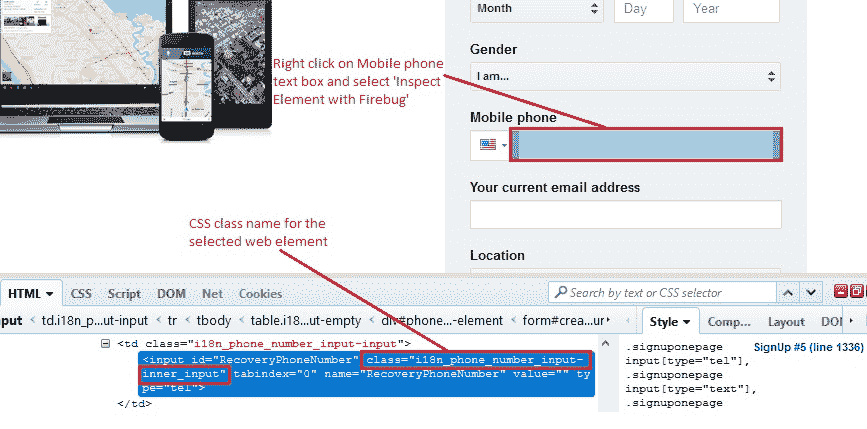
**示例**:让我们找到 gmail 帐户创建页面的“手机”文本框。
右键单击文本框,然后选择检查元素以获取相应的 HTML 代码。 我们可以看到“`input`”标签包含`class ="i18n_phone_number_input-inner_input"`。 让我们继续使用此类名称查找“手机”文本框,以进行进一步的交互。
*代码:*
```java
driver.findElement(By.className("i18n_phone_number_input-inner_input"));
```

### 通过`linkText`定位
当您想与超链接进行交互时,`linkText`非常有用。 使用该链接在网页上显示的实际文本。 那有多容易?
**语法**:`driver.findElement(By.linkText("hyperlink_text");`
**说明**:找到具有匹配链接文本的第一个超链接。
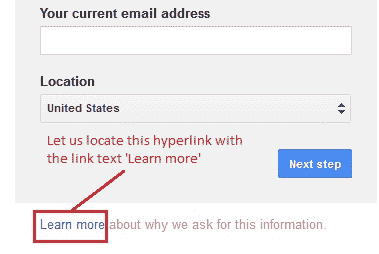
**示例**:让我们找到在 gmail 帐户创建页面底部提供的超链接“了解更多信息”。
*代码:*
```java
driver.findElement(By.linkText("Learn more"));
```

### 通过`partialLinkText`定位
`PartialLinkText`也用于与超链接进行交互,与`linkText`定位策略非常相似。 此方法不提供部分完整链接,而是提供链接显示的完整文本。 因此,可以将链接文本的一部分作为匹配条件。
**语法**:`driver.findElement(By.partialLinkText("hyperlink_partial_text");`
**说明**:找到第一个超链接,其中**包含**指定的部分链接文本。
**示例**:让我们在 Gmail 帐户创建页面的“选择用户名”文本框下方找到超链接“我更喜欢使用我当前的电子邮件地址” - 文本:**我更喜欢**。
*代码:*
```java
driver.findElement(By.partialLinkText("I prefer to"));
```

## 概览
让我们看一个实现上述三种定位器类型的测试用例。
#### 场景
1. 打开 Firefox 浏览器。
2. 导航到 Google 帐户创建页面
3. 通过`className`找到手机文本框
4. 输入“`9496543210`”作为手机号码
5. 通过`linkText`找到“了解详情”超链接
6. 链接超链接
7. 找到“我更喜欢使用当前的电子邮件地址”超链接和`partialLinkText`
8. 将完整的链接文本打印到控制台进行验证
此方案的 JUnit 代码是,
```java
import java.util.concurrent.TimeUnit;
import org.junit.After;
import org.junit.Before;
import org.junit.Test;
import org.openqa.selenium.By;
import org.openqa.selenium.WebDriver;
import org.openqa.selenium.WebElement;
import org.openqa.selenium.firefox.FirefoxDriver;
public class ElementLocatorTest2 {
//Declaring variables
private WebDriver driver;
private String baseUrl;
@Before
public void setUp() throws Exception{
// Selenium version 3 beta releases require system property set up
System.setProperty("webdriver.gecko.driver", "E:\\Softwares\\"
+ "Selenium\\geckodriver-v0.10.0-win64\\geckodriver.exe");
// Create a new instance for the class FirefoxDriver
// that implements WebDriver interface
driver = new FirefoxDriver();
// Implicit wait for 5 seconds
driver.manage().timeouts().implicitlyWait(5, TimeUnit.SECONDS);
// Assign the URL to be invoked to a String variable
baseUrl = "https://accounts.google.com/SignUp";
}
@Test
public void testPageTitle() throws Exception{
// Open baseUrl in Firefox browser window
driver.get(baseUrl);
// Locate Mobile phone text box by className and
// assign it to a variable of type WebElement
WebElement mobileNum = driver.findElement(By.className("i18n_phone_number_input-inner_input"));
// Clear the default placeholder or any value present
mobileNum.clear();
// Enter/type the value to the text box
mobileNum.sendKeys("9496543210");
// Locate 'Learn more' hyperlink by link text
WebElement link1 = driver.findElement(By.linkText("Learn more"));
// Click on 'Learn more'
link1.click();
// Locate hyperlink by partial link text
WebElement link2 = driver.findElement(By.partialLinkText("I prefer to"));
// Printing the complete link text to console
System.out.println("Complete link text: " + link2.getText());
}
@After
public void tearDown() throws Exception{
// Close the Firefox browser
driver.close();
}
}
```
*执行结果*
注释清楚地提供给每一行代码,因此很容易解释。

在 JUnit 窗格中,绿色条显示测试用例已成功执行。 输出将打印到控制台,以确认仅提供子文本“我更喜欢”作为 partialLinkText,即可访问“我更喜欢使用当前的电子邮件地址”超链接。

该图像的左半部分显示输入的电话号码,右半部分显示在 Firefox 浏览器中执行的最终输出。 点击“了解详情”链接后,我们将重定向到相应的页面。
是时候再休息一次了。 在接下来的文章中,准备好消化更多的信息,因为我们将研究两种有效的元素定位技术。
享受这一天!
- JavaBeginnersTutorial 中文系列教程
- Java 教程
- Java 教程 – 入门
- Java 的历史
- Java 基础知识:Java 入门
- jdk vs jre vs jvm
- public static void main(string args[])说明
- 面向初学者的 Java 类和对象教程
- Java 构造器
- 使用 Eclipse 编写 Hello World 程序
- 执行顺序
- Java 中的访问修饰符
- Java 中的非访问修饰符
- Java 中的数据类型
- Java 中的算术运算符
- Java 语句初学者教程
- 用 Java 创建对象的不同方法
- 内部类
- 字符串构建器
- Java 字符串教程
- Java 教程 – 变量
- Java 中的变量
- Java 中的局部变量
- Java 中的实例变量
- Java 引用变量
- 变量遮盖
- Java 教程 – 循环
- Java for循环
- Java 教程 – 异常
- Java 异常教程
- 异常处理 – try-with-resources语句
- Java 异常处理 – try catch块
- Java 教程 – OOPS 概念
- Java 重载
- Java 方法覆盖
- Java 接口
- 继承
- Java 教程 – 关键字
- Java 中的this关键字
- Java static关键字
- Java 教程 – 集合
- Java 数组教程
- Java 集合
- Java 集合迭代器
- Java Hashmap教程
- 链表
- Java 初学者List集合教程
- Java 初学者的Map集合教程
- Java 初学者的Set教程
- Java 初学者的SortedSet集合教程
- Java 初学者SortedMap集合教程
- Java 教程 – 序列化
- Java 序列化概念和示例
- Java 序列化概念和示例第二部分
- Java 瞬态与静态变量
- serialVersionUID的用途是什么
- Java 教程 – 枚举
- Java 枚举(enum)
- Java 枚举示例
- 核心 Java 教程 – 线程
- Java 线程教程
- Java 8 功能
- Java Lambda:初学者指南
- Lambda 表达式简介
- Java 8 Lambda 列表foreach
- Java 8 Lambda 映射foreach
- Java 9
- Java 9 功能
- Java 10
- Java 10 独特功能
- 核心 Java 教程 – 高级主题
- Java 虚拟机基础
- Java 类加载器
- Java 开发人员必须知道..
- Selenium 教程
- 1 什么是 Selenium?
- 2 为什么要进行自动化测试?
- 3 Selenium 的历史
- 4 Selenium 工具套件
- 5 Selenium 工具支持的浏览器和平台
- 6 Selenium 工具:争霸
- 7A Selenium IDE – 简介,优点和局限性
- 7B Selenium IDE – Selenium IDE 和 Firebug 安装
- 7C Selenium IDE – 突破表面:初探
- 7D Selenium IDE – 了解您的 IDE 功能
- 7E Selenium IDE – 了解您的 IDE 功能(续)。
- 7F Selenium IDE – 命令,目标和值
- 7G Selenium IDE – 记录和运行测试用例
- 7H Selenium IDE – Selenium 命令一览
- 7I Selenium IDE – 设置超时,断点,起点
- 7J Selenium IDE – 调试
- 7K Selenium IDE – 定位元素(按 ID,名称,链接文本)
- 7L Selenium IDE – 定位元素(续)
- 7M Selenium IDE – 断言和验证
- 7N Selenium IDE – 利用 Firebug 的优势
- 7O Selenium IDE – 以所需的语言导出测试用例
- 7P Selenium IDE – 其他功能
- 7Q Selenium IDE – 快速浏览插件
- 7Q Selenium IDE – 暂停和反射
- 8 给新手的惊喜
- 9A WebDriver – 架构及其工作方式
- 9B WebDriver – 在 Eclipse 中设置
- 9C WebDriver – 启动 Firefox 的第一个测试脚本
- 9D WebDriver – 执行测试
- 9E WebDriver – 用于启动其他浏览器的代码示例
- 9F WebDriver – JUnit 环境设置
- 9G WebDriver – 在 JUnit4 中运行 WebDriver 测试
- 9H WebDriver – 隐式等待
- 9I WebDriver – 显式等待
- 9J WebDriver – 定位元素:第 1 部分(按 ID,名称,标签名称)
- 9K WebDriver – 定位元素:第 2 部分(按className,linkText,partialLinkText)
- 9L WebDriver – 定位元素:第 3a 部分(按cssSelector定位)
- 9M WebDriver – 定位元素:第 3b 部分(cssSelector续)
- 9N WebDriver – 定位元素:第 4a 部分(通过 xpath)
- 9O WebDriver – 定位元素:第 4b 部分(XPath 续)
- 9P WebDriver – 节省时间的捷径:定位器验证
- 9Q WebDriver – 处理验证码
- 9R WebDriver – 断言和验证
- 9S WebDriver – 处理文本框和图像
- 9T WebDriver – 处理单选按钮和复选框
- 9U WebDriver – 通过两种方式选择项目(下拉菜单和多项选择)
- 9V WebDriver – 以两种方式处理表
- 9W WebDriver – 遍历表元素
- 9X WebDriver – 处理警报/弹出框
- 9Y WebDriver – 处理多个窗口
- 9Z WebDriver – 最大化窗口
- 9AA WebDriver – 执行 JavaScript 代码
- 9AB WebDriver – 使用动作类
- 9AC WebDriver – 无法轻松定位元素? 继续阅读...
- 10A 高级 WebDriver – 使用 Apache ANT
- 10B 高级 WebDriver – 生成 JUnit 报告
- 10C 高级 WebDriver – JUnit 报表自定义
- 10D 高级 WebDriver – JUnit 报告自定义续
- 10E 高级 WebDriver – 生成 PDF 报告
- 10F 高级 WebDriver – 截屏
- 10G 高级 WebDriver – 将屏幕截图保存到 Word 文档
- 10H 高级 WebDriver – 发送带有附件的电子邮件
- 10I 高级 WebDriver – 使用属性文件
- 10J 高级 WebDriver – 使用 POI 从 excel 读取数据
- 10K 高级 WebDriver – 使用 Log4j 第 1 部分
- 10L 高级 WebDriver – 使用 Log4j 第 2 部分
- 10M 高级 WebDriver – 以无头模式运行测试
- Vue 教程
- 1 使用 Vue.js 的 Hello World
- 2 模板语法和反应式的初探
- 3 Vue 指令简介
- 4 Vue Devtools 设置
- 5 数据绑定第 1 部分(文本,原始 HTML,JavaScript 表达式)
- 6 数据绑定第 2 部分(属性)
- 7 条件渲染第 1 部分(v-if,v-else,v-else-if)
- 8 条件渲染第 2 部分(v-if和v-show)
- 9 渲染列表第 1 部分(遍历数组)
- 10 渲染列表第 2 部分(遍历对象)
- 11 监听 DOM 事件和事件修饰符
- 12 监听键盘和鼠标事件
- 13 让我们使用简写
- 14 使用v-model进行双向数据绑定
- 15 表单输入绑定
- 18 类绑定
- Python 教程
- Python 3 简介
- Python 基础知识 - 又称 Hello World 以及如何实现
- 如何在 Windows 中安装 python
- 适用于 Windows,Mac,Linux 的 Python 设置
- Python 数字和字符串
- Python 列表
- Python 集
- Python 字典
- Python 条件语句
- Python 循环
- Python 函数
- 面向对象编程(OOP)
- Python 中的面向对象编程
- Python 3 中的异常处理
- Python 3:猜数字
- Python 3:猜数字 – 回顾
- Python 生成器
- Hibernate 教程
- Hibernate 框架基础
- Hibernate 4 入门教程
- Hibernate 4 注解配置
- Hibernate 4 的实体关系
- Hibernate 4 中的实体继承模型
- Hibernate 4 查询语言
- Hibernate 4 数据库配置
- Hibernate 4 批处理
- Hibernate 4 缓存
- Hibernate 4 审计
- Hibernate 4 的并发控制
- Hibernate 4 的多租户
- Hibernate 4 连接池
- Hibernate 自举
