# 10F 高级 WebDriver – 截屏
> 原文: [https://javabeginnerstutorial.com/selenium/10f-advanced-webdriver-taking-screenshot/](https://javabeginnerstutorial.com/selenium/10f-advanced-webdriver-taking-screenshot/)
嗨冠军! 屏幕截图。 在软件测试的拥挤街道上,另一个经常听到的术语。 如果您的环境中出现错误,而开发中没有错误,则无法用截图来证明,这是一个好测试! 因此,现在是时候该了解如何使用 Selenium WebDriver 来抓取了。
我知道您想到了几个问题。 最重要的是,“如果是手动测试,那么我只要按一下键盘上的`PrntScr`按钮,然后抓取一个漂亮的屏幕截图即可。 但是,当我实现自动化时,如何获得相同的结果?”
猜猜看,这很简单! 只需按照 3 个步骤进行操作,您就可以使用屏幕截图。 如果您像我一样,可能会急切地想看看它在代码中是如何工作的。 我的目标是取悦,所以请不要再拖延……
## 步骤 1:
使用 Selenium WebDriver 提供的`TakesScreenshot`接口。 将 WebDriver 对象强制转换为`TakesScreenshot`类型。
当您在`TakesScreenshot`下面看到一条弯曲的线时,只需单击`import org.openqa.selenium.TakesScreenshot;`包,您将没有任何错误。
```java
// Cast driver object to TakesScreenshot
TakesScreenshot screenshot = (TakesScreenshot) driver;
```
## 步骤 2:
要将屏幕截图获取为图像文件,请调用“`getScreenshotAs`”方法。
波浪线? - 点击:
```java
import org.openqa.selenium.OutputType;
import java.io.File;
```
```java
// Get the screenshot as an image File
File src = screenshot.getScreenshotAs(OutputType.FILE);
```
## 步骤 3:
将生成的图像文件复制到您选择的目标位置。 使用`FileUtils`类的`copyFile`方法可以轻松完成此操作。 重要的是要注意,此方法将引发`IOException`。 因此,作为一种好习惯,请将这段代码包装在`try-catch`块中。
线条更弯曲? - 点击:
```java
import java.io.IOException;
import org.apache.commons.io.FileUtils;
import java.text.SimpleDateFormat;
import java.util.Date;
```
确保完全按照指定的方式导入包。 通常,您可能需要下载`org.apache.commons.io` jar(在撰写本文时为[下载位置](https://jar-download.com/explore-java-source-code.php?a=commons-io&g=commons-io&v=2.5&downloadable=1))并将其添加到项目的构建路径中。 之前,我们已经多次看到此过程,因此,我不再重复(请参阅[本文第 3 步](https://javabeginnerstutorial.com/selenium/9b-webdriver-eclipse-setup/))。
另外,请注意,我们在代码中将图像另存为`.jpg`文件。 也可以将其另存为`.png`文件。
它可以很简单,
```java
// Copy the screenshot to destination
FileUtils.copyFile(src, new File(“\\screenshot\\test.jpg”));
```
还是一样复杂
```java
try {
// Specify the destination where the image will be saved
File dest = new File("\\Selenium\\screenshots\\" + testCaseName + "_" + timestamp() + ".jpg");
// Copy the screenshot to destination
FileUtils.copyFile(src, dest);
} catch (IOException ex) {
System.out.println(ex.getMessage());
}
public static String timestamp() {
// Timestamp to make each screenshot name unique
return new SimpleDateFormat("yyyy-MM-dd HH-mm-ss").format(new Date());
}
```
在我们的示例中,我们将使用复杂的版本。 因为我们要将所有与屏幕快照相关的代码放在一个单独的方法中(在新类中),并在每次我们希望捕获屏幕快照时调用它。 否则,我们将不得不为每种情况做相同的歌舞。
## 概览
使用两种方法创建一个名为“`SaveScreenshot.java`”的新类。
1. `public static void capture(String testCaseName, WebDriver driver)` – 具有捕获屏幕快照并将其保存到所需位置的所有代码。
2. `public static String timestamp()` – 用于生成时间戳并将其提供给上述方法,以使每个保存的屏幕截图都是唯一的。
## 示例场景
1. 打开 Firefox 浏览器。
2. 导航到 Google 帐户创建页面
3. 通过 ID 找到名字文本框
4. 输入“`fname01`”作为名字
5. 按名称找到姓氏文本框
6. 输入“`lname01`”作为姓氏
7. 截取页面截图并将其保存到某个位置。
## JUnit 代码:
1. ### `SaveScreenshot.java`类
```java
package com.blog.junitTests;
import java.io.File;
import java.io.IOException;
import java.text.SimpleDateFormat;
import java.util.Date;
import org.apache.commons.io.FileUtils;
import org.openqa.selenium.OutputType;
import org.openqa.selenium.TakesScreenshot;
import org.openqa.selenium.WebDriver;
public class SaveScreenshot {
public static void capture(String testCaseName, WebDriver driver) {
// Cast driver object to TakesScreenshot
TakesScreenshot screenshot = (TakesScreenshot) driver;
// Get the screenshot as an image File
File src = screenshot.getScreenshotAs(OutputType.FILE);
try {
// Specify the destination where the image will be saved
File dest = new File("\\Selenium\\screenshots\\" + testCaseName + "_" + timestamp() + ".jpg");
// Copy the screenshot to destination
FileUtils.copyFile(src, dest);
} catch (IOException ex) {
System.out.println(ex.getMessage());
}
}
public static String timestamp() {
// Timestamp to make each screenshot name unique
return new SimpleDateFormat("yyyy-MM-dd HH-mm-ss").format(new Date());
}
}
```
### 2\. `Screenshot.java`类(执行示例方案部分中详细介绍的步骤)
```java
package com.blog.junitTests;
import java.util.concurrent.TimeUnit;
import org.junit.After;
import org.junit.Before;
import org.junit.Test;
import org.openqa.selenium.By;
import org.openqa.selenium.WebDriver;
import org.openqa.selenium.WebElement;
import org.openqa.selenium.firefox.FirefoxDriver;
public class ScreenshotTest {
//Declaring variables
private WebDriver driver;
private String baseUrl;
private String testCaseName = "ScreenshotTest";
@Before
public void setUp() throws Exception{
// Selenium version 3 beta releases require system property set up
System.setProperty("webdriver.gecko.driver", "E:\\Softwares\\"
+ "Selenium\\geckodriver-v0.10.0-win64\\geckodriver.exe");
// Create a new instance for the class FirefoxDriver
// that implements WebDriver interface
driver = new FirefoxDriver();
// Implicit wait for 5 seconds
driver.manage().timeouts().implicitlyWait(5, TimeUnit.SECONDS);
// Assign the URL to be invoked to a String variable
baseUrl = "https://accounts.google.com/SignUp";
}
@Test
public void testPageTitle() throws Exception{
// Open baseUrl in Firefox browser window
driver.get(baseUrl);
// Locate First Name text box by id and
// assign it to a variable of type WebElement
WebElement firstName = driver.findElement(By.id("firstName"));
// Clear the default placeholder or any value present
firstName.clear();
// Enter/type the value to the text box
firstName.sendKeys("fname01");
// Locate last name text box by name
WebElement lastName = driver.findElement(By.name("lastName"));
// Clear and enter a value
lastName.clear();
lastName.sendKeys("lname01");
//Take a screenshot
SaveScreenshot.capture(testCaseName, driver);
}
@After
public void tearDown() throws Exception{
// Close the Firefox browser
driver.close();
}
}
```
为每行代码提供了注释,因此它是不言自明的。

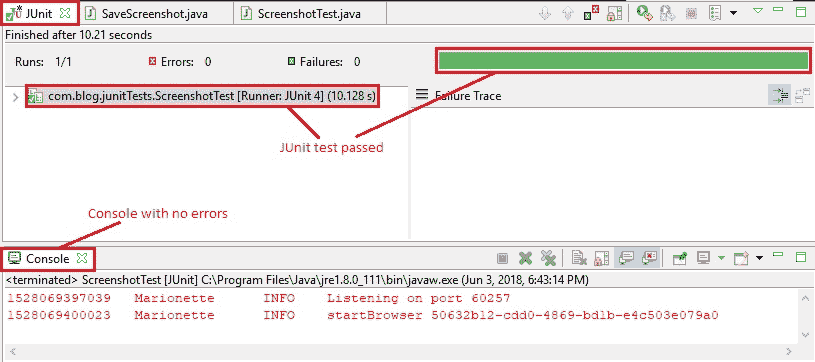
在 Eclipse IDE 中,“JUnit”窗格清楚地显示了测试用例“`ScreenshotTest.java`”已通过,并且控制台没有错误。
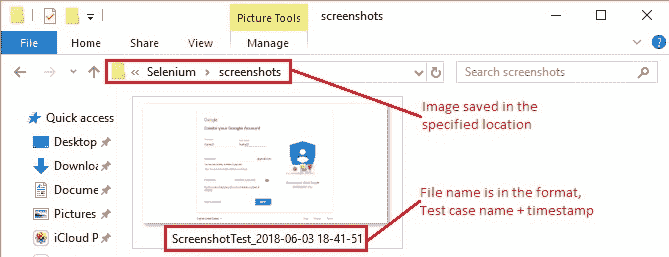
如代码中所指定,屏幕快照以上述格式的名称保存在“`E:/Selenium/screenshots`”路径中。

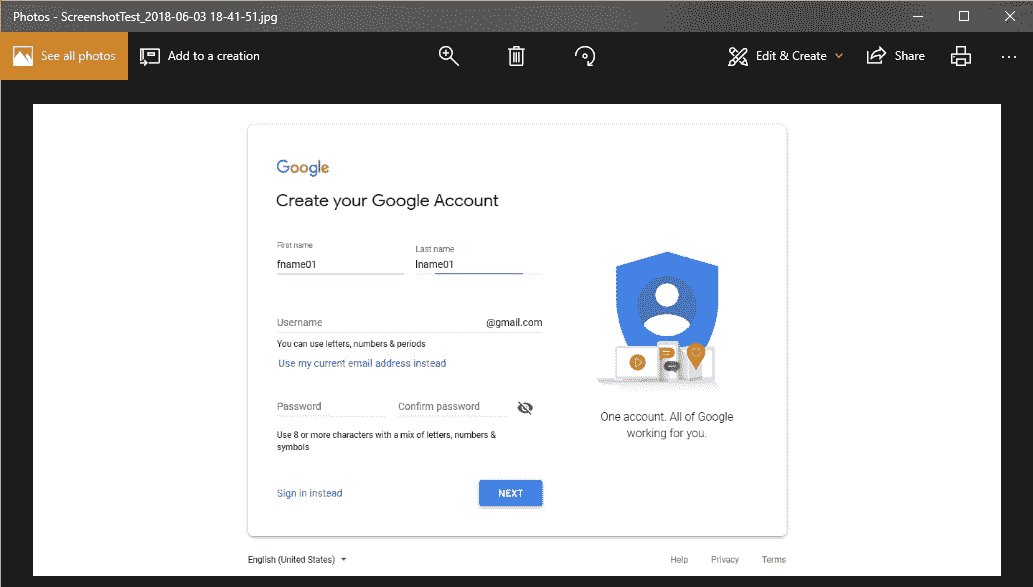
这是捕获的屏幕截图,

现在是时候在您的测试过程中实现这一点并为自己可视化魔术了。
祝屏幕截图愉快!😉
- JavaBeginnersTutorial 中文系列教程
- Java 教程
- Java 教程 – 入门
- Java 的历史
- Java 基础知识:Java 入门
- jdk vs jre vs jvm
- public static void main(string args[])说明
- 面向初学者的 Java 类和对象教程
- Java 构造器
- 使用 Eclipse 编写 Hello World 程序
- 执行顺序
- Java 中的访问修饰符
- Java 中的非访问修饰符
- Java 中的数据类型
- Java 中的算术运算符
- Java 语句初学者教程
- 用 Java 创建对象的不同方法
- 内部类
- 字符串构建器
- Java 字符串教程
- Java 教程 – 变量
- Java 中的变量
- Java 中的局部变量
- Java 中的实例变量
- Java 引用变量
- 变量遮盖
- Java 教程 – 循环
- Java for循环
- Java 教程 – 异常
- Java 异常教程
- 异常处理 – try-with-resources语句
- Java 异常处理 – try catch块
- Java 教程 – OOPS 概念
- Java 重载
- Java 方法覆盖
- Java 接口
- 继承
- Java 教程 – 关键字
- Java 中的this关键字
- Java static关键字
- Java 教程 – 集合
- Java 数组教程
- Java 集合
- Java 集合迭代器
- Java Hashmap教程
- 链表
- Java 初学者List集合教程
- Java 初学者的Map集合教程
- Java 初学者的Set教程
- Java 初学者的SortedSet集合教程
- Java 初学者SortedMap集合教程
- Java 教程 – 序列化
- Java 序列化概念和示例
- Java 序列化概念和示例第二部分
- Java 瞬态与静态变量
- serialVersionUID的用途是什么
- Java 教程 – 枚举
- Java 枚举(enum)
- Java 枚举示例
- 核心 Java 教程 – 线程
- Java 线程教程
- Java 8 功能
- Java Lambda:初学者指南
- Lambda 表达式简介
- Java 8 Lambda 列表foreach
- Java 8 Lambda 映射foreach
- Java 9
- Java 9 功能
- Java 10
- Java 10 独特功能
- 核心 Java 教程 – 高级主题
- Java 虚拟机基础
- Java 类加载器
- Java 开发人员必须知道..
- Selenium 教程
- 1 什么是 Selenium?
- 2 为什么要进行自动化测试?
- 3 Selenium 的历史
- 4 Selenium 工具套件
- 5 Selenium 工具支持的浏览器和平台
- 6 Selenium 工具:争霸
- 7A Selenium IDE – 简介,优点和局限性
- 7B Selenium IDE – Selenium IDE 和 Firebug 安装
- 7C Selenium IDE – 突破表面:初探
- 7D Selenium IDE – 了解您的 IDE 功能
- 7E Selenium IDE – 了解您的 IDE 功能(续)。
- 7F Selenium IDE – 命令,目标和值
- 7G Selenium IDE – 记录和运行测试用例
- 7H Selenium IDE – Selenium 命令一览
- 7I Selenium IDE – 设置超时,断点,起点
- 7J Selenium IDE – 调试
- 7K Selenium IDE – 定位元素(按 ID,名称,链接文本)
- 7L Selenium IDE – 定位元素(续)
- 7M Selenium IDE – 断言和验证
- 7N Selenium IDE – 利用 Firebug 的优势
- 7O Selenium IDE – 以所需的语言导出测试用例
- 7P Selenium IDE – 其他功能
- 7Q Selenium IDE – 快速浏览插件
- 7Q Selenium IDE – 暂停和反射
- 8 给新手的惊喜
- 9A WebDriver – 架构及其工作方式
- 9B WebDriver – 在 Eclipse 中设置
- 9C WebDriver – 启动 Firefox 的第一个测试脚本
- 9D WebDriver – 执行测试
- 9E WebDriver – 用于启动其他浏览器的代码示例
- 9F WebDriver – JUnit 环境设置
- 9G WebDriver – 在 JUnit4 中运行 WebDriver 测试
- 9H WebDriver – 隐式等待
- 9I WebDriver – 显式等待
- 9J WebDriver – 定位元素:第 1 部分(按 ID,名称,标签名称)
- 9K WebDriver – 定位元素:第 2 部分(按className,linkText,partialLinkText)
- 9L WebDriver – 定位元素:第 3a 部分(按cssSelector定位)
- 9M WebDriver – 定位元素:第 3b 部分(cssSelector续)
- 9N WebDriver – 定位元素:第 4a 部分(通过 xpath)
- 9O WebDriver – 定位元素:第 4b 部分(XPath 续)
- 9P WebDriver – 节省时间的捷径:定位器验证
- 9Q WebDriver – 处理验证码
- 9R WebDriver – 断言和验证
- 9S WebDriver – 处理文本框和图像
- 9T WebDriver – 处理单选按钮和复选框
- 9U WebDriver – 通过两种方式选择项目(下拉菜单和多项选择)
- 9V WebDriver – 以两种方式处理表
- 9W WebDriver – 遍历表元素
- 9X WebDriver – 处理警报/弹出框
- 9Y WebDriver – 处理多个窗口
- 9Z WebDriver – 最大化窗口
- 9AA WebDriver – 执行 JavaScript 代码
- 9AB WebDriver – 使用动作类
- 9AC WebDriver – 无法轻松定位元素? 继续阅读...
- 10A 高级 WebDriver – 使用 Apache ANT
- 10B 高级 WebDriver – 生成 JUnit 报告
- 10C 高级 WebDriver – JUnit 报表自定义
- 10D 高级 WebDriver – JUnit 报告自定义续
- 10E 高级 WebDriver – 生成 PDF 报告
- 10F 高级 WebDriver – 截屏
- 10G 高级 WebDriver – 将屏幕截图保存到 Word 文档
- 10H 高级 WebDriver – 发送带有附件的电子邮件
- 10I 高级 WebDriver – 使用属性文件
- 10J 高级 WebDriver – 使用 POI 从 excel 读取数据
- 10K 高级 WebDriver – 使用 Log4j 第 1 部分
- 10L 高级 WebDriver – 使用 Log4j 第 2 部分
- 10M 高级 WebDriver – 以无头模式运行测试
- Vue 教程
- 1 使用 Vue.js 的 Hello World
- 2 模板语法和反应式的初探
- 3 Vue 指令简介
- 4 Vue Devtools 设置
- 5 数据绑定第 1 部分(文本,原始 HTML,JavaScript 表达式)
- 6 数据绑定第 2 部分(属性)
- 7 条件渲染第 1 部分(v-if,v-else,v-else-if)
- 8 条件渲染第 2 部分(v-if和v-show)
- 9 渲染列表第 1 部分(遍历数组)
- 10 渲染列表第 2 部分(遍历对象)
- 11 监听 DOM 事件和事件修饰符
- 12 监听键盘和鼠标事件
- 13 让我们使用简写
- 14 使用v-model进行双向数据绑定
- 15 表单输入绑定
- 18 类绑定
- Python 教程
- Python 3 简介
- Python 基础知识 - 又称 Hello World 以及如何实现
- 如何在 Windows 中安装 python
- 适用于 Windows,Mac,Linux 的 Python 设置
- Python 数字和字符串
- Python 列表
- Python 集
- Python 字典
- Python 条件语句
- Python 循环
- Python 函数
- 面向对象编程(OOP)
- Python 中的面向对象编程
- Python 3 中的异常处理
- Python 3:猜数字
- Python 3:猜数字 – 回顾
- Python 生成器
- Hibernate 教程
- Hibernate 框架基础
- Hibernate 4 入门教程
- Hibernate 4 注解配置
- Hibernate 4 的实体关系
- Hibernate 4 中的实体继承模型
- Hibernate 4 查询语言
- Hibernate 4 数据库配置
- Hibernate 4 批处理
- Hibernate 4 缓存
- Hibernate 4 审计
- Hibernate 4 的并发控制
- Hibernate 4 的多租户
- Hibernate 4 连接池
- Hibernate 自举
