# 10B 高级 WebDriver – 生成 JUnit 报告
> 原文: [https://javabeginnerstutorial.com/selenium/10b-advanced-webdriver-generating-junit-reports/](https://javabeginnerstutorial.com/selenium/10b-advanced-webdriver-generating-junit-reports/)
嗨冠军! 报告,报告,无处不在的报告。 从哈利·波特时代开始,我们就一直在处理这些问题!! (还记得学校的进度报告吗?!)无论如何,报告真的很重要,尤其是在测试中,以便快速了解一切工作原理。
因此,今天,我们将使用 Apache ANT 的`junitreport`任务来生成一个任务。 热身!
从我的[上一篇文章](https://javabeginnerstutorial.com/selenium/10a-advanced-webdriver-apache-ant/)中,我们生成了带有“`junit`”作为默认 JUnit 输出目录的构建文件。 用简单的英语来说,这仅意味着将作为 JUnit 报告任务的一部分生成的所有文件都放置在名为“`junit`”的目录下。
#### 步骤 1 :
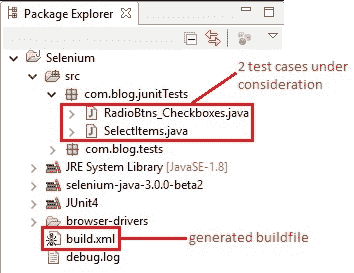
在项目“Selenium”下,将生成名为“`build.xml`”的 ANT 构建文件。 我已经在“`com.blog.junitTests`”包下创建了两个 JUnit 测试用例,分别是 [RadioBtns_Checkboxes.java](https://javabeginnerstutorial.com/selenium/9t-webdriver-handling-radio-buttons-checkboxes/) 和 [SelectItems.java](https://javabeginnerstutorial.com/selenium/9u-webdriver-select-items-two-ways/) ,如下图所示。 该代码可在相应的帖子中找到。 只需单击文件名即可进行导航。
#### 步骤 2 :
打开“`build.xml`”,并确保自动生成“`junitreport`”任务。 以下是我的项目的目标(初始化,清理,构建,`RadioBtns_Checkboxes`,`SelectItems`和`junitreport`)。
```xml
<project basedir="." default="build" name="Selenium">
<property environment="env"/>
<property name="junit.output.dir" value="junit"/>
<property name="debuglevel" value="source,lines,vars"/>
<property name="target" value="1.8"/>
<property name="source" value="1.8"/>
<target name="init">
<mkdir dir="bin"/>
<copy includeemptydirs="false" todir="bin">
<fileset dir="src">
<exclude name="**/*.java"/>
</fileset>
</copy>
</target>
<target name="clean">
<delete dir="bin"/>
</target>
<target name="build" depends="init">
<echo message="${ant.project.name}: ${ant.file}"/>
<javac debug="true" debuglevel="${debuglevel}" destdir="bin" includeantruntime="false" source="${source}" target="${target}">
<src path="src"/>
<classpath refid="Selenium.classpath"/>
</javac>
</target>
<target name="RadioBtns_Checkboxes">
<mkdir dir="${junit.output.dir}"/>
<junit fork="yes" printsummary="withOutAndErr">
<formatter type="xml"/>
<test name="com.blog.junitTests.RadioBtns_Checkboxes" todir="${junit.output.dir}"/>
<classpath refid="Selenium.classpath"/>
</junit>
</target>
<target name="SelectItems">
<mkdir dir="${junit.output.dir}"/>
<junit fork="yes" printsummary="withOutAndErr">
<formatter type="xml"/>
<test name="com.blog.junitTests.SelectItems" todir="${junit.output.dir}"/>
<classpath refid="Selenium.classpath"/>
</junit>
</target>
<target name="junitreport">
<junitreport todir="${junit.output.dir}">
<fileset dir="${junit.output.dir}">
<include name="TEST-*.xml"/>
</fileset>
<report format="frames" todir="${junit.output.dir}"/>
</junitreport>
</target>
</project>
```
#### 步骤 3 :
可以通过以下任意一种方式执行构建,
1.右键单击“构建文件(`build.xml`)-> 运行方式 -> Ant Build”
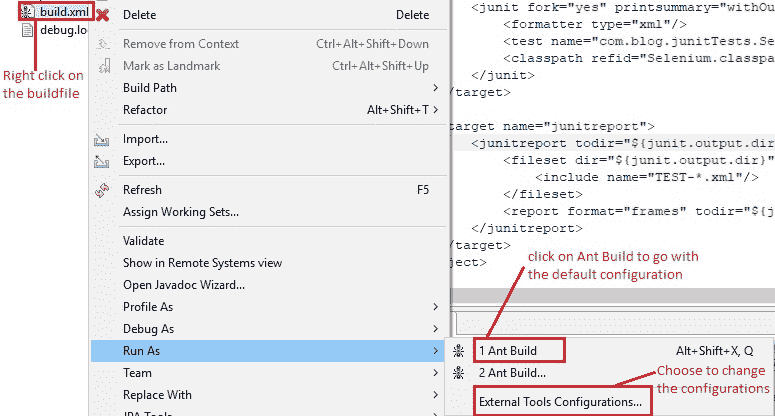
2.右键单击“构建文件(`build.xml`)-> 运行方式 -> 外部工具配置 -> 运行”
3.蚀工具栏中的快捷方式运行图标
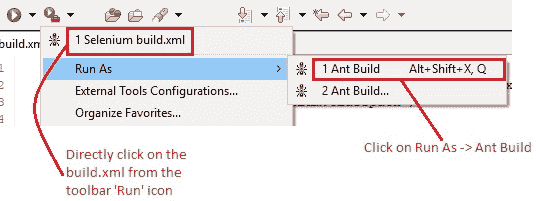
让我们采用第二种方法,看看如何使用“外部工具配置”选项修改现有配置。
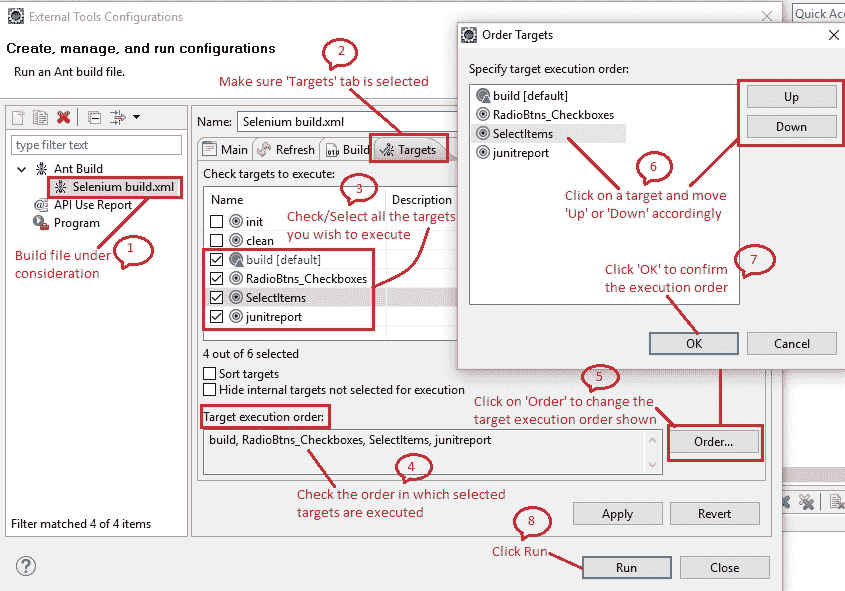
因此,右键单击“构建文件->运行方式->外部工具配置”:这将打开一个弹出窗口。 选择“主要”标签,并确保选择了正确的构建文件。

然后点击“目标”标签。
1. 将列出构建文件中定义的所有目标名称,并且仅检查默认目标。 点击“运行”,选择要执行的所有目标。
2. 在“目标执行顺序”框中,将从上一步中选择的所有目标按执行顺序列出。
3. 如果您想更改顺序,请点击“顺序...”。 这将打开“顺序目标”弹出窗口。
4. 我们可以通过选择目标并相应地单击“上”或“下”按钮来在此弹出窗口中指定目标执行顺序。 点击“确定”以确认最终的执行顺序。
5. 完成所有操作后,点击“应用”和“运行”
#### 步骤 4 :
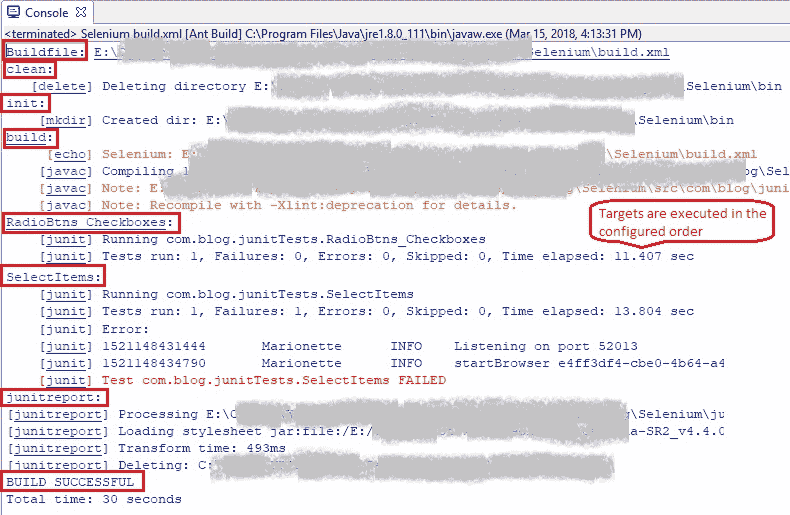
可以通过查看控制台视图来验证成功执行。 它显示了按配置顺序执行的所有目标以及基于构建文件中提到的日志记录级别的日志。 如图所示,将显示运行构建所花费的总时间以及消息“`BUILD SUCCESSFUL`”或“`BUILD FAILED`”。
#### 步骤 5 :
在 Eclipse 的“包浏览器”视图中,右键单击该项目,然后单击“刷新”或`F5`。 已经创建了“`junit`”文件夹(在生成构建文件时在“JUnit 输出目录”框中指定的名称)。 这是 JUnit 报告(`index.html`)和 XML 一起提供的地方,用于执行的每个测试用例,显示其成功或失败。
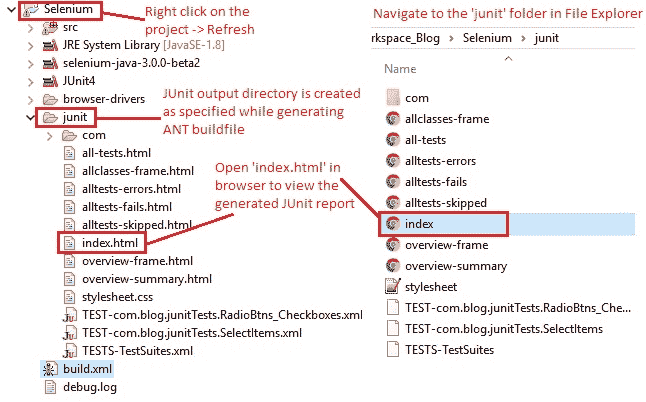
或者,在文件浏览器中导航到项目路径,然后双击“`junit`”文件夹。
#### 步骤 6 :
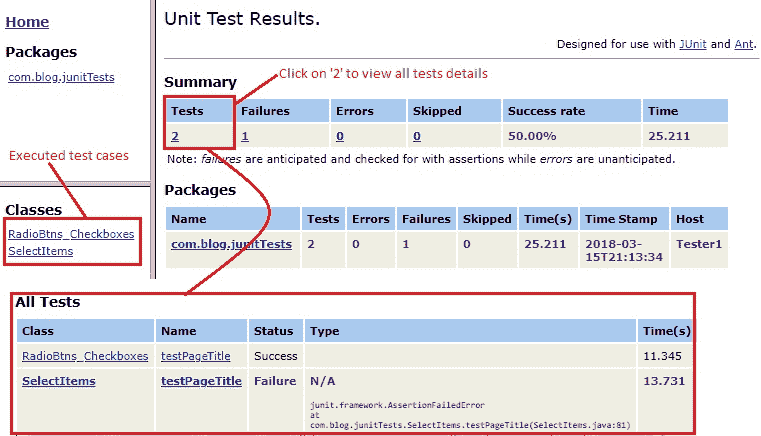
在浏览器中打开“`index.html`”,并检查生成的默认报告。 这将在左窗格中显示所涉及的包和所有已执行的 Java 文件。
右窗格显示测试结果的摘要,其中包括测试的总数,失败,错误,跳过,成功率和执行时间。 还显示了包列表,其中包含类似的详细信息。
要深入查看所有已执行的测试或失败等,请单击显示的数字,如下图所示,
用 Apache ANT 生成 JUnit 报告不是一件容易的事吗? 猜猜这就是我们今天要做的。
在另一篇文章中再见。 祝您报告愉快!
- JavaBeginnersTutorial 中文系列教程
- Java 教程
- Java 教程 – 入门
- Java 的历史
- Java 基础知识:Java 入门
- jdk vs jre vs jvm
- public static void main(string args[])说明
- 面向初学者的 Java 类和对象教程
- Java 构造器
- 使用 Eclipse 编写 Hello World 程序
- 执行顺序
- Java 中的访问修饰符
- Java 中的非访问修饰符
- Java 中的数据类型
- Java 中的算术运算符
- Java 语句初学者教程
- 用 Java 创建对象的不同方法
- 内部类
- 字符串构建器
- Java 字符串教程
- Java 教程 – 变量
- Java 中的变量
- Java 中的局部变量
- Java 中的实例变量
- Java 引用变量
- 变量遮盖
- Java 教程 – 循环
- Java for循环
- Java 教程 – 异常
- Java 异常教程
- 异常处理 – try-with-resources语句
- Java 异常处理 – try catch块
- Java 教程 – OOPS 概念
- Java 重载
- Java 方法覆盖
- Java 接口
- 继承
- Java 教程 – 关键字
- Java 中的this关键字
- Java static关键字
- Java 教程 – 集合
- Java 数组教程
- Java 集合
- Java 集合迭代器
- Java Hashmap教程
- 链表
- Java 初学者List集合教程
- Java 初学者的Map集合教程
- Java 初学者的Set教程
- Java 初学者的SortedSet集合教程
- Java 初学者SortedMap集合教程
- Java 教程 – 序列化
- Java 序列化概念和示例
- Java 序列化概念和示例第二部分
- Java 瞬态与静态变量
- serialVersionUID的用途是什么
- Java 教程 – 枚举
- Java 枚举(enum)
- Java 枚举示例
- 核心 Java 教程 – 线程
- Java 线程教程
- Java 8 功能
- Java Lambda:初学者指南
- Lambda 表达式简介
- Java 8 Lambda 列表foreach
- Java 8 Lambda 映射foreach
- Java 9
- Java 9 功能
- Java 10
- Java 10 独特功能
- 核心 Java 教程 – 高级主题
- Java 虚拟机基础
- Java 类加载器
- Java 开发人员必须知道..
- Selenium 教程
- 1 什么是 Selenium?
- 2 为什么要进行自动化测试?
- 3 Selenium 的历史
- 4 Selenium 工具套件
- 5 Selenium 工具支持的浏览器和平台
- 6 Selenium 工具:争霸
- 7A Selenium IDE – 简介,优点和局限性
- 7B Selenium IDE – Selenium IDE 和 Firebug 安装
- 7C Selenium IDE – 突破表面:初探
- 7D Selenium IDE – 了解您的 IDE 功能
- 7E Selenium IDE – 了解您的 IDE 功能(续)。
- 7F Selenium IDE – 命令,目标和值
- 7G Selenium IDE – 记录和运行测试用例
- 7H Selenium IDE – Selenium 命令一览
- 7I Selenium IDE – 设置超时,断点,起点
- 7J Selenium IDE – 调试
- 7K Selenium IDE – 定位元素(按 ID,名称,链接文本)
- 7L Selenium IDE – 定位元素(续)
- 7M Selenium IDE – 断言和验证
- 7N Selenium IDE – 利用 Firebug 的优势
- 7O Selenium IDE – 以所需的语言导出测试用例
- 7P Selenium IDE – 其他功能
- 7Q Selenium IDE – 快速浏览插件
- 7Q Selenium IDE – 暂停和反射
- 8 给新手的惊喜
- 9A WebDriver – 架构及其工作方式
- 9B WebDriver – 在 Eclipse 中设置
- 9C WebDriver – 启动 Firefox 的第一个测试脚本
- 9D WebDriver – 执行测试
- 9E WebDriver – 用于启动其他浏览器的代码示例
- 9F WebDriver – JUnit 环境设置
- 9G WebDriver – 在 JUnit4 中运行 WebDriver 测试
- 9H WebDriver – 隐式等待
- 9I WebDriver – 显式等待
- 9J WebDriver – 定位元素:第 1 部分(按 ID,名称,标签名称)
- 9K WebDriver – 定位元素:第 2 部分(按className,linkText,partialLinkText)
- 9L WebDriver – 定位元素:第 3a 部分(按cssSelector定位)
- 9M WebDriver – 定位元素:第 3b 部分(cssSelector续)
- 9N WebDriver – 定位元素:第 4a 部分(通过 xpath)
- 9O WebDriver – 定位元素:第 4b 部分(XPath 续)
- 9P WebDriver – 节省时间的捷径:定位器验证
- 9Q WebDriver – 处理验证码
- 9R WebDriver – 断言和验证
- 9S WebDriver – 处理文本框和图像
- 9T WebDriver – 处理单选按钮和复选框
- 9U WebDriver – 通过两种方式选择项目(下拉菜单和多项选择)
- 9V WebDriver – 以两种方式处理表
- 9W WebDriver – 遍历表元素
- 9X WebDriver – 处理警报/弹出框
- 9Y WebDriver – 处理多个窗口
- 9Z WebDriver – 最大化窗口
- 9AA WebDriver – 执行 JavaScript 代码
- 9AB WebDriver – 使用动作类
- 9AC WebDriver – 无法轻松定位元素? 继续阅读...
- 10A 高级 WebDriver – 使用 Apache ANT
- 10B 高级 WebDriver – 生成 JUnit 报告
- 10C 高级 WebDriver – JUnit 报表自定义
- 10D 高级 WebDriver – JUnit 报告自定义续
- 10E 高级 WebDriver – 生成 PDF 报告
- 10F 高级 WebDriver – 截屏
- 10G 高级 WebDriver – 将屏幕截图保存到 Word 文档
- 10H 高级 WebDriver – 发送带有附件的电子邮件
- 10I 高级 WebDriver – 使用属性文件
- 10J 高级 WebDriver – 使用 POI 从 excel 读取数据
- 10K 高级 WebDriver – 使用 Log4j 第 1 部分
- 10L 高级 WebDriver – 使用 Log4j 第 2 部分
- 10M 高级 WebDriver – 以无头模式运行测试
- Vue 教程
- 1 使用 Vue.js 的 Hello World
- 2 模板语法和反应式的初探
- 3 Vue 指令简介
- 4 Vue Devtools 设置
- 5 数据绑定第 1 部分(文本,原始 HTML,JavaScript 表达式)
- 6 数据绑定第 2 部分(属性)
- 7 条件渲染第 1 部分(v-if,v-else,v-else-if)
- 8 条件渲染第 2 部分(v-if和v-show)
- 9 渲染列表第 1 部分(遍历数组)
- 10 渲染列表第 2 部分(遍历对象)
- 11 监听 DOM 事件和事件修饰符
- 12 监听键盘和鼠标事件
- 13 让我们使用简写
- 14 使用v-model进行双向数据绑定
- 15 表单输入绑定
- 18 类绑定
- Python 教程
- Python 3 简介
- Python 基础知识 - 又称 Hello World 以及如何实现
- 如何在 Windows 中安装 python
- 适用于 Windows,Mac,Linux 的 Python 设置
- Python 数字和字符串
- Python 列表
- Python 集
- Python 字典
- Python 条件语句
- Python 循环
- Python 函数
- 面向对象编程(OOP)
- Python 中的面向对象编程
- Python 3 中的异常处理
- Python 3:猜数字
- Python 3:猜数字 – 回顾
- Python 生成器
- Hibernate 教程
- Hibernate 框架基础
- Hibernate 4 入门教程
- Hibernate 4 注解配置
- Hibernate 4 的实体关系
- Hibernate 4 中的实体继承模型
- Hibernate 4 查询语言
- Hibernate 4 数据库配置
- Hibernate 4 批处理
- Hibernate 4 缓存
- Hibernate 4 审计
- Hibernate 4 的并发控制
- Hibernate 4 的多租户
- Hibernate 4 连接池
- Hibernate 自举
