# 浏览器
chrome浏览器占有越来越高的市场份额,虽然作为消费者永远不希望任何一家独大,但我们不得不承认,chrome浏览器对开发者的确非常友好。如果你的计算机上还没有安装chrome浏览器,请下载安装以更好的与教程保持步调一致。
# 模块化
Angular支持模块化开发,这非常友好的支持了项目分工,而且使开发、维护都变得非常容易。如果我们愿意,结合适当的单元测试还可以大幅度提升软件的开发质量。
## ng test
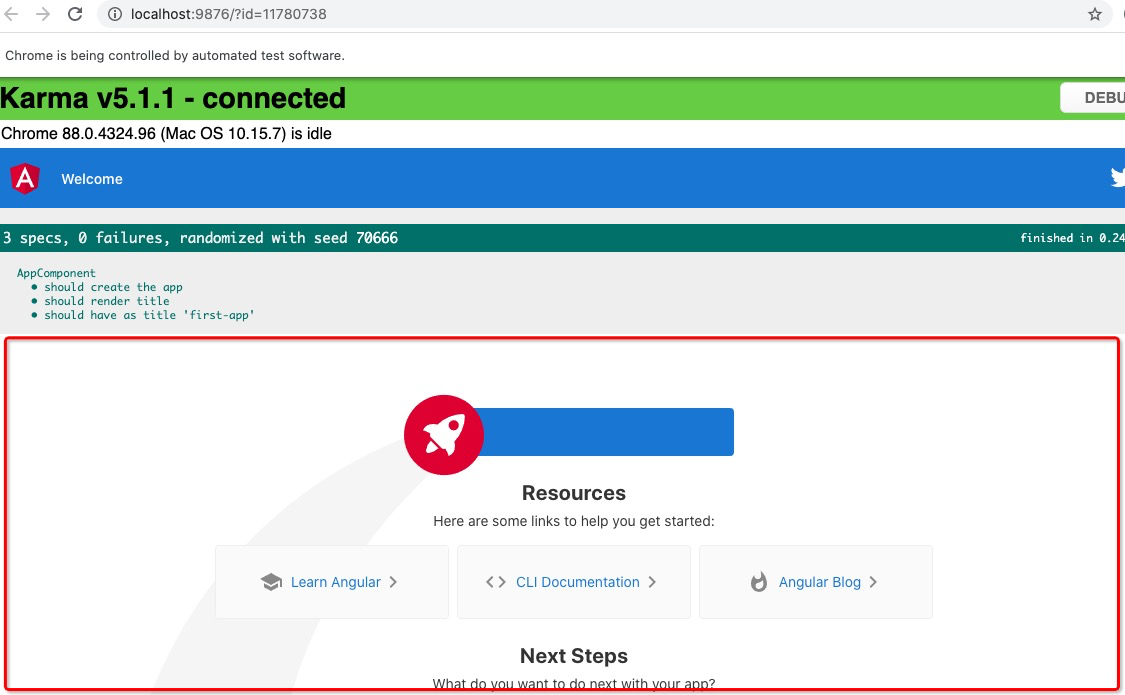
本节我们使用`ng test`或`ng t`来代替`ng serve`来启动Angular的欢迎模块:
```bash
panjiedeMac-Pro:first-app panjie$ ng t
Compiling @angular/core/testing : es2015 as esm2015
Chrome 88.0.4324.96 (Mac OS 10.15.7): Executed 3 of 3 SUCCESS (0.243 secs / 0.179 secs)
TOTAL: 3 SUCCESS
```
该命令将自动为我们打开浏览器,显示欢迎页面如下:

与使用`ng serve`不同,`ng t`显示了更多的信息,我们暂时仅仅需要知道其它信息属于模块化开发时显示的帮助信息即可。
# IDE
虽然我们可以选择任一款IDE,但在此仍然强烈的推荐大家使用`WebStorm`,除占用的资源较高、收费外,它真的全身都是优点。
在IDE的领域里,如果jetbrains称自己排行老二,当前怕是还没有人敢说自己排行第一。WebStorm是该公共发布的IDEA之一,官方称其为: The smartest JavaScript IDE - 最智能的JavaScript集成开发环境。该软件对一般用户是收费的,当前的价格是首年129刀、次年103刀、第三年起每年77刀;但它其非常友好的是对教育用户都是免费的,而这只需要你拥有一个.edu的邮箱(没有邮箱,使用学生证也是可以的,但需要人工审核,周期会长一些)。我们暂时假设大家都是有.edu邮箱的,官方还很贴心的给出了学生授权申请方式。
官方地址:[https://www.jetbrains.com/webstorm/](https://www.jetbrains.com/webstorm/)
# Hello World!
使用WebStorm打开项目文件夹`first-app`,依次打开左侧`project`中的如下文件:

清空该文件中的内容后将以下内容复制至该文件:
```html
<h1>Hello World!</h1>
```
在执行`ng t`的情况下,对应的浏览器将自动刷新,并显示以下界面:

我们注意到在页面上出现了红色的错误,这是由于`ng t`的`约束`起了作用。我们可以在一些文件中去写一些约束的方法,该约束方法能够保证:在日后的代码更新中,我们当前书写的功能不被**误杀**,而这个约束的行为我们称为单元测试,这些约束的代码则是单元测试的代码。
## 解决错误提示
Angular中用于约束的单元测试代码全部以`.spec.ts`结尾,当前报错的约束代码位于`app.component.spec.ts`中,文件可对应约束:`app.component.ts`、`app.component.html`、`app.component.css`三个文件。
当前`app.component.spec.ts`测试文件中有一段代码是对`app.component.html`进行约束的:
```typescript
it('should render title', () => {
const fixture = TestBed.createComponent(AppComponent);
fixture.detectChanges();
const compiled = fixture.nativeElement;
expect(compiled.querySelector('.content span').textContent).toContain('first-app app is running!')❶;
});
```
此处代码的作用是:最终生成的界面内容中必须包含`first-app app is running`❶,否则就会用报错的方法来提示,我们把这种错误的提醒方式称为**断言**。
如何使用代码来约束代码是个相对复杂的话题,在此我们暂时放弃这种复杂的操作,**删除**`app.component.spec.ts`中的以下代码:
```typescript
it(`should have as title 'first-app'`, () => {
const fixture = TestBed.createComponent(AppComponent);
const app = fixture.componentInstance;
expect(app.title).toEqual('first-app');
});
it('should render title', () => {
const fixture = TestBed.createComponent(AppComponent);
fixture.detectChanges();
const compiled = fixture.nativeElement;
expect(compiled.querySelector('.content span').textContent).toContain('first-app app is running!');
});
```
删除后`app.component.spec.ts`代码如下:
```typescript
import { TestBed } from '@angular/core/testing';
import { RouterTestingModule } from '@angular/router/testing';
import { AppComponent } from './app.component';
describe('AppComponent', () => {
beforeEach(async () => {
await TestBed.configureTestingModule({
imports: [
RouterTestingModule
],
declarations: [
AppComponent
],
}).compileComponents();
});
it('should create the app', () => {
const fixture = TestBed.createComponent(AppComponent);
const app = fixture.componentInstance;
expect(app).toBeTruthy();
});
});
```

错误消失。
# 本节作业
浏览 `app.component.spec.ts`、`app.component.ts`、`app.component.html`、`app.component.css`四个文件,猜猜它们间是如何关联在一起的。
# 资源列表
| 名称 | 地址 |
|---- | ---- |
| 搭建环境 | [https://www.angular.cn/guide/setup-local](https://www.angular.cn/guide/setup-local) |
| 本节源码 | [https://github.com/mengyunzhi/angular11-guild/archive/step1.3.zip](https://github.com/mengyunzhi/angular11-guild/archive/step1.3.zip)
- 序言
- 第一章 Hello World
- 1.1 环境安装
- 1.2 Hello Angular
- 1.3 Hello World!
- 第二章 教师管理
- 2.1 教师列表
- 2.1.1 初始化原型
- 2.1.2 组件生命周期之初始化
- 2.1.3 ngFor
- 2.1.4 ngIf、ngTemplate
- 2.1.5 引用 Bootstrap
- 2.2 请求后台数据
- 2.2.1 HttpClient
- 2.2.2 请求数据
- 2.2.3 模块与依赖注入
- 2.2.4 异步与回调函数
- 2.2.5 集成测试
- 2.2.6 本章小节
- 2.3 新增教师
- 2.3.1 组件初始化
- 2.3.2 [(ngModel)]
- 2.3.3 对接后台
- 2.3.4 路由
- 2.4 编辑教师
- 2.4.1 组件初始化
- 2.4.2 获取路由参数
- 2.4.3 插值与模板表达式
- 2.4.4 初识泛型
- 2.4.5 更新教师
- 2.4.6 测试中的路由
- 2.5 删除教师
- 2.6 收尾工作
- 2.6.1 RouterLink
- 2.6.2 fontawesome图标库
- 2.6.3 firefox
- 2.7 总结
- 第三章 用户登录
- 3.1 初识单元测试
- 3.2 http概述
- 3.3 Basic access authentication
- 3.4 着陆组件
- 3.5 @Output
- 3.6 TypeScript 类
- 3.7 浏览器缓存
- 3.8 总结
- 第四章 个人中心
- 4.1 原型
- 4.2 管道
- 4.3 对接后台
- 4.4 x-auth-token认证
- 4.5 拦截器
- 4.6 小结
- 第五章 系统菜单
- 5.1 延迟及测试
- 5.2 手动创建组件
- 5.3 隐藏测试信息
- 5.4 规划路由
- 5.5 定义菜单
- 5.6 注销
- 5.7 小结
- 第六章 班级管理
- 6.1 新增班级
- 6.1.1 组件初始化
- 6.1.2 MockApi 新建班级
- 6.1.3 ApiInterceptor
- 6.1.4 数据验证
- 6.1.5 教师选择列表
- 6.1.6 MockApi 教师列表
- 6.1.7 代码重构
- 6.1.8 小结
- 6.2 教师列表组件
- 6.2.1 初始化
- 6.2.2 响应式表单
- 6.2.3 getTestScheduler()
- 6.2.4 应用组件
- 6.2.5 小结
- 6.3 班级列表
- 6.3.1 原型设计
- 6.3.2 初始化分页
- 6.3.3 MockApi
- 6.3.4 静态分页
- 6.3.5 动态分页
- 6.3.6 @Input()
- 6.4 编辑班级
- 6.4.1 测试模块
- 6.4.2 响应式表单验证
- 6.4.3 @Input()
- 6.4.4 FormGroup
- 6.4.5 自定义FormControl
- 6.4.6 代码重构
- 6.4.7 小结
- 6.5 删除班级
- 6.6 集成测试
- 6.6.1 惰性加载
- 6.6.2 API拦截器
- 6.6.3 路由与跳转
- 6.6.4 ngStyle
- 6.7 初识Service
- 6.7.1 catchError
- 6.7.2 单例服务
- 6.7.3 单元测试
- 6.8 小结
- 第七章 学生管理
- 7.1 班级列表组件
- 7.2 新增学生
- 7.2.1 exports
- 7.2.2 自定义验证器
- 7.2.3 异步验证器
- 7.2.4 再识DI
- 7.2.5 属性型指令
- 7.2.6 完成功能
- 7.2.7 小结
- 7.3 单元测试进阶
- 7.4 学生列表
- 7.4.1 JSON对象与对象
- 7.4.2 单元测试
- 7.4.3 分页模块
- 7.4.4 子组件测试
- 7.4.5 重构分页
- 7.5 删除学生
- 7.5.1 第三方dialog
- 7.5.2 批量删除
- 7.5.3 面向对象
- 7.6 集成测试
- 7.7 编辑学生
- 7.7.1 初始化
- 7.7.2 自定义provider
- 7.7.3 更新学生
- 7.7.4 集成测试
- 7.7.5 可订阅的路由参数
- 7.7.6 小结
- 7.8 总结
- 第八章 其它
- 8.1 打包构建
- 8.2 发布部署
- 第九章 总结