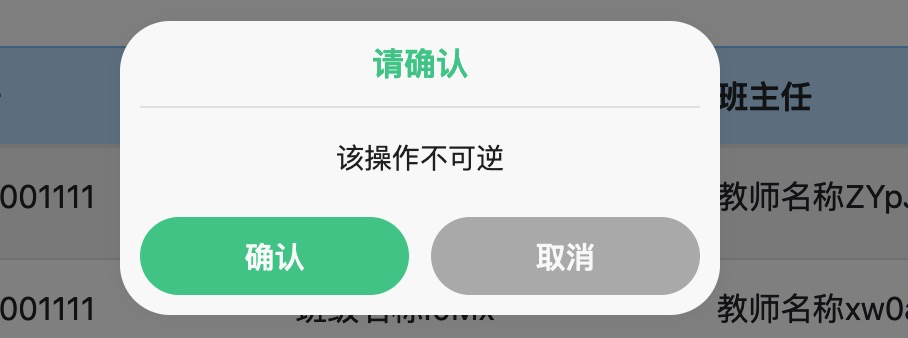
本节我们尝试引入一个更加友好的对话框来替换原生的`confirm`对话。
对话框在英文中又称为`alert`、`Dialog`或是 `notifications`,以`html confirm beautiful dialog`为关键字搜索,可以找到很多优秀的组件。比如[https://www.cssscript.com/tag/confirm/](https://www.cssscript.com/tag/confirm/)一文中给出了30种具体这样功能的组件:`Notiflix`,`Cute Alert`,`Asteroid Alert`,`sweet alert`,`Confirmo`等。
如此众多的组件(包),到底该怎么选择呢?建议如下:
1. 如果有一篇类似于总结的文章,优先选择位于前面的包。因为虽然它可能不是最少的,但却必然不会是最差的。
2. 优先选择`npm`已托管的包(组件),包被`npm`托管说明该项目不会太过时,同时安装起来也不会太难。
3. 优先使用自己说明文档能被自己看懂的包,这样的阻力最小。
4. 优先选择提供`demo`的包,有`demo`参考性更强,成功集成的概率也会越大。
5. 优先使用周下载量更高的包。`npmjs`对每个包都会有个周下载量的值,该值越大说明使用该包的用户越多,也就意味着其被更多的用户认同。
在第三包的使用过程中,应该本着先完成后完美的思想。先把组件跑起来,然后再逐步的优化,以达到自己理想的目标。
## Notiflix
接下来我们以 Notiflix 为例,展示将其引入到当前项目中的步骤。
之所以选择 Notiflix,是因为它在刚刚提到的文章中处于第一个,相信效果肯定不会太差。接下来来到[https://www.npmjs.com/package](https://www.npmjs.com/package),以 Notiflix 为关键字进行查找。

发现找到它的身影。这意味着它已被`npm`托管,所以不会太过时,安装起来应该也不会太难。
接着点击搜索的结果,来到 Notiflix 在 npm中的首页 [https://www.npmjs.com/package/notiflix](https://www.npmjs.com/package/notiflix),按提示进行安装。
### Npm i
在大多部的npm包的文件中,都会出现如下的安装方式:
```bash
npm i xxx
```
其实这里的参数`i`是`install`的简写,所以上述写法等同于`npm install xxx`。同时由于我们是团队开发,所以需要把自己当前依赖的第三方包以`配置文件`的形式共享给其它成员,这个`配置文件`也就是项目根目录下的`package.json`。而若想将安装`xxx`的信息自动添加到`package.json`中,则需要使用`-s`参数。所以如果得到的安装命令是`npm i xxx`,我们实际上执行的是:
```bash
npm i xxx -s
```
或者全称:
```bash
npm install xxx --save
```
当然了,如果你愿意使用:`npm i xxx --save`或`npm install xxx -s`也是完成可以的。
### 安装
按文档的提示,安装 notiflix 的命令为:`npm i notiflix`。我们使用shell来到项目根路径,执行:
```bash
npm i notiflix -s
```
为与教程保持一致的效果,请使用以下命令来指定安装版本:
```bash
npm i notiflix@3.0.1 -s
```
安装结果如下:
```bash
panjie@panjies-iMac first-app % npm i notiflix@3.0.1 -s
+ notiflix@3.0.1
added 1 package from 1 contributor, removed 1 package and audited 1473 packages in 8.805s
84 packages are looking for funding
run `npm fund` for details
found 478 vulnerabilities (88 moderate, 389 high, 1 critical)
run `npm audit fix` to fix them, or `npm audit` for details
```
## 使用
第三方包的使用方式大体上分为两种,第一种即我们在前面引入`bootstrap`的方式:将特定的`js`、`css`文件放到`angular.json`的特定位置上。这是一种通用的作法,适用于引入所有的第三方包。
但如果当前包支持`import`引用,则完全不需要那么麻烦,比如当前 notiflix 在文档中便明确的说明,可以使用`import`来引入。
```typescript
+++ b/first-app/src/app/student/student.component.ts
@@ -3,6 +3,7 @@ import {Page} from '../entity/page';
import {Student} from '../entity/student';
import {StudentService} from '../service/student.service';
import {environment} from '../../environments/environment';
+import {Confirm} from 'notiflix';
@Component({
selector: 'app-student',
```
同引入`environment`的作用完全一致,引用了`Confirm`后,便可以在组件中使用`Confirm`了。随即参考官方文档[https://www.notiflix.com/#Confirm](https://www.notiflix.com/#Confirm)将学生列表组件的`delete`方法改写为:
```typescript
onDelete(index: number, id: number): void {
console.log(Confirm);
Confirm.show('请确认', '该操作不可逆', '确认', '取消',
() => {
this.studentService.delete(id)
.subscribe(() => this.pageData.content.splice(index, 1));
}, () => {
console.log('cancel');
});
}
```
> 在学习教程时,可能由于notiflix官方更新的原因,导致教程的方法与官方文档不一致。
此时再次点击删除按钮,将在控制台中打印`Confirm`:

在控制台中查看该`Confirm`的类型是个对象,该对象中存在4个可用的方法,可以的一个`show()`方法便是我们此次调用的。

该方法被调用后,一个清新的对话框便被成功的展示在了我们面前。
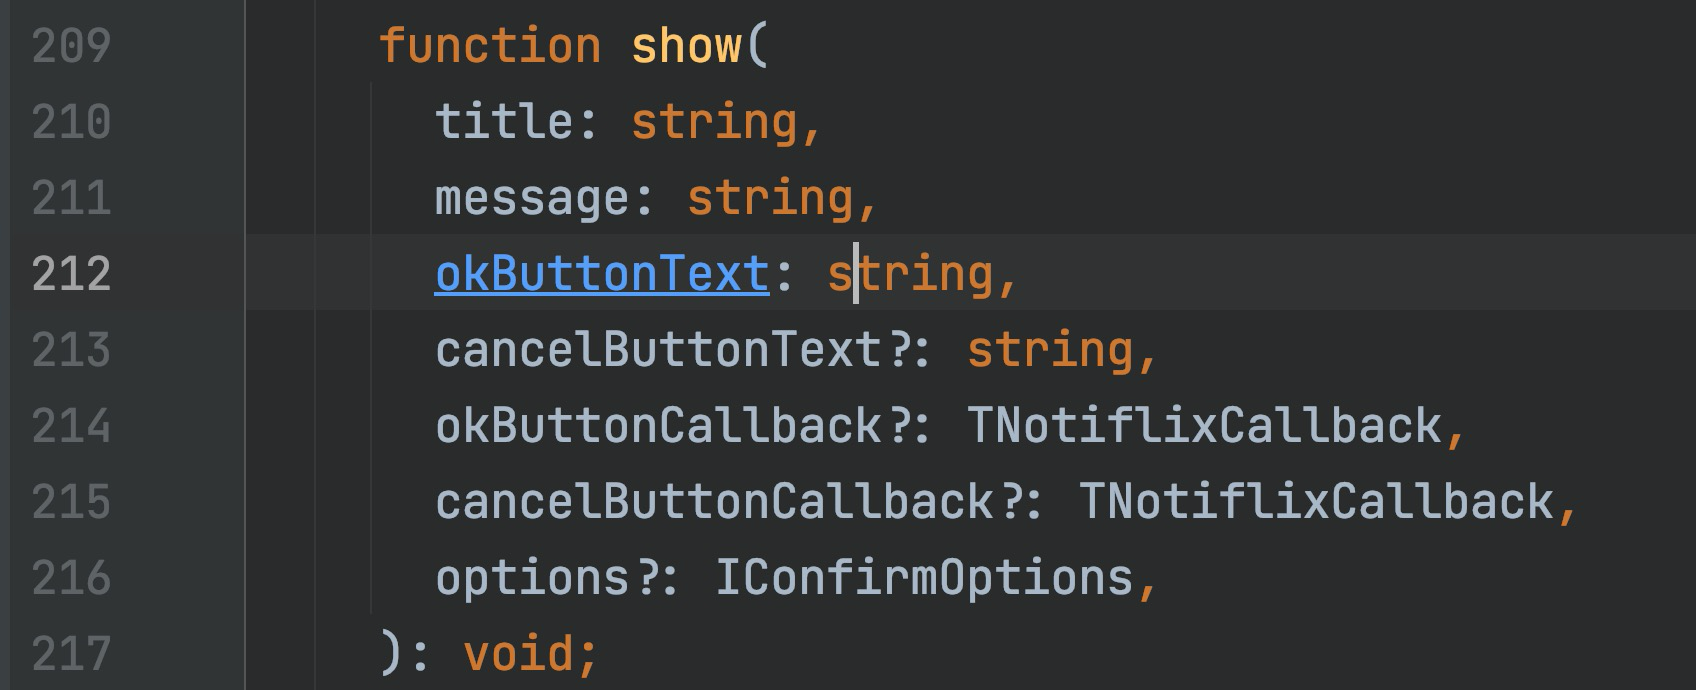
有人说老师你怎么就知道`Confirm.show()`方法的各个参数都代表什么,我想说在没有看官方文档之前,我也不知道。另外除了可以看官方文档以外,还可以借助IDE按往`ctrl`后点击`show`方法,进行跳转到`Confirm.show()`的源代码,如果源代码写的好,那么也可以很轻松的获取到各个参数的意思。

当然了,你也可以懒到啥都不看,多尝试几次也可以蒙出来。
### 本节作业
还等什么,赶快尝试引用一下其它的第三方对话框库吧。
## 总结
相较于在`angular.json`添加各种配置来引用第三方库,这种使用`import`引入的方式的确是太棒了!
## 上节参考答案:
C层:
```typescript
+++ b/first-app/src/app/student/student.component.ts
@@ -33,6 +33,11 @@ export class StudentComponent implements OnInit {
}
onDelete(index: number, id: number): void {
+ const result = confirm('确认要删除吗?');
+ if (result) {
+ this.studentService.delete(id)
+ .subscribe(() => this.pageData.content.splice(index, 1));
+ }
}
```
M层:
```typescript
+++ b/first-app/src/app/service/student.service.ts
@@ -28,6 +28,15 @@ export class StudentService {
return this.httpClient.post<Student>('/student', student);
}
+ /**
+ * 删除
+ * @param id 学生ID
+ */
+ delete(id: number): Observable<void> {
+ const url = '/student/' + id.toString();
+ return this.httpClient.delete<void>(url);
+ }
+
```
对应单元测试:
```typescript
+++ b/first-app/src/app/service/student.service.spec.ts
@@ -26,6 +26,20 @@ describe('StudentService', () => {
error => console.log('error', error));
});
+ fit('delete', () => {
+ const id = Math.floor(Math.random() * 10);
+ let called = false;
+ service.delete(id).subscribe(() => {
+ called = true;
+ });
+ // 由于HTTP请求是异步的,所以在短时间内还没有返回数据,called值仍然为false
+ expect(called).toBeFalse();
+
+ // 数据被手动返回后,called值为true
+ getTestScheduler().flush();
+ expect(called).toBeTrue();
+ });
+
```
| 链接 | 名称 |
| ------------------------------------------------------------ | -------- |
| [https://github.com/mengyunzhi/angular11-guild/archive/step7.5.1.zip](https://github.com/mengyunzhi/angular11-guild/archive/step7.5.1.zip) | 本节源码 |
- 序言
- 第一章 Hello World
- 1.1 环境安装
- 1.2 Hello Angular
- 1.3 Hello World!
- 第二章 教师管理
- 2.1 教师列表
- 2.1.1 初始化原型
- 2.1.2 组件生命周期之初始化
- 2.1.3 ngFor
- 2.1.4 ngIf、ngTemplate
- 2.1.5 引用 Bootstrap
- 2.2 请求后台数据
- 2.2.1 HttpClient
- 2.2.2 请求数据
- 2.2.3 模块与依赖注入
- 2.2.4 异步与回调函数
- 2.2.5 集成测试
- 2.2.6 本章小节
- 2.3 新增教师
- 2.3.1 组件初始化
- 2.3.2 [(ngModel)]
- 2.3.3 对接后台
- 2.3.4 路由
- 2.4 编辑教师
- 2.4.1 组件初始化
- 2.4.2 获取路由参数
- 2.4.3 插值与模板表达式
- 2.4.4 初识泛型
- 2.4.5 更新教师
- 2.4.6 测试中的路由
- 2.5 删除教师
- 2.6 收尾工作
- 2.6.1 RouterLink
- 2.6.2 fontawesome图标库
- 2.6.3 firefox
- 2.7 总结
- 第三章 用户登录
- 3.1 初识单元测试
- 3.2 http概述
- 3.3 Basic access authentication
- 3.4 着陆组件
- 3.5 @Output
- 3.6 TypeScript 类
- 3.7 浏览器缓存
- 3.8 总结
- 第四章 个人中心
- 4.1 原型
- 4.2 管道
- 4.3 对接后台
- 4.4 x-auth-token认证
- 4.5 拦截器
- 4.6 小结
- 第五章 系统菜单
- 5.1 延迟及测试
- 5.2 手动创建组件
- 5.3 隐藏测试信息
- 5.4 规划路由
- 5.5 定义菜单
- 5.6 注销
- 5.7 小结
- 第六章 班级管理
- 6.1 新增班级
- 6.1.1 组件初始化
- 6.1.2 MockApi 新建班级
- 6.1.3 ApiInterceptor
- 6.1.4 数据验证
- 6.1.5 教师选择列表
- 6.1.6 MockApi 教师列表
- 6.1.7 代码重构
- 6.1.8 小结
- 6.2 教师列表组件
- 6.2.1 初始化
- 6.2.2 响应式表单
- 6.2.3 getTestScheduler()
- 6.2.4 应用组件
- 6.2.5 小结
- 6.3 班级列表
- 6.3.1 原型设计
- 6.3.2 初始化分页
- 6.3.3 MockApi
- 6.3.4 静态分页
- 6.3.5 动态分页
- 6.3.6 @Input()
- 6.4 编辑班级
- 6.4.1 测试模块
- 6.4.2 响应式表单验证
- 6.4.3 @Input()
- 6.4.4 FormGroup
- 6.4.5 自定义FormControl
- 6.4.6 代码重构
- 6.4.7 小结
- 6.5 删除班级
- 6.6 集成测试
- 6.6.1 惰性加载
- 6.6.2 API拦截器
- 6.6.3 路由与跳转
- 6.6.4 ngStyle
- 6.7 初识Service
- 6.7.1 catchError
- 6.7.2 单例服务
- 6.7.3 单元测试
- 6.8 小结
- 第七章 学生管理
- 7.1 班级列表组件
- 7.2 新增学生
- 7.2.1 exports
- 7.2.2 自定义验证器
- 7.2.3 异步验证器
- 7.2.4 再识DI
- 7.2.5 属性型指令
- 7.2.6 完成功能
- 7.2.7 小结
- 7.3 单元测试进阶
- 7.4 学生列表
- 7.4.1 JSON对象与对象
- 7.4.2 单元测试
- 7.4.3 分页模块
- 7.4.4 子组件测试
- 7.4.5 重构分页
- 7.5 删除学生
- 7.5.1 第三方dialog
- 7.5.2 批量删除
- 7.5.3 面向对象
- 7.6 集成测试
- 7.7 编辑学生
- 7.7.1 初始化
- 7.7.2 自定义provider
- 7.7.3 更新学生
- 7.7.4 集成测试
- 7.7.5 可订阅的路由参数
- 7.7.6 小结
- 7.8 总结
- 第八章 其它
- 8.1 打包构建
- 8.2 发布部署
- 第九章 总结