# 原型
我们常常听到程序员在报怨项目经理或是客户,报怨他们往往在产品成型后马上提出近一步的需求。我想说这是非常正常的现象,因为作为项目经理或客户,他们是完全的外行。在与他们进行信息交流时,存在信息差属于非常正常的现象。
而我们要做的,就是把这种信息差尽量降低到最小。程序员是必然离不开电脑的,而一个优秀的程序员是必然离不开纸和笔的。在正式编码前,一定要把脑子带上,使用最小的成本将我们计划完成的产品展示给用户,同时也是展示给自己。
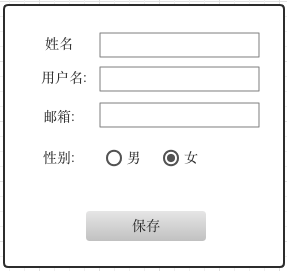
而**手绘原型**则是这个最小的成本。在动手编码前,使用铅笔、橡皮、直尺等绘制原型是非常必要的!假设我们当前手绘原型如下:
接下来,让我们共同实现教师保存功能。
## 初始化组件
使用shell进入项目`src/app`文件夹:
```bash
panjie@panjies-Mac-Pro first-app % cd src/app
panjie@panjies-Mac-Pro app % pwd
/Users/panjie/github/mengyunzhi/angular11-guild/first-app/src/app
panjie@panjies-Mac-Pro app %
```
接下来执行:`ng generate component add`来生成一个教师添加组件:
```bash
panjie@panjies-Mac-Pro first-app % cd src/app
panjie@panjies-Mac-Pro app % pwd
/Users/panjie/github/mengyunzhi/angular11-guild/first-app/src/app
panjie@panjies-Mac-Pro app % ng generate component add
? Would you like to share anonymous usage data about this project with the Angular Team at
Google under Google’s Privacy Policy at https://policies.google.com/privacy? For more
details and how to change this setting, see http://angular.io/analytics. Yes
Thank you for sharing anonymous usage data. Would you change your mind, the following
command will disable this feature entirely:
ng analytics project off
panjie@panjies-Mac-Pro app %
CREATE src/app/add/add.component.css (0 bytes)
CREATE src/app/add/add.component.html (18 bytes)
CREATE src/app/add/add.component.spec.ts (605 bytes)
CREATE src/app/add/add.component.ts (263 bytes)
UPDATE src/app/app.module.ts (540 bytes)
panjie@panjies-Mac-Pro app %
```
> info: 如果出现以下提示(google在问我们是否在共享我们的使用情况),输入`y`后回车键(允许)继续。当然了,你可以直接按回车(不分享我们的数据给google)后继续 。
以上命令将自动为我们创建四个文件、更新一个文件。创建的文件分别为构成组件的三个文件:`src/app/add/add.component.css`, `src/app/add/add.component.html`,`src/app/add/add.component.ts`,一个供快速开发的测试文件`src/app/add/add.component.spec.ts`;更新了当前`src/app`文件夹下的模块文件`src/app/app.module.ts`。
```bash
panjie@panjies-Mac-Pro app % tree
.
├── add
│ ├── add.component.css ➊
│ ├── add.component.html ➊
│ ├── add.component.spec.ts ➊
│ └── add.component.ts ➊
├── app
├── app-routing.module.ts
├── app.component.css
├── app.component.html
├── app.component.spec.ts
├── app.component.ts
└── app.module.ts ➋
2 directories, 10 files
```
- ➊ 新建文件
- ➋ 更新文件
`src/app/app.module.ts`更新情况如下:
```typescript
import { AddComponent } from './add/add.component'; ➋
@NgModule({
declarations: [
AppComponent,
AddComponent ➊
],
```
➊将新建的`AddComponent`自动添加到了`AppModule`模块下的`declarations`中, ➋自动添加了相应的文件引用。
## 测试
接下来我们继续使用`ng t`运行单元测试以查看当前新建的教师添加组件:
````bash
panjie@panjies-Mac-Pro first-app % ng t
````
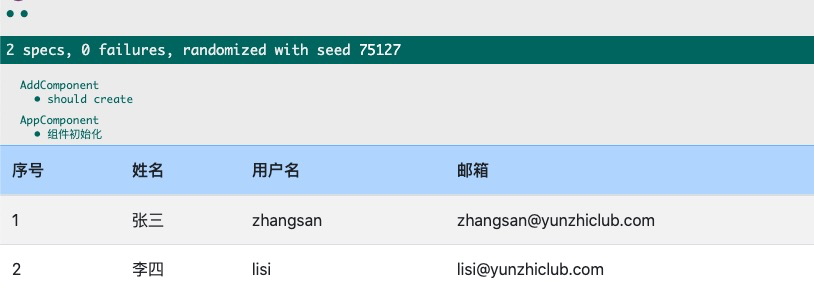
🧐 什么情况,说好的使用`ng t`显示的组件呢?怎么仍然显示的是教师列表呢?再刷新几次试试:
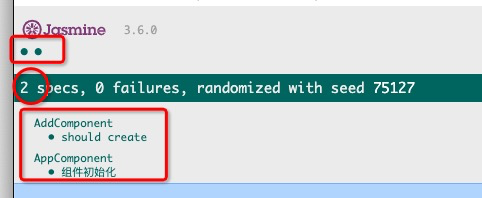
是的,和你看到的一样。angular会随机的显示以前的教师列表组件以及我们刚刚初始化的ADD组件,较以前仅有一个组件比较,angular当前显示的信息中表明正在测试两个组件,被标明了测试的顺序。当我们的Add组件被最后测试时,最终的界面将停留在Add组件,而当我们的Add组件被最先测试时,最终的界面则将停留在教师列表组件。
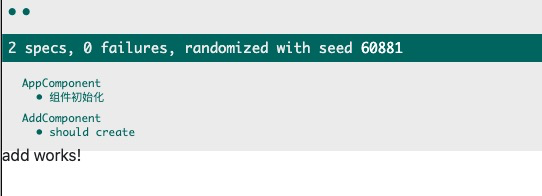
此时,我们可以找到Add组件对应的测试文件`add.component.spec.ts`,将第5行的`describe`变更为`fdescribe`,表示强制(force)执行当前测试同时忽略其它以`describe`声明的测试:
```typescript
describe('AddComponent', () => { ✘
fdescribe('AddComponent', () => { ✔
```
使用`ctrl(command)+s`保存当前文件后,测试界面将自动更新:
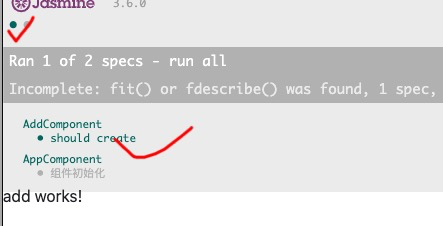
其中绿色代码正在执行的测试,而灰色表示该测试未执行。
## V层
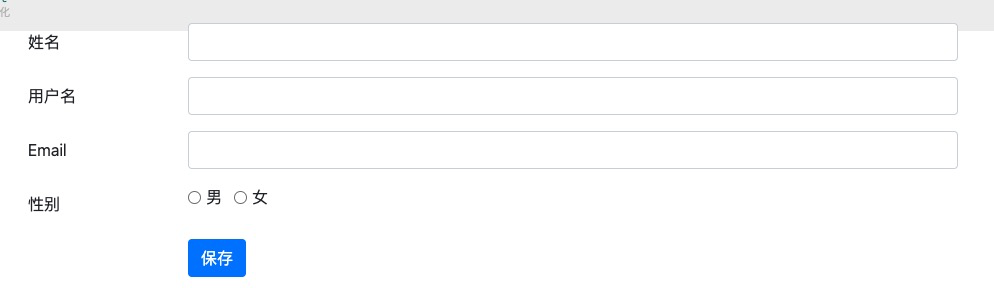
下面我们打开`add.component.html`:
```html
<p>add works!</p>
```
删除文件中的代码并加入以下代码,以初始化教师添加表单:
```html
<form class="container-sm">
<div class="mb-3 row">
<label for="name" class="col-sm-2 col-form-label">姓名</label>
<div class="col-sm-10">
<input type="text" class="form-control" id="name">
</div>
</div>
<div class="mb-3 row">
<label for="username" class="col-sm-2 col-form-label">用户名</label>
<div class="col-sm-10">
<input type="text" class="form-control" id="username">
</div>
</div>
<div class="mb-3 row">
<label for="email" class="col-sm-2 col-form-label">Email</label>
<div class="col-sm-10">
<input type="text" class="form-control" id="email">
</div>
</div>
<div class="mb-3 row">
<label class="col-sm-2 col-form-label">性别</label>
<div class="col-sm-10">
<div class="form-check form-check-inline">
<input class="form-check-input" type="radio" name="inlineRadioOptions" id="sex-male" value="option1">
<label class="form-check-label" for="sex-male">男</label>
</div>
<div class="form-check form-check-inline">
<input class="form-check-input" type="radio" name="inlineRadioOptions" id="sex-female" value="option2">
<label class="form-check-label" for="sex-female">女</label>
</div>
</div>
</div>
<div class="mb-3 row">
<div class="col-sm-10 offset-2">
<button class="btn btn-primary">保存</button>
</div>
</div>
</form>
```
最终效果如下:
# 本节资源
| 名称 | 地址 |
| ---------------------- | ------------------------------------------------------------ |
| Jasmine fdescribe | [https://jasmine.github.io/api/3.6/global.html#fdescribe](https://jasmine.github.io/api/3.6/global.html#fdescribe) |
| CLI 概览与命令参考手册 | [https://angular.cn/cli](https://angular.cn/cli) |
| 本节源码 | [https://github.com/mengyunzhi/angular11-guild/archive/step2.3.1.zip](https://github.com/mengyunzhi/angular11-guild/archive/step2.3.1.zip) |
- 序言
- 第一章 Hello World
- 1.1 环境安装
- 1.2 Hello Angular
- 1.3 Hello World!
- 第二章 教师管理
- 2.1 教师列表
- 2.1.1 初始化原型
- 2.1.2 组件生命周期之初始化
- 2.1.3 ngFor
- 2.1.4 ngIf、ngTemplate
- 2.1.5 引用 Bootstrap
- 2.2 请求后台数据
- 2.2.1 HttpClient
- 2.2.2 请求数据
- 2.2.3 模块与依赖注入
- 2.2.4 异步与回调函数
- 2.2.5 集成测试
- 2.2.6 本章小节
- 2.3 新增教师
- 2.3.1 组件初始化
- 2.3.2 [(ngModel)]
- 2.3.3 对接后台
- 2.3.4 路由
- 2.4 编辑教师
- 2.4.1 组件初始化
- 2.4.2 获取路由参数
- 2.4.3 插值与模板表达式
- 2.4.4 初识泛型
- 2.4.5 更新教师
- 2.4.6 测试中的路由
- 2.5 删除教师
- 2.6 收尾工作
- 2.6.1 RouterLink
- 2.6.2 fontawesome图标库
- 2.6.3 firefox
- 2.7 总结
- 第三章 用户登录
- 3.1 初识单元测试
- 3.2 http概述
- 3.3 Basic access authentication
- 3.4 着陆组件
- 3.5 @Output
- 3.6 TypeScript 类
- 3.7 浏览器缓存
- 3.8 总结
- 第四章 个人中心
- 4.1 原型
- 4.2 管道
- 4.3 对接后台
- 4.4 x-auth-token认证
- 4.5 拦截器
- 4.6 小结
- 第五章 系统菜单
- 5.1 延迟及测试
- 5.2 手动创建组件
- 5.3 隐藏测试信息
- 5.4 规划路由
- 5.5 定义菜单
- 5.6 注销
- 5.7 小结
- 第六章 班级管理
- 6.1 新增班级
- 6.1.1 组件初始化
- 6.1.2 MockApi 新建班级
- 6.1.3 ApiInterceptor
- 6.1.4 数据验证
- 6.1.5 教师选择列表
- 6.1.6 MockApi 教师列表
- 6.1.7 代码重构
- 6.1.8 小结
- 6.2 教师列表组件
- 6.2.1 初始化
- 6.2.2 响应式表单
- 6.2.3 getTestScheduler()
- 6.2.4 应用组件
- 6.2.5 小结
- 6.3 班级列表
- 6.3.1 原型设计
- 6.3.2 初始化分页
- 6.3.3 MockApi
- 6.3.4 静态分页
- 6.3.5 动态分页
- 6.3.6 @Input()
- 6.4 编辑班级
- 6.4.1 测试模块
- 6.4.2 响应式表单验证
- 6.4.3 @Input()
- 6.4.4 FormGroup
- 6.4.5 自定义FormControl
- 6.4.6 代码重构
- 6.4.7 小结
- 6.5 删除班级
- 6.6 集成测试
- 6.6.1 惰性加载
- 6.6.2 API拦截器
- 6.6.3 路由与跳转
- 6.6.4 ngStyle
- 6.7 初识Service
- 6.7.1 catchError
- 6.7.2 单例服务
- 6.7.3 单元测试
- 6.8 小结
- 第七章 学生管理
- 7.1 班级列表组件
- 7.2 新增学生
- 7.2.1 exports
- 7.2.2 自定义验证器
- 7.2.3 异步验证器
- 7.2.4 再识DI
- 7.2.5 属性型指令
- 7.2.6 完成功能
- 7.2.7 小结
- 7.3 单元测试进阶
- 7.4 学生列表
- 7.4.1 JSON对象与对象
- 7.4.2 单元测试
- 7.4.3 分页模块
- 7.4.4 子组件测试
- 7.4.5 重构分页
- 7.5 删除学生
- 7.5.1 第三方dialog
- 7.5.2 批量删除
- 7.5.3 面向对象
- 7.6 集成测试
- 7.7 编辑学生
- 7.7.1 初始化
- 7.7.2 自定义provider
- 7.7.3 更新学生
- 7.7.4 集成测试
- 7.7.5 可订阅的路由参数
- 7.7.6 小结
- 7.8 总结
- 第八章 其它
- 8.1 打包构建
- 8.2 发布部署
- 第九章 总结