# 拦截器
完成上节的作业后,我们发现我们好像做了一个比较笨的工作。因为如果按在个人中心中加入
Login组件获取的token的话,则意味着我们以后所有需要用户认证的请求,都需要手动在请求时加入`x-auth-token`。而以懒人自居的我们,怎么能容忍这么冗余的动作呢?
除此以外,如果我们在每个需要认证的请求上都手动的加入`x-auth-token`,则会大幅降低整个项目的灵活性。比如后台哪个抽疯说咱换个认证方式,不使用`x-auth-token`了。这时候我们希望自己能做的不是骂街,而是能快速的响应这种需求。
> 世间唯有变化是永恒不变的。
为此,我们再来看看这个cookie的原理:
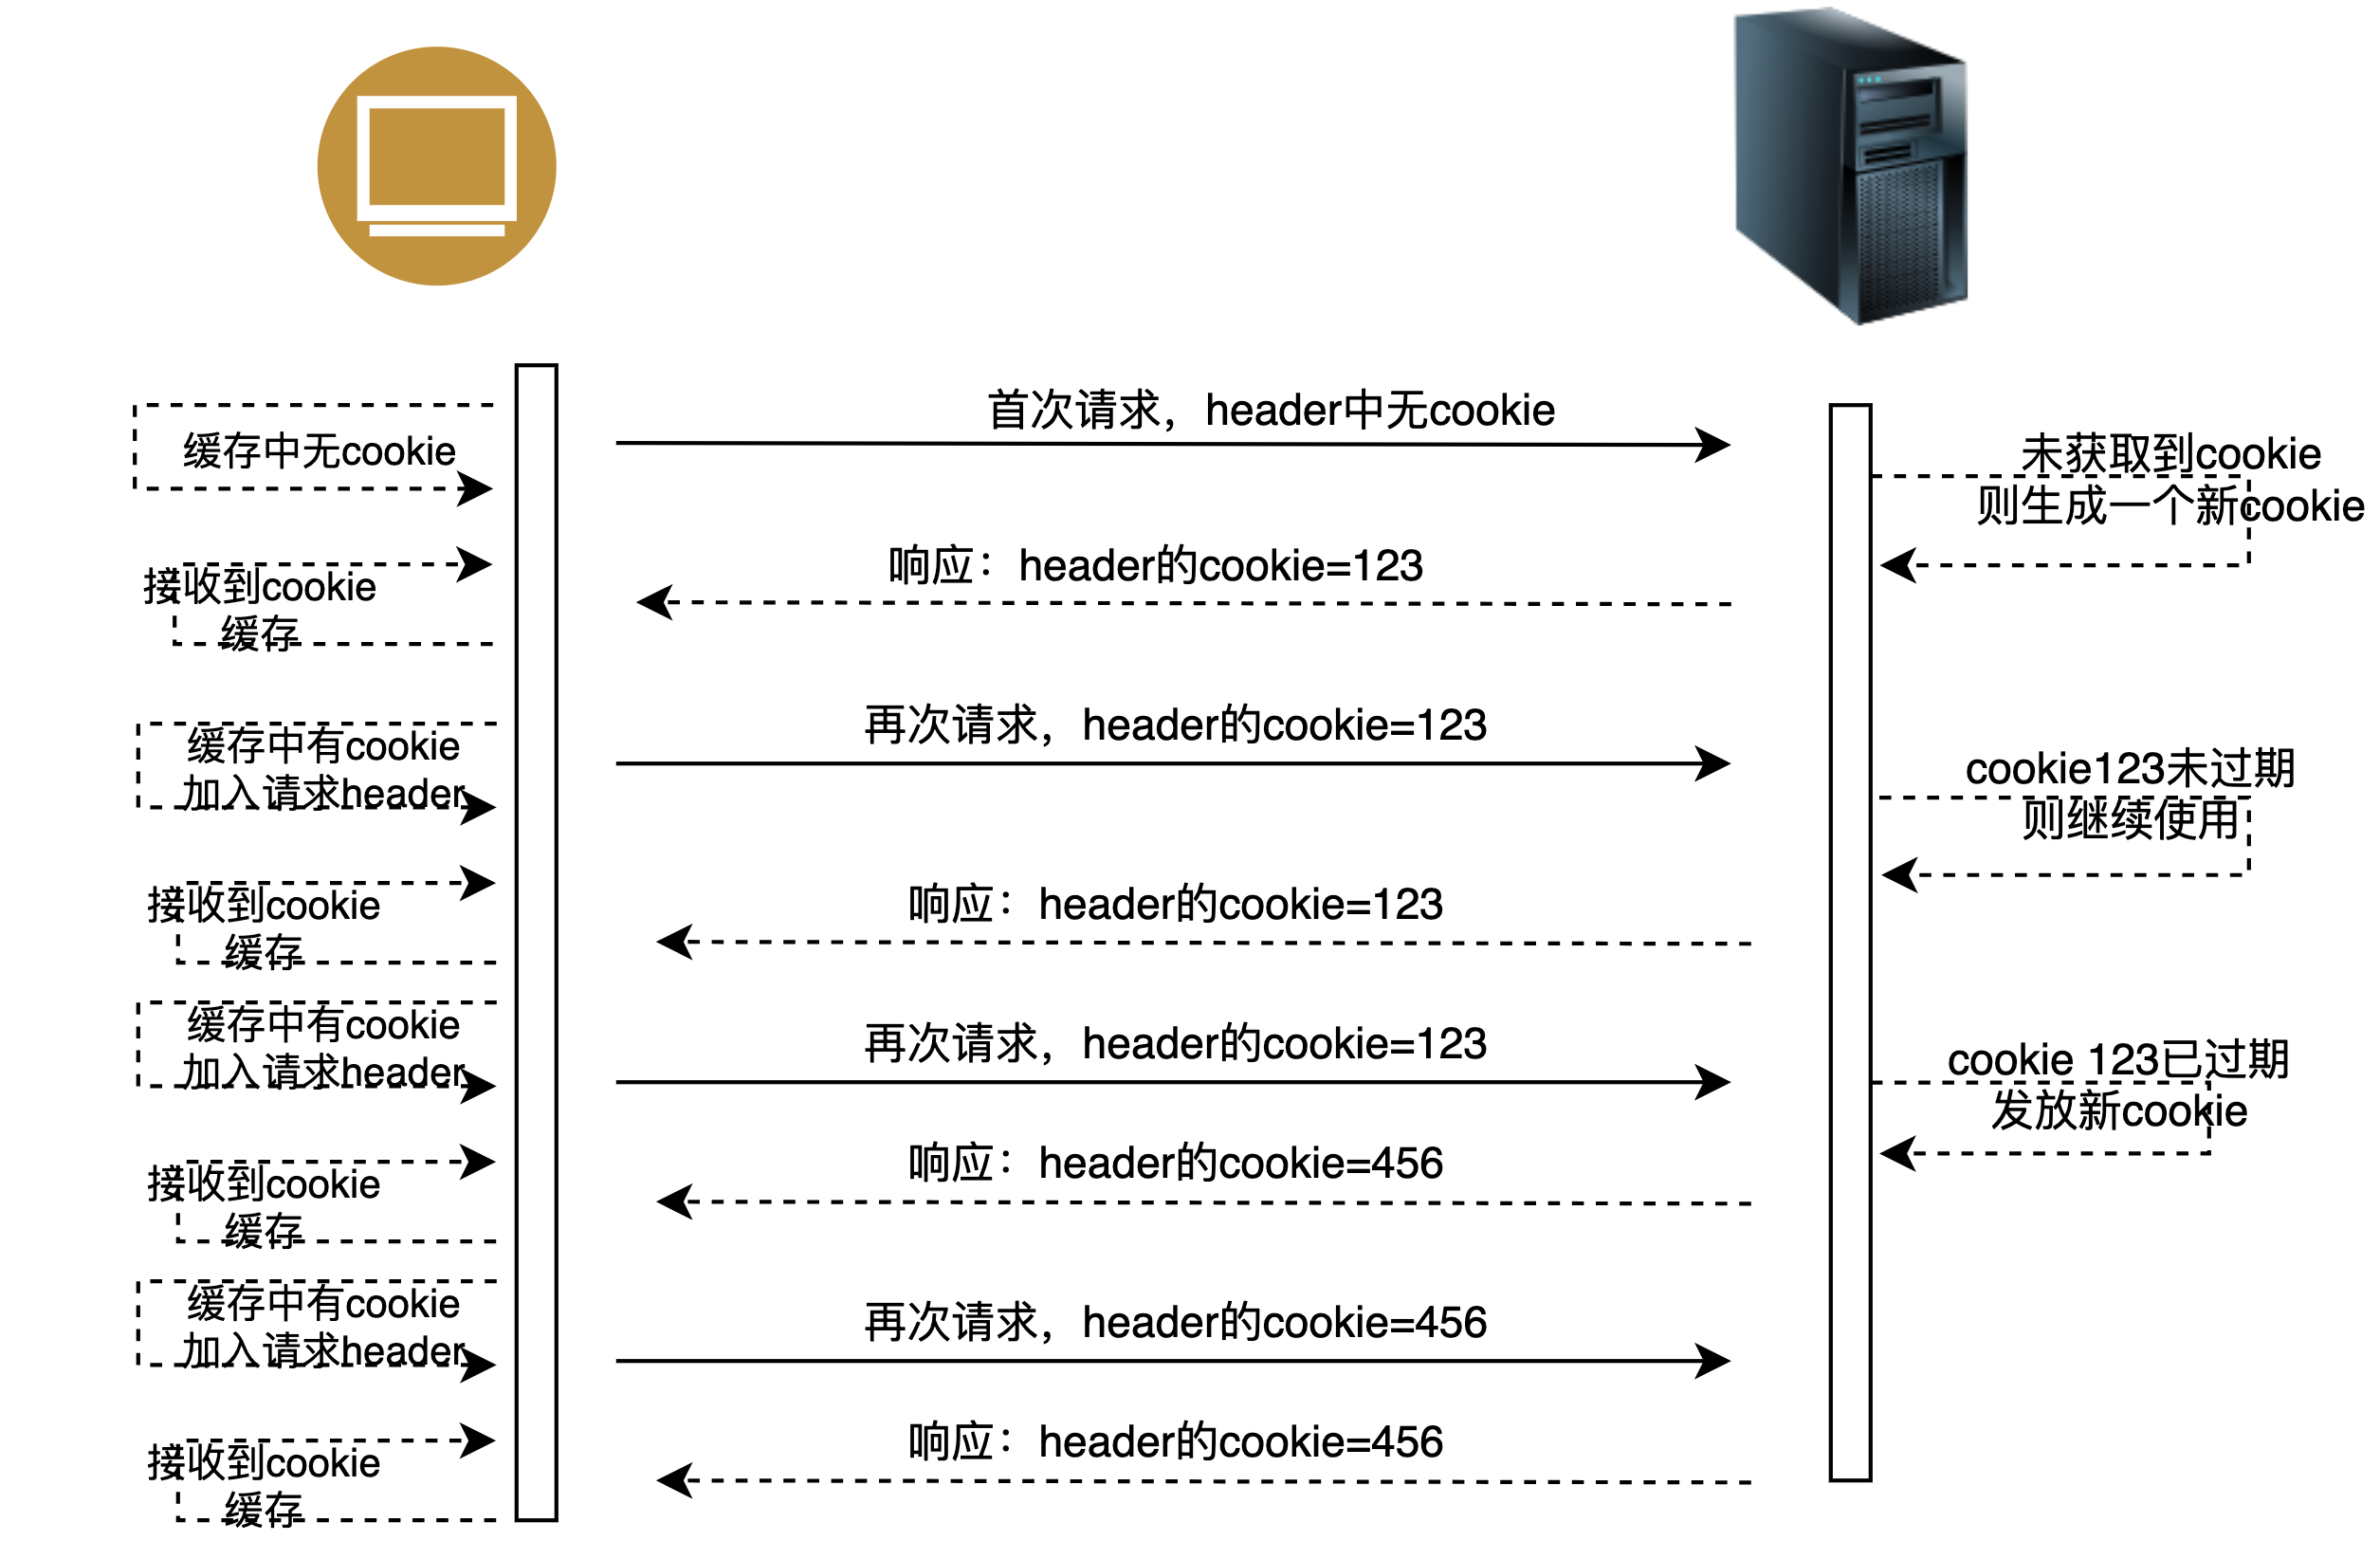
不然发现浏览器在处理cookie时,与用户是否请求登录无关。只是有请求,浏览器变会自动处理cookie,而不去管这个请求到底在实现什么逻辑功能。
其实我们当前后台为我们提供的`x-auth-token`也是这样的。我们在前台向后台发起任意请求时,后台都会按上图处理cookie的逻辑来处理`x-auth-token`。
那么,我们便可以使用Angular提供的**Interceptor拦截器**来快速完成在每次请求时自动处理`x-auth-token`的功能。
## Interceptor拦截器
Angular提供的拦截器,可以在前台发起任何的http请求时进行拦截。
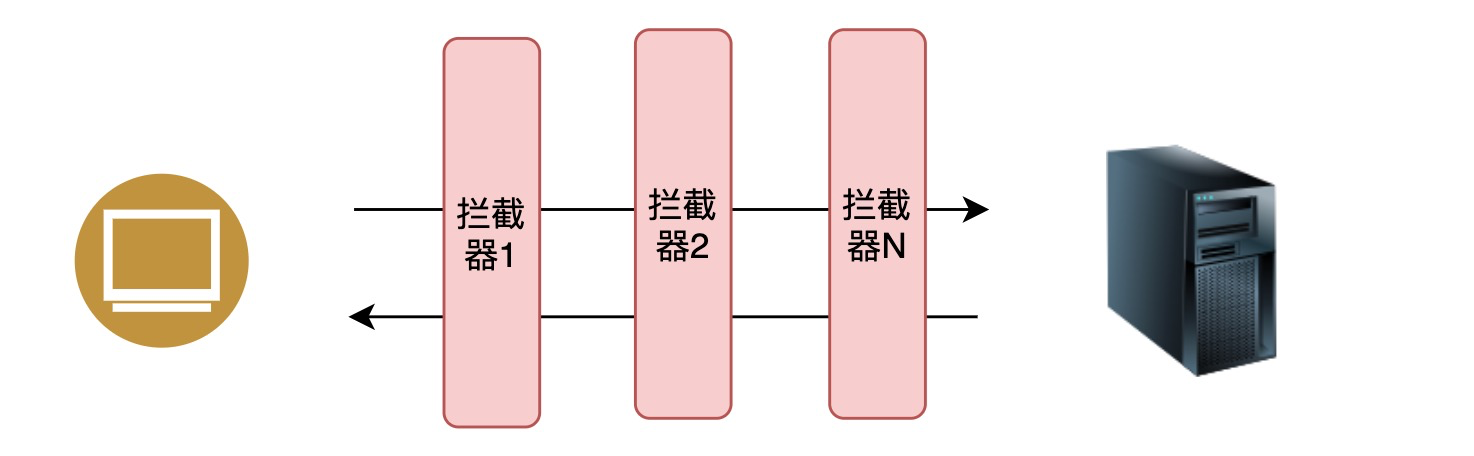
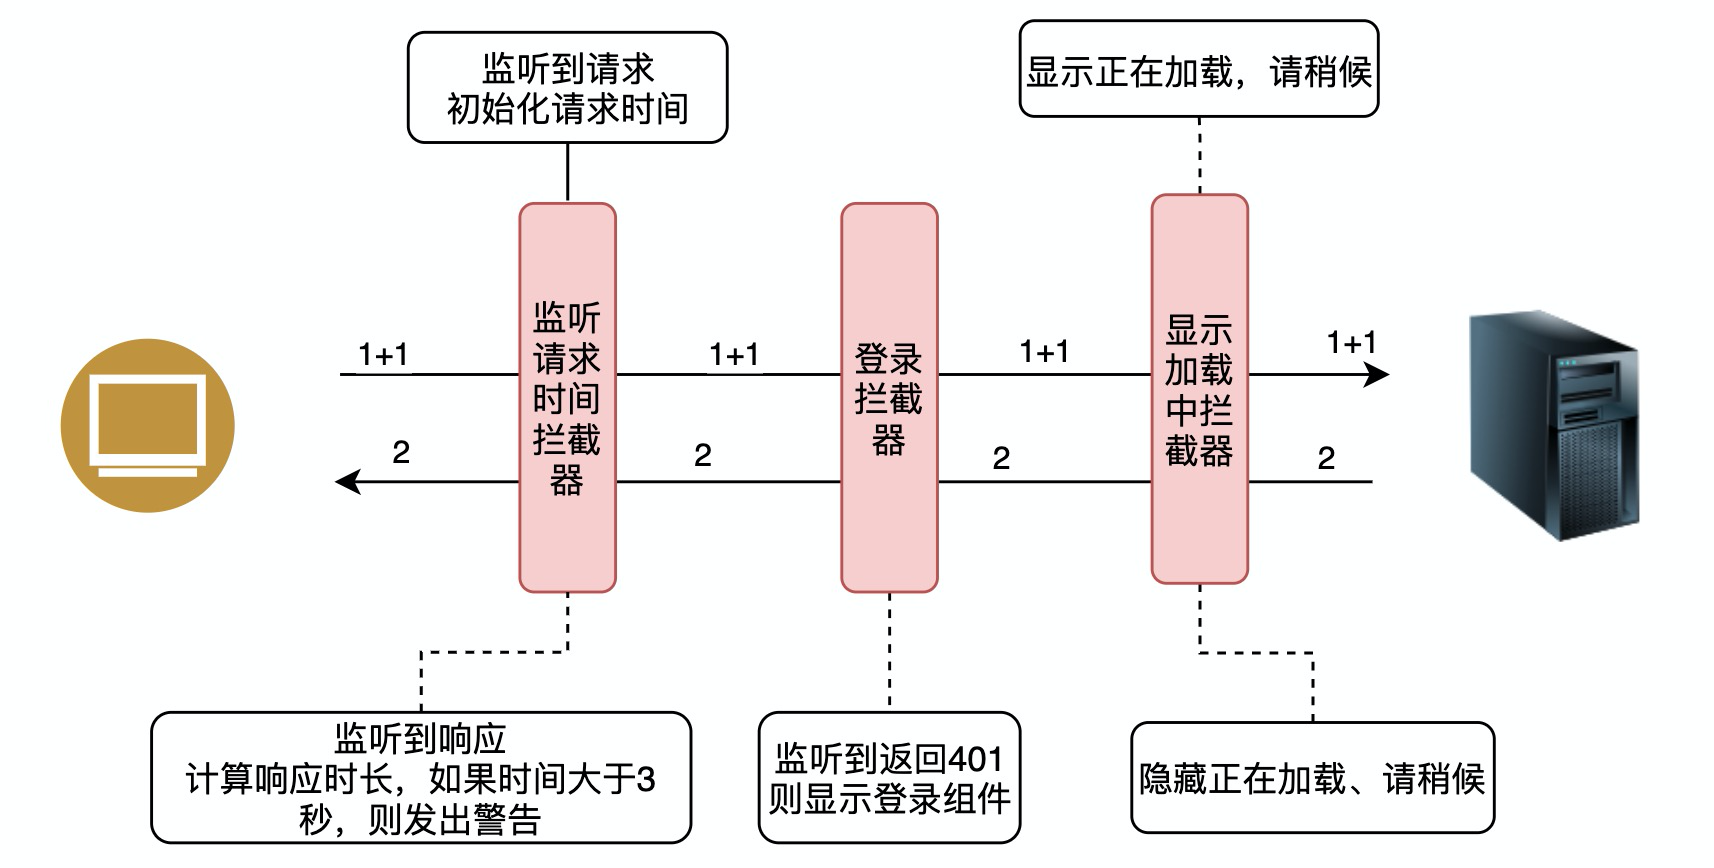
我们可以为Angular中的模块配置多个拦截器,这些拦截器能够对http请求以及响应进行拦截。近而提供:监视请求、响应数据;改变请求、响应数据等功能。比如在生产项目,我们可以使用拦截器来完成监听长请求、监听用户需要授权、显示loading等功能。
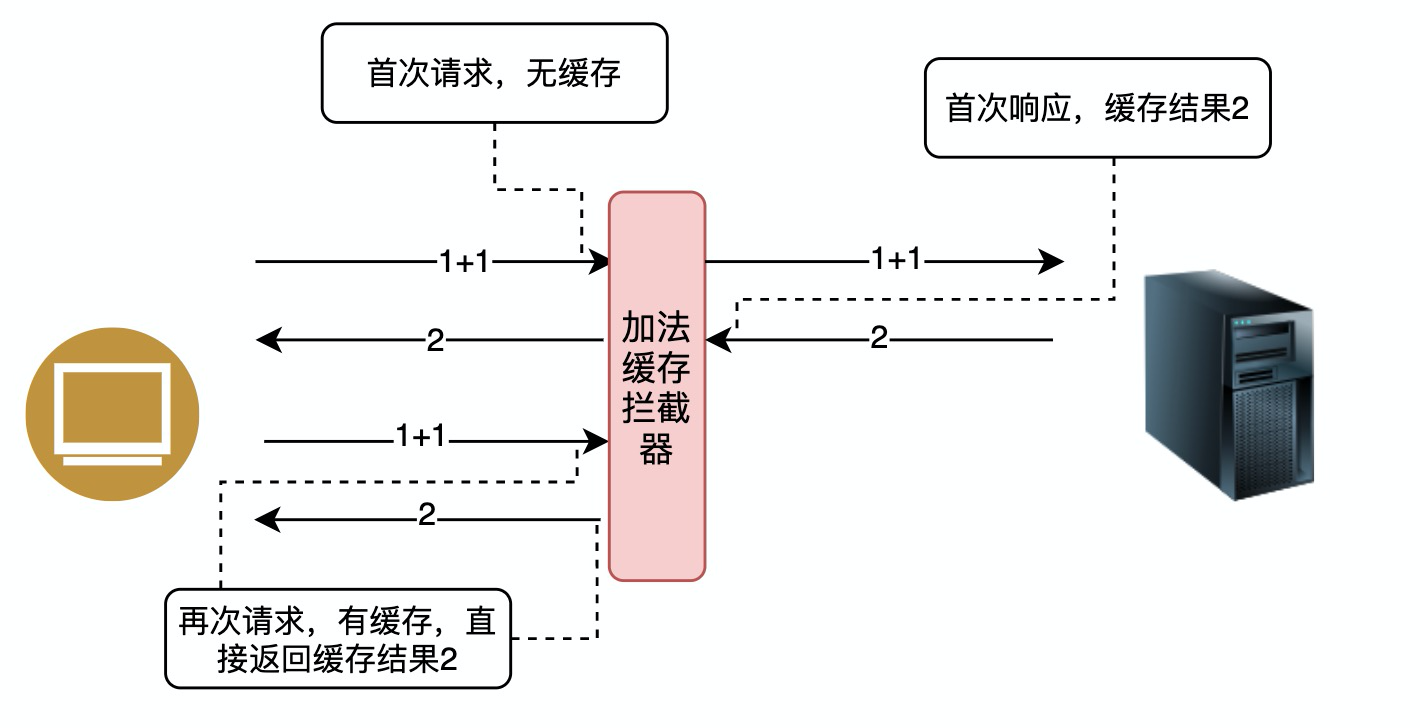
除此以外,还可以在拦截器中加入缓存:
`x-auth-token`实现正是拦截器的基于监视请求、响应数据、改变请求数据三个基本的功能。

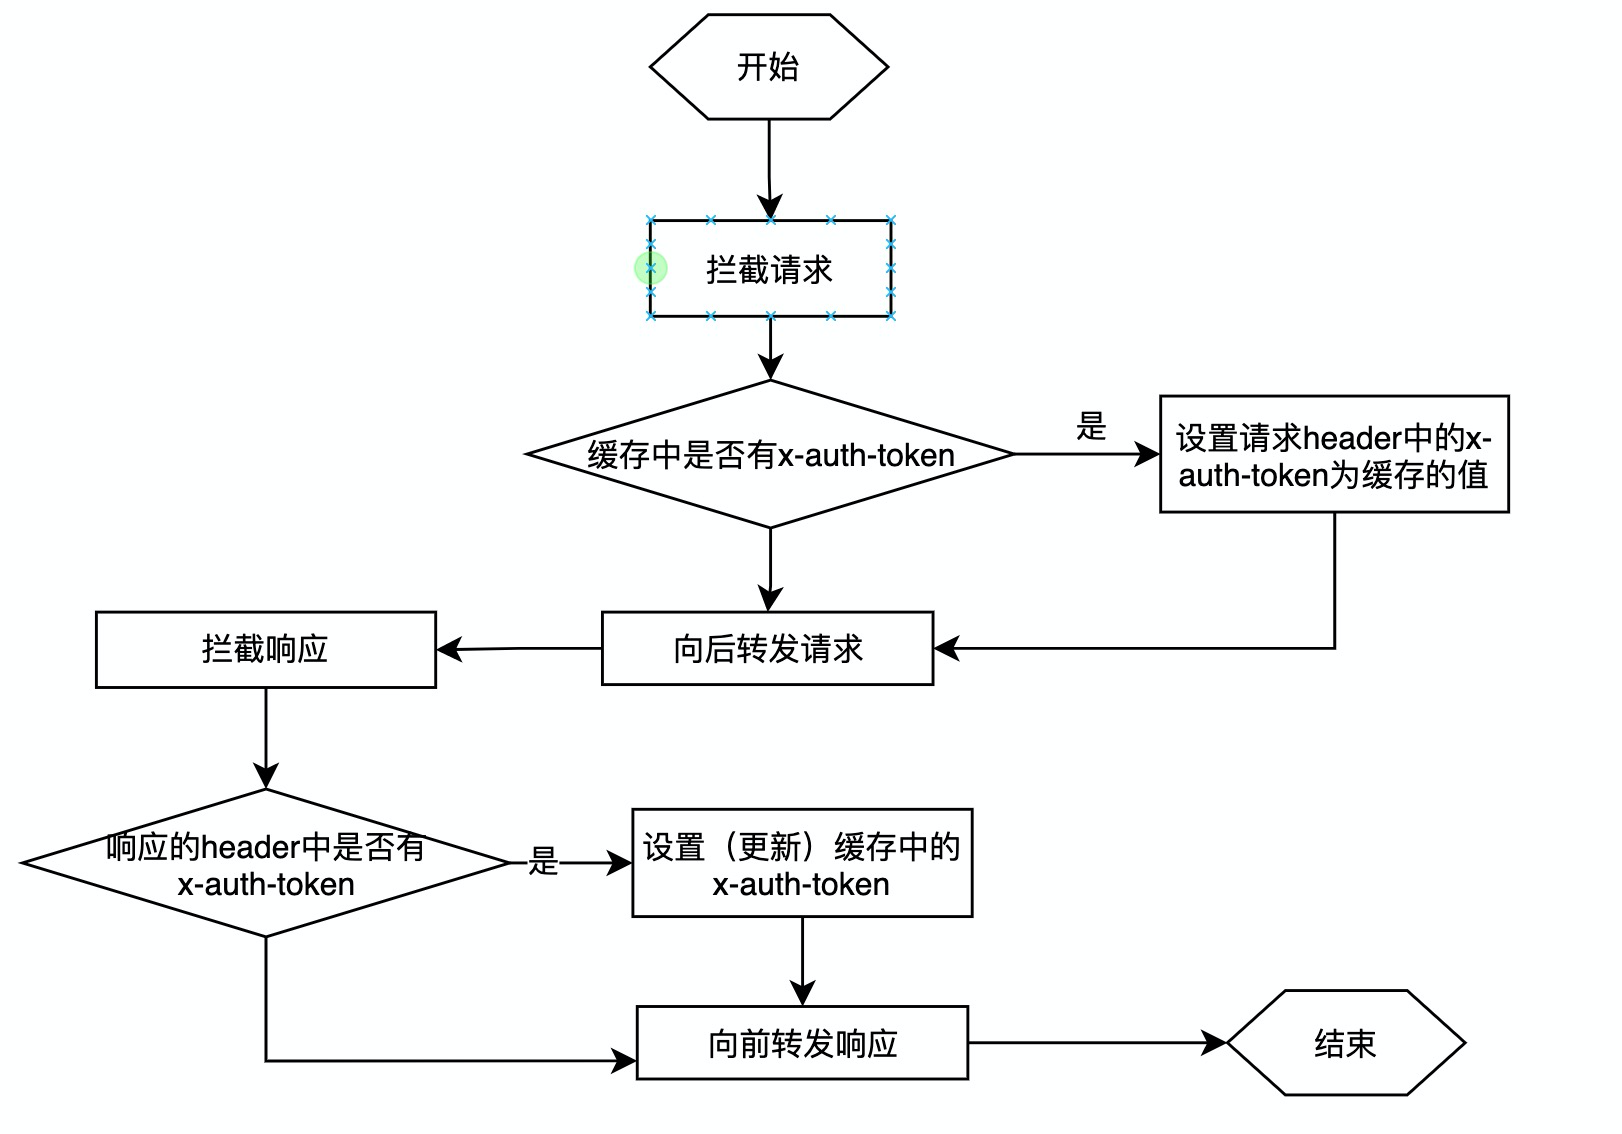
其处理流程如下:
## 定义拦截器
打开shell并定位到`src/app`文件夹,使用以下命令初始化xAuthToken拦截器:
```bash
panjiedeMacBook-Pro:app panjie$ pwd
/Users/panjie/github/mengyunzhi/angular11-guild/first-app/src/app
panjiedeMacBook-Pro:app panjie$ ng g interceptor xAuthToken
CREATE src/app/x-auth-token.interceptor.spec.ts (442 bytes)
CREATE src/app/x-auth-token.interceptor.ts (415 bytes)
```
在`x-auth-token.interceptor.ts`打如下断点,以验证其是否执行:
```typescript
+++ b/first-app/src/app/x-auth-token.interceptor.ts
@@ -13,6 +13,7 @@ export class XAuthTokenInterceptor implements HttpInterceptor {
constructor() {}
intercept(request: HttpRequest<unknown>, next: HttpHandler): Observable<HttpEvent<unknown>> {
+ console.log('xAuthTokenInterceptor is called');
return next.handle(request);
}
}
```
然后在任意测试模块中加入此拦截器,比如我们将其加入到login组件对应的动态测试模块中:
```typescript
+++ b/first-app/src/app/login/login.component.spec.ts
-import {HttpClientModule} from "@angular/common/http";
+import {HttpClientModule, HTTP_INTERCEPTORS} from "@angular/common/http";
@@ -16,6 +16,9 @@ describe('LoginComponent', () => {
imports: [
FormsModule,
HttpClientModule
+ ],
+ providers: [
+ {provide: HTTP_INTERCEPTORS, useClass: XAuthTokenInterceptor, multi: true}
]
})
.compileComponents();
@@ -44,7 +47,7 @@ describe('LoginComponent', () => {
expect(component.onSubmit).toHaveBeenCalledTimes(1);
});
- it('onSubmit 用户登录', () => {
+ fit('onSubmit 用户登录', () => {
// 启动自动变更检测
fixture.autoDetectChanges();
component.teacher = {username: '张三', password: 'codedemo.club'} as Teacher;
```
`providers`译为**具有某种能力的提供者**,我们在其中声明了一个具有提供`HTTP_INTERCEPTORS HTTP`**拦截器**能力的提供者`XAuthTokenInterceptor`,使用`multi: true`来表时当前提供者为多个具有这种能力的一个(使用该方案保证了可以定义多个拦截器)。
Angular在发起Http请求时,会查询当前模块是否有`HTTP_INTERCEPTORS`的提供者, 如果有则会使用该提供者对请求进行拦截。我们使用`ng t`来触发该单元测试:
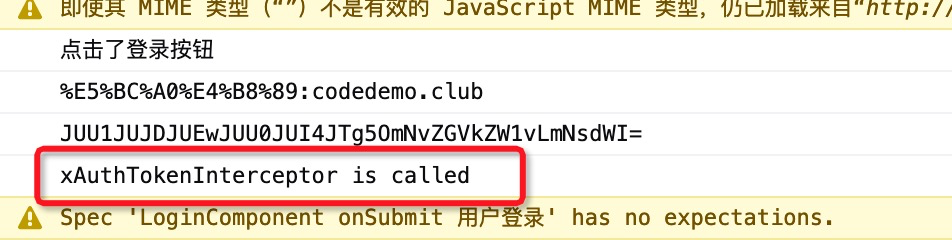
控制台的成功打印了信息,表明在发请http请求时该拦截器中的代码被调用,拦截器起作用了。
## 初识Observable
```typescript
intercept(request: HttpRequest<unknown>, next: HttpHandler): Observable<HttpEvent<unknown>> { 👈
console.log('xAuthTokenInterceptor is called');
return next.handle(request);
}
```
intercept方法中有两个参数,顾名思义第一个参数为请求,第二个参数为下一个处理者(可能是拦截器)。所以我们可以通过request来获取关于请求的相关信息,那么如何拦截到响应信息呢?这要深入学习下`Observable`这个返回值类型。
其实我们早早的就接触了`Observable`,该类型是设计模式中**观察者模式**在js中的具体体现。我们可以在此返回值上调用`subscribe(success, error, complete)`方法。当`Observable`发送数据时,则会触发`success`;当`Observable`发生错误时,则会调用`error` ;此外,`Observable`还会发送一个`完成`的通知,当`Observable`发送完所有的数据时,就会调用`complete`。
所以才有了我们在进行http请求时的如下代码:
```typescript
httpClient.get(url)
.subscribe(data => console.log('成功', data),
error => console.log('失败', error),
() => console.log('数据发送完毕'));
```
也就说`httpClient.get()`方法实际上返回了一个`Observable`,当请求成功时,`Observable`开始发送数据,触发`data => console.log('成功', data)`;请求失败时,触发`error => console.log('失败', error),`;在http请求中无论成功或是失败,后台都会一次性的把数据发送回来,也就说请求的过程都完成了,所以`() => console.log('数据发送完毕')`在上述代码中必然执行。
语言描述是空洞的,我们在拦截器对应的单元测试文件中建立如下测试代码:
```typescript
+++ b/first-app/src/app/x-auth-token.interceptor.spec.ts
@@ -1,6 +1,7 @@
import {TestBed} from '@angular/core/testing';
import {XAuthTokenInterceptor} from './x-auth-token.interceptor';
+import {of} from 'rxjs';
describe('XAuthTokenInterceptor', () => {
beforeEach(() => TestBed.configureTestingModule({
@@ -9,8 +10,17 @@ describe('XAuthTokenInterceptor', () => {
]
}));
- it('should be created', () => {
+ fit('should be created', () => {
const interceptor: XAuthTokenInterceptor = TestBed.inject(XAuthTokenInterceptor);
expect(interceptor).toBeTruthy();
+
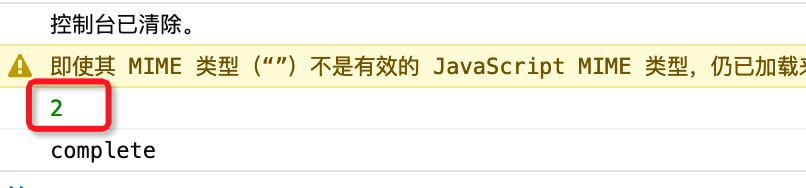
+ // 定义一个observable,在其上调用subscribe将得到数字1
+ const observable = of(1);
+ observable.subscribe(
+ data => console.log(data),
+ error => {
+ },
+ () => console.log('complete')
+ );
});
});
```
执行结果如下:

## 再识管道
在V层显示性别的时候,我们接触了管道的概念。数据由第一个管道的这头流入,最后由最后一个管道的那头流出。`Observable`也支持了管道的思想,我们可以在`Observable`类型上添加任意多个管道,它们使得`Observable`在向外发送数据前,先将这些数据依次通过这些管道。
`Observable`提供了`pipe()`方法来快速的添加管道:
```typescript
- const observable = of(1);
+ const observable = of(1).pipe();
```
如果我们想使值在管道中发生变化,则可以使用`map()`管道。在`Observable`的世界里,所有的管道都被习惯称为`操作符`。`map()`便是一个可以改变数据值的操作符:
```typescript
+++ b/first-app/src/app/x-auth-token.interceptor.spec.ts
@@ -2,6 +2,7 @@ import {TestBed} from '@angular/core/testing';
import {XAuthTokenInterceptor} from './x-auth-token.interceptor';
import {of} from 'rxjs';
+import {map} from 'rxjs/operators';
describe('XAuthTokenInterceptor', () => {
beforeEach(() => TestBed.configureTestingModule({
@@ -15,7 +16,7 @@ describe('XAuthTokenInterceptor', () => {
expect(interceptor).toBeTruthy();
// 定义一个observable,在其上调用subscribe将得到数字1
- const observable = of(1).pipe();
+ const observable = of(1).pipe(map(input => input * 2));
observable.subscribe(
```
`map`操作符中的参数类型是个回调函数,该函数的参数`input`为流入,而方法中的函数则为流出,所以最终控制台打印如下:
其实`Observable`并不是Angular的特性,而是属于一个叫做`rxjs`的分支。我们可以搜索关键字`rxjs`以获取更多的信息,`rxjs`同时提供了多的记不过来的操作符来满足现实编程中的各种环境。
## tap操作符
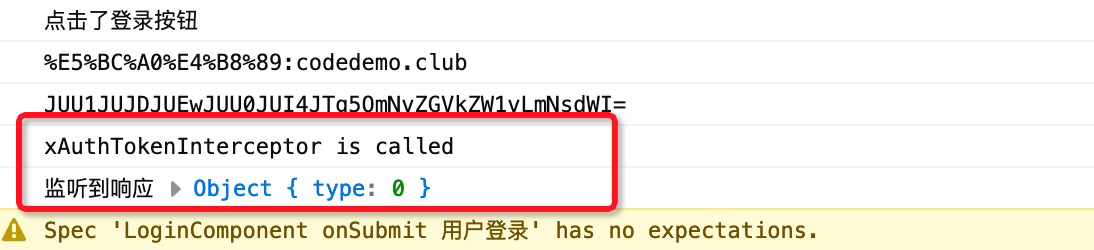
我们再回来拦截器拦截响应的需求上来。拦截器的如下代码返回了一个`Observable`,http请求的数据将通过该`Observable`向前返回。而我们则可以利用`Observable`可设置管道的特性,在其上设置一个监听管道,以起到监听header中的x-auth-token的目的。而rxjs提供的tap操作符的作用正合适:
```typescript
+++ b/first-app/src/app/x-auth-token.interceptor.ts
@@ -6,6 +6,7 @@ import {
HttpInterceptor
} from '@angular/common/http';
import { Observable } from 'rxjs';
+import {tap} from 'rxjs/operators';
@Injectable()
export class XAuthTokenInterceptor implements HttpInterceptor {
@@ -14,6 +15,6 @@ export class XAuthTokenInterceptor implements HttpInterceptor {
intercept(request: HttpRequest<unknown>, next: HttpHandler): Observable<HttpEvent<unknown>> {
console.log('xAuthTokenInterceptor is called');
- return next.handle(request);
+ return next.handle(request).pipe(tap(input => console.log('监听到响应', input)));
}
}
```
继续使用login组件单元测试文件进行测试:
```typescript
+++ b/first-app/src/app/login/login.component.spec.ts
@@ -47,7 +47,7 @@ describe('LoginComponent', () => {
expect(component.onSubmit).toHaveBeenCalledTimes(1);
});
- it('onSubmit 用户登录', () => {
+ fit('onSubmit 用户登录', () => {
// 启动自动变更检测
fixture.autoDetectChanges();
component.teacher = {username: '张三', password: 'codedemo.club'} as Teacher;
```
## HttpEvent
`Observable`支持泛型,当前拦截器泛型对应的为`HttpEvent<unknown>`:
```typescript
intercept(request: HttpRequest<unknown>, next: HttpHandler): Observable<HttpEvent<unknown>> {
```
`HttpEvent`是个由5种类型组成的混合类型:
```typescript
export declare type HttpEvent<T> = HttpSentEvent | HttpHeaderResponse | HttpResponse<T> | HttpProgressEvent | HttpUserEvent<T>;
```
在此并不是所有的返回类型都携带了header信息(可在IDE中依次点击其类型查看,不在详细阐述原因),携带有header信息的信息为:`HttpHeaderResponse`以及`HttpResponse`,这两个类型又全部继承于`HttpResponseBase`,所以在进行监听时,我们仅监听这两种类型的数据。
在TypeScirpt中,可以使用`instance of`对类型进行判断。
## 完成功能
当一切**知识盲区**都被我们解决掉的时候,完成功能则成为了最简单的一环。下面,我们实现x-auth-token拦截器的功能:
```typescript
+++ b/first-app/src/app/x-auth-token.interceptor.ts
@@ -1,20 +1,48 @@
-import { Injectable } from '@angular/core';
+import {Injectable} from '@angular/core';
import {
HttpRequest,
HttpHandler,
HttpEvent,
- HttpInterceptor
+ HttpInterceptor, HttpResponseBase
} from '@angular/common/http';
-import { Observable } from 'rxjs';
+import {Observable} from 'rxjs';
import {tap} from 'rxjs/operators';
@Injectable()
export class XAuthTokenInterceptor implements HttpInterceptor {
+ /**
+ * 由缓存中获取token,防止页面刷新后失效
+ */
+ private token = window.sessionStorage.getItem('x-auth-token');
- constructor() {}
+ constructor() {
+ }
intercept(request: HttpRequest<unknown>, next: HttpHandler): Observable<HttpEvent<unknown>> {
- console.log('xAuthTokenInterceptor is called');
- return next.handle(request).pipe(tap(input => console.log('监听到响应', input)));
+ if (this.token !== null) {
+ request.headers.set('x-auth-token', this.token);
+ }
+ return next.handle(request).pipe(tap(input => {
+ // 仅当input类型为HttpResponseBase,才尝试获取token并更新
+ if (input instanceof HttpResponseBase) {
+ const httpHeader = input.headers;
+ const xAuthToken = httpHeader.get('x-auth-token');
+ if (xAuthToken !== null) {
+ this.setToken(xAuthToken);
+ }
+ }
+ }));
+ }
+
+ /**
+ * 设置token
+ * 如果接收到了新的token则更新,否则什么也不做
+ * @param xAuthToken token
+ */
+ private setToken(xAuthToken: string): void {
+ if (this.token !== xAuthToken) {
+ this.token = xAuthToken;
+ window.sessionStorage.setItem('x-auth-token', this.token);
+ }
}
}
```
## 测试
任何没有经过测试代码都是坑队友的利器。由于我们梦想着拦截器会有登录组件、个人中心组件中自动发挥作用,所以我们在此应该使用`ng s`来完成测试。
### 添加拦截器
为使其在`ng s`生效,则需要将其配置到`AppModule`中:
```typescript
+++ b/first-app/src/app/app.module.ts
@@ -3,7 +3,7 @@ import {NgModule} from '@angular/core';
import {AppRoutingModule} from './app-routing.module';
import {AppComponent} from './app.component';
-import {HttpClientModule} from '@angular/common/http';
+import {HTTP_INTERCEPTORS, HttpClientModule} from '@angular/common/http';
import {AddComponent} from './add/add.component';
import {FormsModule} from '@angular/forms';
import {EditComponent} from './edit/edit.component';
@@ -12,6 +12,7 @@ import {LoginComponent} from './login/login.component';
import {IndexComponent} from './index/index.component';
import { PersonalCenterComponent } from './personal-center/personal-center.component';
import { SexPipe } from './personal-center/sex.pipe';
+import {XAuthTokenInterceptor} from './x-auth-token.interceptor';
@NgModule({
@@ -31,7 +32,9 @@ import { SexPipe } from './personal-center/sex.pipe';
FormsModule,
RouterModule
],
- providers: [],
+ providers: [
+ {provide: HTTP_INTERCEPTORS, useClass: XAuthTokenInterceptor, multi: true}
+ ],
bootstrap: [IndexComponent]
})
export class AppModule {
```
### 删除冗余代码
然后删除个人中心组件进行后台请求时手动添加header的代码,将其恢复为:
```typescript
+++ b/first-app/src/app/personal-center/personal-center.component.ts
ngOnInit(): void {
const url = 'http://angular.api.codedemo.club:81/teacher/me';
this.httpClient.get<Teacher>(url)
.subscribe(teacher => {
console.log('请求当前登录用户成功');
this.me = teacher;
},
error => console.log('请求当前登录用户发生错误', error));
}
```
### 定制路由
```typescript
+++ b/first-app/src/app/app-routing.module.ts
@@ -2,6 +2,7 @@ import {NgModule} from '@angular/core';
import {Routes, RouterModule} from '@angular/router';
import {AddComponent} from './add/add.component';
import {EditComponent} from './edit/edit.component';
+import {PersonalCenterComponent} from './personal-center/personal-center.component';
const routes: Routes = [
{
@@ -11,6 +12,10 @@ const routes: Routes = [
{
path: 'edit/:id',
component: EditComponent
+ },
+ {
+ path: 'personal-center',
+ component: PersonalCenterComponent
}
];
```
## 测试
使用正常的用户名密码登录后,打开http://localhost:4200/personal-center,却在控制台中发生了错误:

此时,我们正常人做的一定是去盯代码,然后开始意念是哪块的代码出了错误,接着就开始了万劫不复之旅。正确的做法应该是去科学的`debug`。
既然用户认证发生了错误,那么说明在请求时要么没有带入`x-auth-token`信息,要么带入的`x-auth-token`是无效的。所以我们第一步应该去找到网络选项卡,并找到个人中心的请求,查看其请求头中是否存在`x-auth-token`:

由上图得知并未携带`x-auth-token`。那么未携带的原因有两种:1. 首次与后台交互时拦截器并未成功缓存这个`x-auth-token`;2. 虽然拦截器缓存了,并由于书写失误,在请求时忘了加入此`x-auth-token`了。拦截器是否缓存了该值应该去控制台中的sessionStorege中查看:
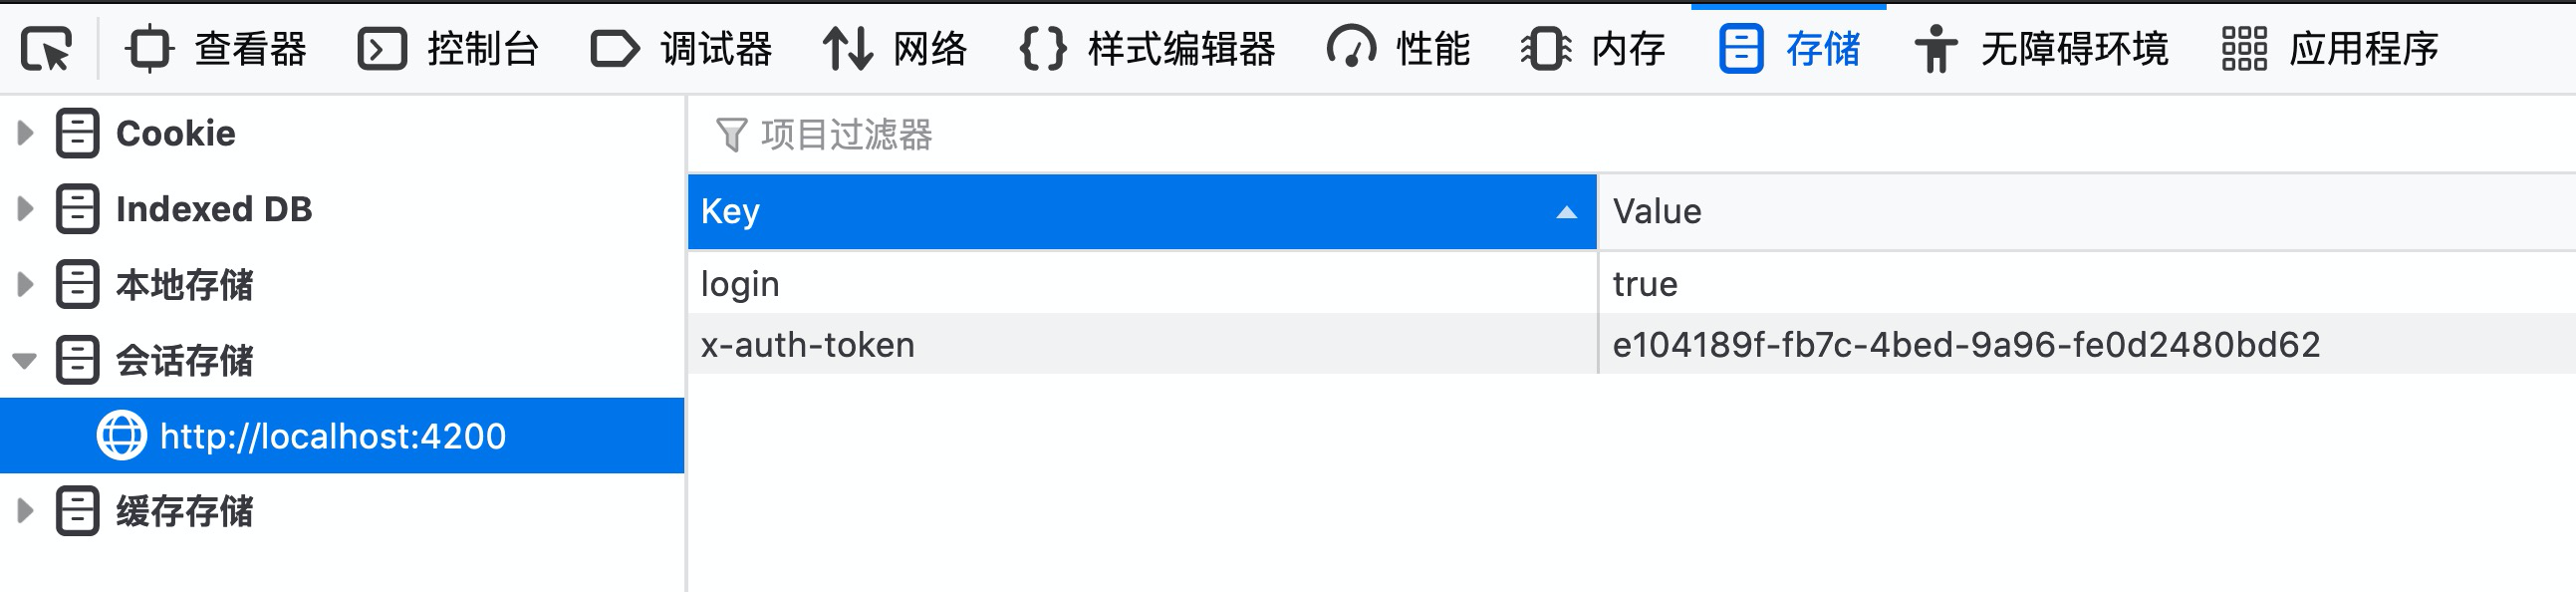
可见,浏览器已存储该值。则问题应该出现在拦截器请求时加入x-auth-token的代码上了,那就乖乖的打断点吧:
```typescript
+++ b/first-app/src/app/x-auth-token.interceptor.ts
@@ -20,7 +20,9 @@ export class XAuthTokenInterceptor implements HttpInterceptor {
intercept(request: HttpRequest<unknown>, next: HttpHandler): Observable<HttpEvent<unknown>> {
if (this.token !== null) {
+ console.log('设置token', this.token);
request.headers.set('x-auth-token', this.token);
+ console.log(request.headers.get('x-auth-token'));
}
return next.handle(request).pipe(tap(input => {
// 仅当input类型为HttpResponseBase,才尝试获取token并更新
```
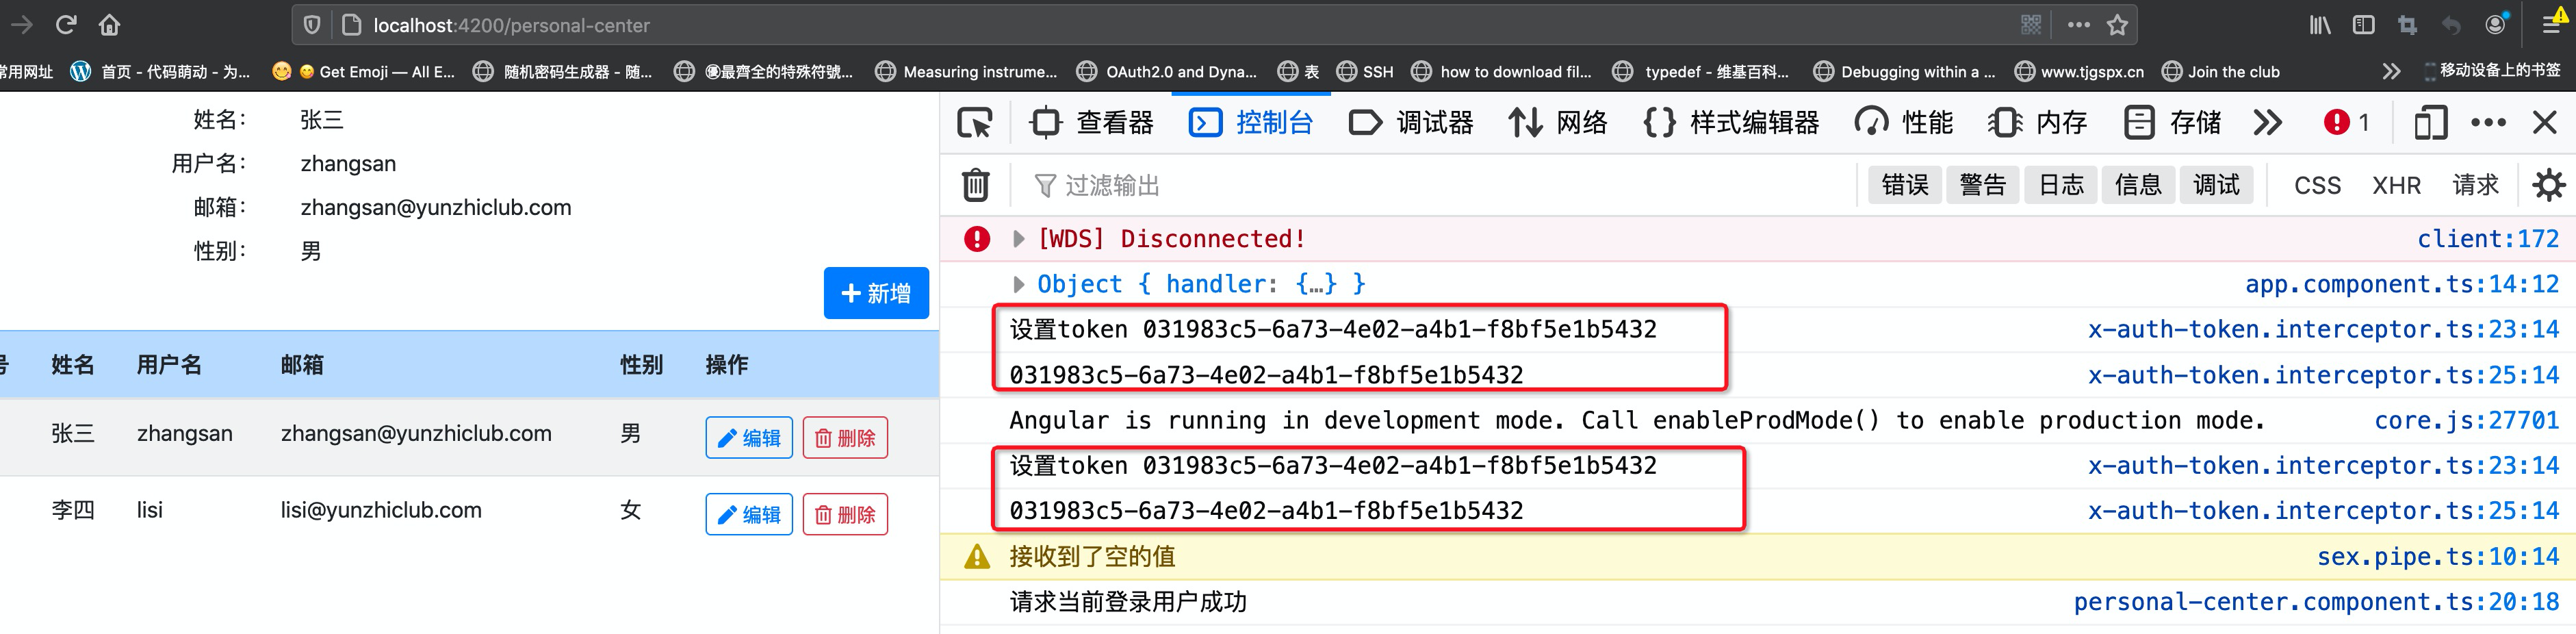
结果另我们想不到:

控制台显示了如上信息,表明`if`中的程序块已执行;23行中显示了`this.token`的值;24行设置值后,25行却获取到了`null`。该情况已经超出了我们的认识,那么下一步做的就是去相应的google了:

除此以外,另外一种更便捷的方法是读官方文档,我们点击`request.headers.set`后进入其源码,查看注释信息如下:
```typescript
/**
* Sets or modifies a value for a given header in a clone of the original instance.
* If the header already exists, its value is replaced with the given value
* in the returned object.
*
* @param name The header name.
* @param value The value or values to set or overide for the given header.
*
* @returns A clone of the HTTP headers object with the newly set header value.
*/
```
译文:
```typescript
/**
* 在源实际的 克隆 上设置或是修改header值
* If the header already exists, its value is replaced with the given value
* in the returned object.
*
* @param name The header name.
* @param value The value or values to set or overide for the given header.
*
* @returns 一个HTTP头对象的 克隆,该克隆对象中header值是设置过的
*/
```
原来更快的解决方案在于官方文档中!由于` request.headers.set('x-auth-token', this.token);`并未改变原实例`request.headers`,所以在原实例上获取`x-auth-token`仍为null,也就是说请求并未带入`x-auth-token`。原因有了,解决方案当然也就随着页出来:

好事多磨,当我们想使用返回的新实例来设置`request.header`时,却又发生了read-only错误。这并不是angular的专利,在其它的框架中也是不允许我们直接对请求对象修改的。好在Angular提供了clone方法来解决此问题:
```typescript
+++ b/first-app/src/app/x-auth-token.interceptor.ts
@@ -21,7 +21,7 @@ export class XAuthTokenInterceptor implements HttpInterceptor {
intercept(request: HttpRequest<unknown>, next: HttpHandler): Observable<HttpEvent<unknown>> {
if (this.token !== null) {
console.log('设置token', this.token);
- request.headers.set('x-auth-token', this.token);
+ request = request.clone({setHeaders: {'x-auth-token': this.token}});
console.log(request.headers.get('x-auth-token'));
}
return next.handle(request).pipe(tap(input => {
```
我们关闭原窗口(防止登录过期问题),再重新打开一个,访问http://localhost:4200/personal-center进行测试。
成功的请求到个人中心的信息,尽情地享受这种喜悦吧。
## 本节作业
1. 在前面的已学教程中,我们成功的规避掉了设置header时原header实例并未改变的情况,请把它们找出来。
2. 本节最后一张图片打印了两次token值,请解释其原因。
3. 在同一个浏览器的两个窗口中分别打开http://localhost:4200,A窗口中完成登录后,在B窗口中刷新界面B窗口仍然需要登录。但大多数我们所使用的应用(比如思否、京东等)并非如此,你能解释这其中的原因吗?
| 名称 | 地址 | |
| --------------- | ------------------------------------------------------------ | ---- |
| 请求拦截和响应 | [https://angular.cn/guide/http#intercepting-requests-and-responses](https://angular.cn/guide/http#intercepting-requests-and-responses) | |
| Observable | [https://cn.rx.js.org/class/es6/Observable.js~Observable.html](https://cn.rx.js.org/class/es6/Observable.js~Observable.html) | |
| Of | [https://cn.rx.js.org/class/es6/Observable.js~Observable.html#static-method-of](https://cn.rx.js.org/class/es6/Observable.js~Observable.html#static-method-of) | |
| subscribe | [https://cn.rx.js.org/class/es6/Observable.js~Observable.html#instance-method-subscribe](https://cn.rx.js.org/class/es6/Observable.js~Observable.html#instance-method-subscribe) | |
| Pipeable 操作符 | [https://cn.rx.js.org/manual/usage.html](https://cn.rx.js.org/manual/usage.html) | |
| Map | [https://rxjs-cn.github.io/learn-rxjs-operators/operators/transformation/map.html](https://rxjs-cn.github.io/learn-rxjs-operators/operators/transformation/map.html) | |
| 本节源码 | [https://github.com/mengyunzhi/angular11-guild/archive/step4.5.zip](https://github.com/mengyunzhi/angular11-guild/archive/step4.5.zip) | |
- 序言
- 第一章 Hello World
- 1.1 环境安装
- 1.2 Hello Angular
- 1.3 Hello World!
- 第二章 教师管理
- 2.1 教师列表
- 2.1.1 初始化原型
- 2.1.2 组件生命周期之初始化
- 2.1.3 ngFor
- 2.1.4 ngIf、ngTemplate
- 2.1.5 引用 Bootstrap
- 2.2 请求后台数据
- 2.2.1 HttpClient
- 2.2.2 请求数据
- 2.2.3 模块与依赖注入
- 2.2.4 异步与回调函数
- 2.2.5 集成测试
- 2.2.6 本章小节
- 2.3 新增教师
- 2.3.1 组件初始化
- 2.3.2 [(ngModel)]
- 2.3.3 对接后台
- 2.3.4 路由
- 2.4 编辑教师
- 2.4.1 组件初始化
- 2.4.2 获取路由参数
- 2.4.3 插值与模板表达式
- 2.4.4 初识泛型
- 2.4.5 更新教师
- 2.4.6 测试中的路由
- 2.5 删除教师
- 2.6 收尾工作
- 2.6.1 RouterLink
- 2.6.2 fontawesome图标库
- 2.6.3 firefox
- 2.7 总结
- 第三章 用户登录
- 3.1 初识单元测试
- 3.2 http概述
- 3.3 Basic access authentication
- 3.4 着陆组件
- 3.5 @Output
- 3.6 TypeScript 类
- 3.7 浏览器缓存
- 3.8 总结
- 第四章 个人中心
- 4.1 原型
- 4.2 管道
- 4.3 对接后台
- 4.4 x-auth-token认证
- 4.5 拦截器
- 4.6 小结
- 第五章 系统菜单
- 5.1 延迟及测试
- 5.2 手动创建组件
- 5.3 隐藏测试信息
- 5.4 规划路由
- 5.5 定义菜单
- 5.6 注销
- 5.7 小结
- 第六章 班级管理
- 6.1 新增班级
- 6.1.1 组件初始化
- 6.1.2 MockApi 新建班级
- 6.1.3 ApiInterceptor
- 6.1.4 数据验证
- 6.1.5 教师选择列表
- 6.1.6 MockApi 教师列表
- 6.1.7 代码重构
- 6.1.8 小结
- 6.2 教师列表组件
- 6.2.1 初始化
- 6.2.2 响应式表单
- 6.2.3 getTestScheduler()
- 6.2.4 应用组件
- 6.2.5 小结
- 6.3 班级列表
- 6.3.1 原型设计
- 6.3.2 初始化分页
- 6.3.3 MockApi
- 6.3.4 静态分页
- 6.3.5 动态分页
- 6.3.6 @Input()
- 6.4 编辑班级
- 6.4.1 测试模块
- 6.4.2 响应式表单验证
- 6.4.3 @Input()
- 6.4.4 FormGroup
- 6.4.5 自定义FormControl
- 6.4.6 代码重构
- 6.4.7 小结
- 6.5 删除班级
- 6.6 集成测试
- 6.6.1 惰性加载
- 6.6.2 API拦截器
- 6.6.3 路由与跳转
- 6.6.4 ngStyle
- 6.7 初识Service
- 6.7.1 catchError
- 6.7.2 单例服务
- 6.7.3 单元测试
- 6.8 小结
- 第七章 学生管理
- 7.1 班级列表组件
- 7.2 新增学生
- 7.2.1 exports
- 7.2.2 自定义验证器
- 7.2.3 异步验证器
- 7.2.4 再识DI
- 7.2.5 属性型指令
- 7.2.6 完成功能
- 7.2.7 小结
- 7.3 单元测试进阶
- 7.4 学生列表
- 7.4.1 JSON对象与对象
- 7.4.2 单元测试
- 7.4.3 分页模块
- 7.4.4 子组件测试
- 7.4.5 重构分页
- 7.5 删除学生
- 7.5.1 第三方dialog
- 7.5.2 批量删除
- 7.5.3 面向对象
- 7.6 集成测试
- 7.7 编辑学生
- 7.7.1 初始化
- 7.7.2 自定义provider
- 7.7.3 更新学生
- 7.7.4 集成测试
- 7.7.5 可订阅的路由参数
- 7.7.6 小结
- 7.8 总结
- 第八章 其它
- 8.1 打包构建
- 8.2 发布部署
- 第九章 总结