成熟的web服务有很多,也都很著名。各个著名的web服务的配置当前也不可能完全相同。在此,我们参考Angular官方文档,给出Apache、NGinx的部署方式。
## Hosts
无论我们使用什么web服务,在本地测试部署前都需要先为应用设置一个域名,比如我们使用http:///www.yz.com。
> **注意:**我们当前的后台仅支持http://www.yz.com以及http://localhost:4200的跨域请求。所以如果你是新手的话,也使用http://www.yz.com就好。
下一步则在本机为http://www.yz.com添加一个127.0.0.1的指向。
### windows
1. 按下 **Windows键 + R**
2. 在运行窗口中输入 notepad
3. 点击确定
4. 将下列文字复制到文件中:
```
# Copyright (c) 1993-2006 Microsoft Corp.
#
# This is a sample HOSTS file used by Microsoft TCP/IP for Windows.
#
# This file contains the mappings of IP addresses to host names. Each
# entry should be kept on an individual line. The IP address should
# be placed in the first column followed by the corresponding host name.
# The IP address and the host name should be separated by at least one
# space.
#
# Additionally, comments (such as these) may be inserted on individual
# lines or following the machine name denoted by a '#' symbol.
#
# For example:
#
# 102.54.94.97 rhino.acme.com # source server
# 38.25.63.10 x.acme.com # x client host
# localhost name resolution is handle within DNS itself.
127.0.0.1 localhost
::1 localhost
127.0.0.1 www.yz.com
```
5. 在“文件”菜单上,选择“另存为”,在“文件名”框中键入“**hosts**”(不包括引号),然后将文件保存到桌面
6. 再次按下 **Windows 键 + R**
7. 输入 **%WinDir%\System32\Drivers\Etc**,点击确定
8. 重新命名 hosts文件成 hosts.old。
9. 将刚刚在桌面创建的hosts文件复制或移动到 **%WinDir%\System32\Drivers\Etc 文件夹**中,如果系统提示您输入管理员密码,请选择“继续”。
### macos
macos下修改hosts需要`sudo`权限,以下分别展示使用`nano`及`vi`编辑器的实现方式:
#### nano
`nano`编辑器使用相对简单,各个快捷键都有提示,适用于新手。打开命令行,依次执行如下:
```bash
sudo nano /etc/hosts
```
然后在文件的最后新建一行,输入:
```bash
127.0.0.1 www.yz.com
```
输入完成后,依次按`ctrl+x`、`y`、`回车`完成编辑。
#### vi
如果你喜欢使用`vi`编辑器,则可以按以下步骤:
```bash
sudo vi /etc/hosts
```
按快捷键:`shift+g`切到最后一行,然后按`end`切到该行结尾,在按`i`切换到编辑模式,再按方向键右来到文件结尾,按回车后新起一行输入:
```bash
127.0.0.1 www.yz.com
```
输入完成后按:`esc`退出编辑模式,然后输入`:wq`后回车,完成文件的编辑保存功能。
### 测试
完成`hosts`文件变更后,便可以新打开一个`shell`,然后在其中执行`ping www.yz.com`,如果看以下字样则说明成功:
```bash
panjie@panjies-iMac angular11-guild % ping www.yz.com
PING www.yz.com (127.0.0.1): 56 data bytes
64 bytes from 127.0.0.1: icmp_seq=0 ttl=64 time=0.029 ms
64 bytes from 127.0.0.1: icmp_seq=1 ttl=64 time=0.079 ms
```
此时如果我们已经成功安装并运行了web服务,该服务同时运行于80端口的话。则重新打开浏览器并输入http://www.yz.com的话,则会显示相应的web服务信息。
如果你确认按教程的步骤修改了`hosts`文件,重启系统后仍然未生效的话,那么你可能需要清空一样系统的DNS缓存。
windows系统下执行:`ipconfig /flushdns`
macos系统下执行:`sudo killall -HUP mDNSResponder`
## http-server
`nodejs`下有一个小巧的http服务软件,我们可以非常方便的使用它向同一局域网的伙伴们共享数据,或者应用我们当前的展示环境。
和`Angular/cli`等众多软件一样`http-server`也是`npm`托管的软件之一,所以也可以使用`npm install`命令来安装。在项目开发中,我们使用了`http install -s xxx`当软件仅安装到当前的项目中。而在此,我们需要将`http-server`安装到系统上,所以应该使用`npm install -g http-server`:
```bash
% npm install -g http-server
```
如果发生权限错误,则应该执行`sudo npm install -g http-server`:
```bash
panjie@panjies-iMac angular11-guild % sudo npm install -g http-server
/usr/local/bin/http-server -> /usr/local/lib/node_modules/http-server/bin/http-server
/usr/local/bin/hs -> /usr/local/lib/node_modules/http-server/bin/http-server
+ http-server@0.12.3
updated 3 packages in 5.05s
```
然后我们使用`shell`来到打包后的项目文件夹`dist/first-app`,执行`http-server -p 80`:
```bash
panjie@panjies-iMac first-app % pwd
/Users/panjie/github/mengyunzhi/angular11-guild/first-app/dist/first-app
panjie@panjies-iMac first-app % http-server -p 80
Starting up http-server, serving ./
Available on:
http://127.0.0.1:80
http://10.70.1.141:80
Hit CTRL-C to stop the server
```
接着打开浏览器,访问:http://www.yz.com

## Apache
安装apache的方式有很多,在此省略安装过程,需要注意的是angular构建后的应用依赖于Apache的重写模块,在Apache安装完成后,需要启动其重写(rewite)模块。
apache安装成功后,会有一个名称为`httpd.conf`的文件。该文件即apache的配置文件,我们使用编辑器打开此文件(动手改之前先备份):
> 如果默认安装的Apache的服务端口不是80,请自行更改为80。
然后以`httpd-vhosts.conf`关键字进行查找,找到该行后去除该行最左侧的`#`,比如:
```
- #Include /usr/local/etc/httpd/extra/httpd-vhosts.conf
+ Include /usr/local/etc/httpd/extra/httpd-vhosts.conf
```
**注意:**不要照抄上面的代码,每台计算机都不一样,你要做的就是去除该行前的注释。
然后我们再来到Apache配置文件夹下的`extra`文件夹,将原有的`httpd-vhosts.conf`重命名为任意名称,并新建一个空的`httpd-vhosts.conf`文件,在文件中加入以下内容:
```bash
<VirtualHost www.yz.com:80>
ServerAdmin yourmail@yunzhi.club
DocumentRoot "/Users/panjie/github/mengyunzhi/angular11-guild/first-app/dist/first-app"
ServerName www.yz.com
ErrorLog "/usr/local/var/log/httpd/www.yz.com-error_log"
CustomLog "/usr/local/var/log/httpd/www.yz.com-access_log" common
</VirtualHost>
<Directory "/Users/panjie/github/mengyunzhi/angular11-guild/first-app/dist/first-app">
Options Indexes FollowSymLinks
AllowOverride All
Require all granted
</Directory>
```
需要注意的是你不能照抄上述代码,上述代码中所有以`""`包裹起来的字符串,都应该按照实际的情况替换你自己的。
然后我们重新启动`apache`服务。
最后来到当前构建的项目中,在构建完成的项目根目中(当前为:/Users/panjie/github/mengyunzhi/angular11-guild/first-app/dist/first-app),增加一个`.htaccess`文件,内容如下:
```
RewriteEngine On
# If an existing asset or directory is requested go to it as it is
RewriteCond %{DOCUMENT_ROOT}%{REQUEST_URI} -f [OR]
RewriteCond %{DOCUMENT_ROOT}%{REQUEST_URI} -d
RewriteRule ^ - [L]
# If the requested resource doesn't exist, use index.html
RewriteRule ^ /index.html
```
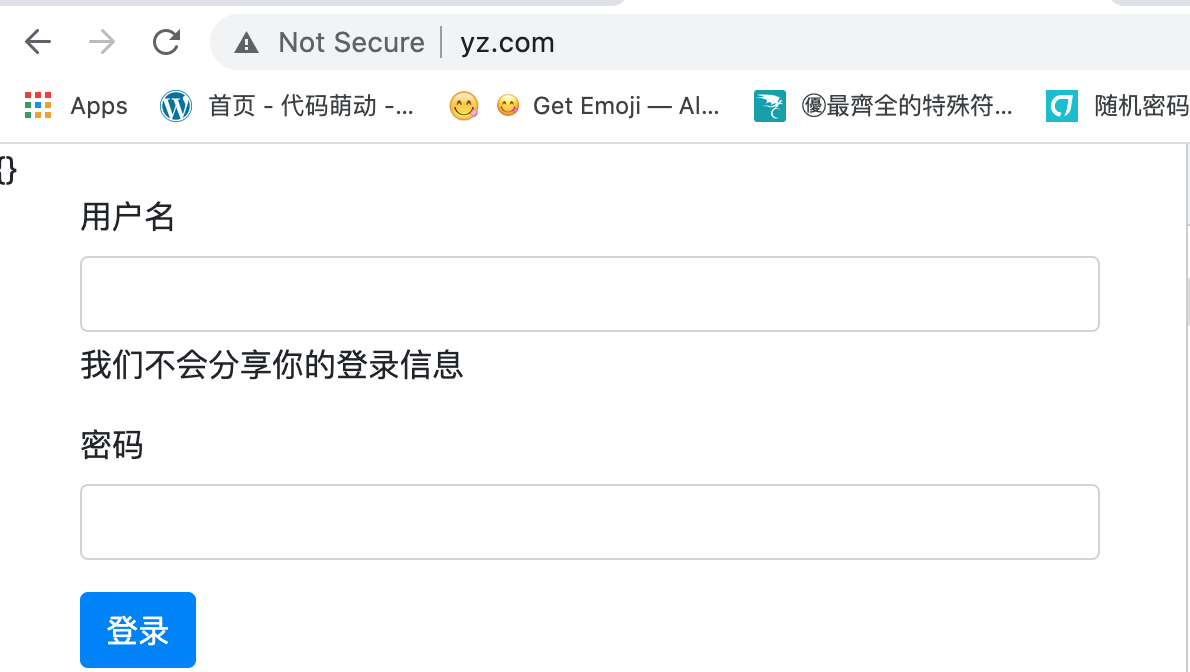
此时我们打开浏览器访问:http://www.yz.com,将显示以下信息:

## nginx
安装nginx的过程略。nginx安装后,基配置文件名为`nginx.conf`,备份此文件后我们打开并编辑它,然后在其`http`标签中加入以下子标签:
```
server {
listen 80;
server_name www.yz.com;
location / {
root /Users/panjie/github/mengyunzhi/angular11-guild/first-app/dist/first-app;
try_files $uri $uri/ /index.html =404;
}
}
```
**注意:**需要注意的是你不能照抄上述代码,上述代码中`root `以后的字符,应该按照实际的情况替换你自己的。
然后执行`nginx -t`查看是否报错,无报错的话使用`nginx -s reload`来重新加载配置文件。
此时我们打开浏览器访问:http://www.yz.com,将显示以下信息:

## github pages
github为了提供的pages也可以为我们提供免费的web服务,比如我们当前项目位于为https://github.com/mengyunzhi/angular11-guild,则可以利用该仓库来发布一个web服务:
```bash
ng build --output-path ../docs --base-href /angular11-guild/
```
接着在github的项目上按一定的规则来设置pages,则可以在[https://mengyunzhi.github.io/angular11-guild/](https://mengyunzhi.github.io/angular11-guild/)浏览当前项目了。
## 小结
任何web服务都可以拿来做angular应用的服务。这是由于Angular构建完成后就是一个普普通通的web页面,该页面由html、css以及javascript三大部分构成。本节中我们在配置Apache及nginx时,进行了不多的配置,这是由于Angular中拥有对URL的重写功能,为了防止这种重写机制造成的404错误,我们将404的回跳设置给了`index.html`。
- 序言
- 第一章 Hello World
- 1.1 环境安装
- 1.2 Hello Angular
- 1.3 Hello World!
- 第二章 教师管理
- 2.1 教师列表
- 2.1.1 初始化原型
- 2.1.2 组件生命周期之初始化
- 2.1.3 ngFor
- 2.1.4 ngIf、ngTemplate
- 2.1.5 引用 Bootstrap
- 2.2 请求后台数据
- 2.2.1 HttpClient
- 2.2.2 请求数据
- 2.2.3 模块与依赖注入
- 2.2.4 异步与回调函数
- 2.2.5 集成测试
- 2.2.6 本章小节
- 2.3 新增教师
- 2.3.1 组件初始化
- 2.3.2 [(ngModel)]
- 2.3.3 对接后台
- 2.3.4 路由
- 2.4 编辑教师
- 2.4.1 组件初始化
- 2.4.2 获取路由参数
- 2.4.3 插值与模板表达式
- 2.4.4 初识泛型
- 2.4.5 更新教师
- 2.4.6 测试中的路由
- 2.5 删除教师
- 2.6 收尾工作
- 2.6.1 RouterLink
- 2.6.2 fontawesome图标库
- 2.6.3 firefox
- 2.7 总结
- 第三章 用户登录
- 3.1 初识单元测试
- 3.2 http概述
- 3.3 Basic access authentication
- 3.4 着陆组件
- 3.5 @Output
- 3.6 TypeScript 类
- 3.7 浏览器缓存
- 3.8 总结
- 第四章 个人中心
- 4.1 原型
- 4.2 管道
- 4.3 对接后台
- 4.4 x-auth-token认证
- 4.5 拦截器
- 4.6 小结
- 第五章 系统菜单
- 5.1 延迟及测试
- 5.2 手动创建组件
- 5.3 隐藏测试信息
- 5.4 规划路由
- 5.5 定义菜单
- 5.6 注销
- 5.7 小结
- 第六章 班级管理
- 6.1 新增班级
- 6.1.1 组件初始化
- 6.1.2 MockApi 新建班级
- 6.1.3 ApiInterceptor
- 6.1.4 数据验证
- 6.1.5 教师选择列表
- 6.1.6 MockApi 教师列表
- 6.1.7 代码重构
- 6.1.8 小结
- 6.2 教师列表组件
- 6.2.1 初始化
- 6.2.2 响应式表单
- 6.2.3 getTestScheduler()
- 6.2.4 应用组件
- 6.2.5 小结
- 6.3 班级列表
- 6.3.1 原型设计
- 6.3.2 初始化分页
- 6.3.3 MockApi
- 6.3.4 静态分页
- 6.3.5 动态分页
- 6.3.6 @Input()
- 6.4 编辑班级
- 6.4.1 测试模块
- 6.4.2 响应式表单验证
- 6.4.3 @Input()
- 6.4.4 FormGroup
- 6.4.5 自定义FormControl
- 6.4.6 代码重构
- 6.4.7 小结
- 6.5 删除班级
- 6.6 集成测试
- 6.6.1 惰性加载
- 6.6.2 API拦截器
- 6.6.3 路由与跳转
- 6.6.4 ngStyle
- 6.7 初识Service
- 6.7.1 catchError
- 6.7.2 单例服务
- 6.7.3 单元测试
- 6.8 小结
- 第七章 学生管理
- 7.1 班级列表组件
- 7.2 新增学生
- 7.2.1 exports
- 7.2.2 自定义验证器
- 7.2.3 异步验证器
- 7.2.4 再识DI
- 7.2.5 属性型指令
- 7.2.6 完成功能
- 7.2.7 小结
- 7.3 单元测试进阶
- 7.4 学生列表
- 7.4.1 JSON对象与对象
- 7.4.2 单元测试
- 7.4.3 分页模块
- 7.4.4 子组件测试
- 7.4.5 重构分页
- 7.5 删除学生
- 7.5.1 第三方dialog
- 7.5.2 批量删除
- 7.5.3 面向对象
- 7.6 集成测试
- 7.7 编辑学生
- 7.7.1 初始化
- 7.7.2 自定义provider
- 7.7.3 更新学生
- 7.7.4 集成测试
- 7.7.5 可订阅的路由参数
- 7.7.6 小结
- 7.8 总结
- 第八章 其它
- 8.1 打包构建
- 8.2 发布部署
- 第九章 总结